
Painting a front door without removing it is a straightforward task that can be accomplished with careful preparation and the right tools. This step-by-step guide demonstrates how to paint your front door without removing the hardware.
There are many advantages to painting your front door while it’s still on its hinges. For example, it’s time-saving, particularly if the door has already been painted or sealed multiple times. It also helps maintain the security of your home since you won’t leave it vulnerable to unauthorized access. Removing a door can be challenging, particularly for inexperienced DIYers or when there’s no one available to help you. It eliminates the risk of damaging the door or surrounding area during removal and reinstallation. Painting the door while still attached to the hinges provides better stability and a more even surface for applying paint, especially if you don’t have a suitable workspace or sawhorses to support the door when removed.
On the other hand, painting a door without removing it may require additional precautions, such as carefully masking the hardware and surrounding area to avoid paint drips or spills. You’ll also need to ensure the door remains open long enough for the paint to dry properly, which can be inconvenient in some situations. It is also more tedious to reach the nooks and crannies.
This guide takes you through all steps necessary for safely painting a front door while it’s still in its hinges: gathering your materials, cleaning the door, prepping the area, sanding the surface, stirring the paint, applying the paint, allowing drying time, applying additional coats, and removing the tape.
1. Gather your materials
- All-in-one paint and primer
- Paint stirrer
- High-quality synthetic brush or small foam roller
- Mild soap and water solution
- Sponge or soft cloth
- Tack cloth or damp rag
- Drop cloth or plastic sheet
- Painter’s tape
- Fine-grit sandpaper (around 220-grit)
2. Clean the door
Start by cleaning the door with a mild soap and water solution. Use a sponge or soft cloth to remove any dirt, grime, or grease from the surface. Allow the door to dry completely.
3. Prep the area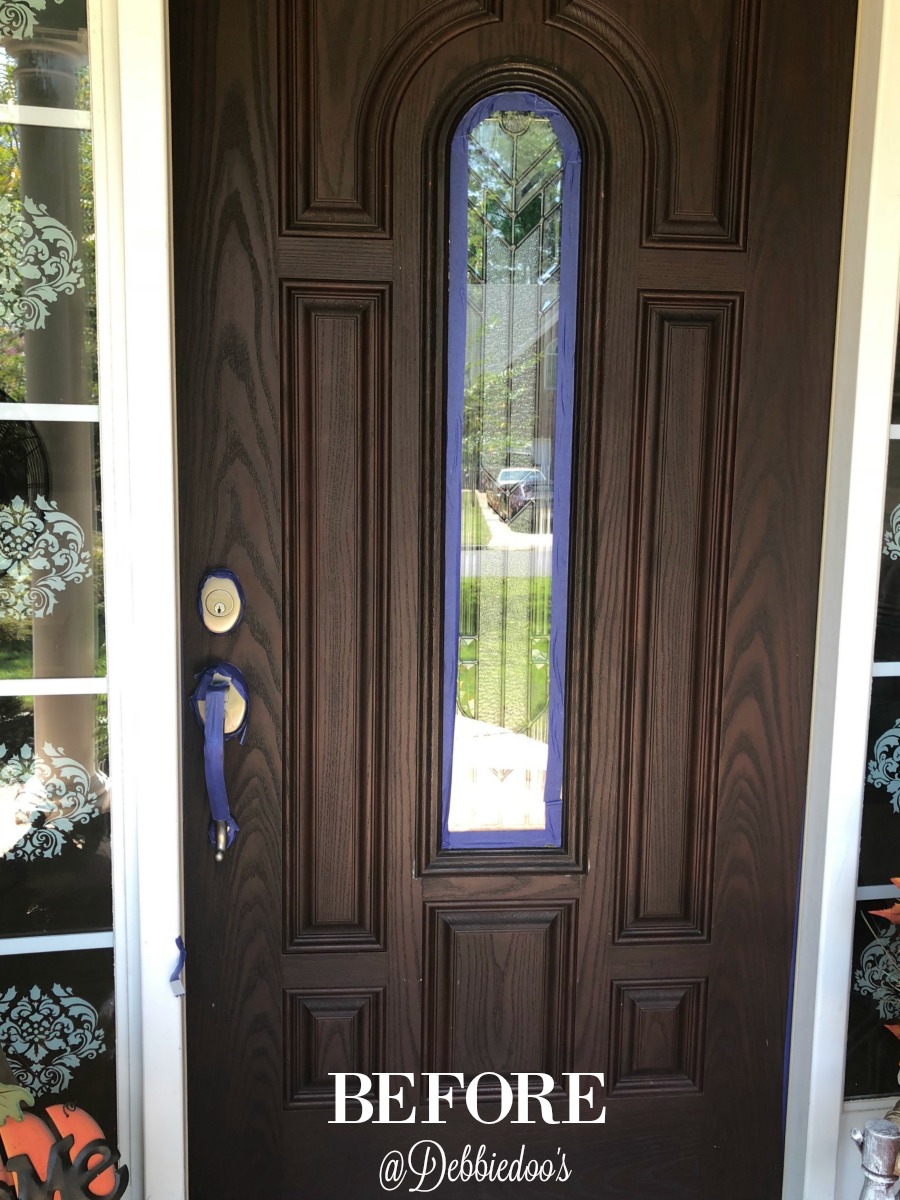
Lay down a drop cloth or plastic sheeting on the ground to protect the surrounding area from paint drips or spills. Use painter’s tape to mask off any hardware, glass, or trim that you don’t want to be painted.
4. Sand the surface
Lightly sand the door using a fine-grit sandpaper to remove any loose paint and create a smooth surface for the new paint to adhere to. Be sure to sand any rough spots, edges, or raised areas. After sanding, use a tack cloth or damp rag to remove any dust or debris from the surface.
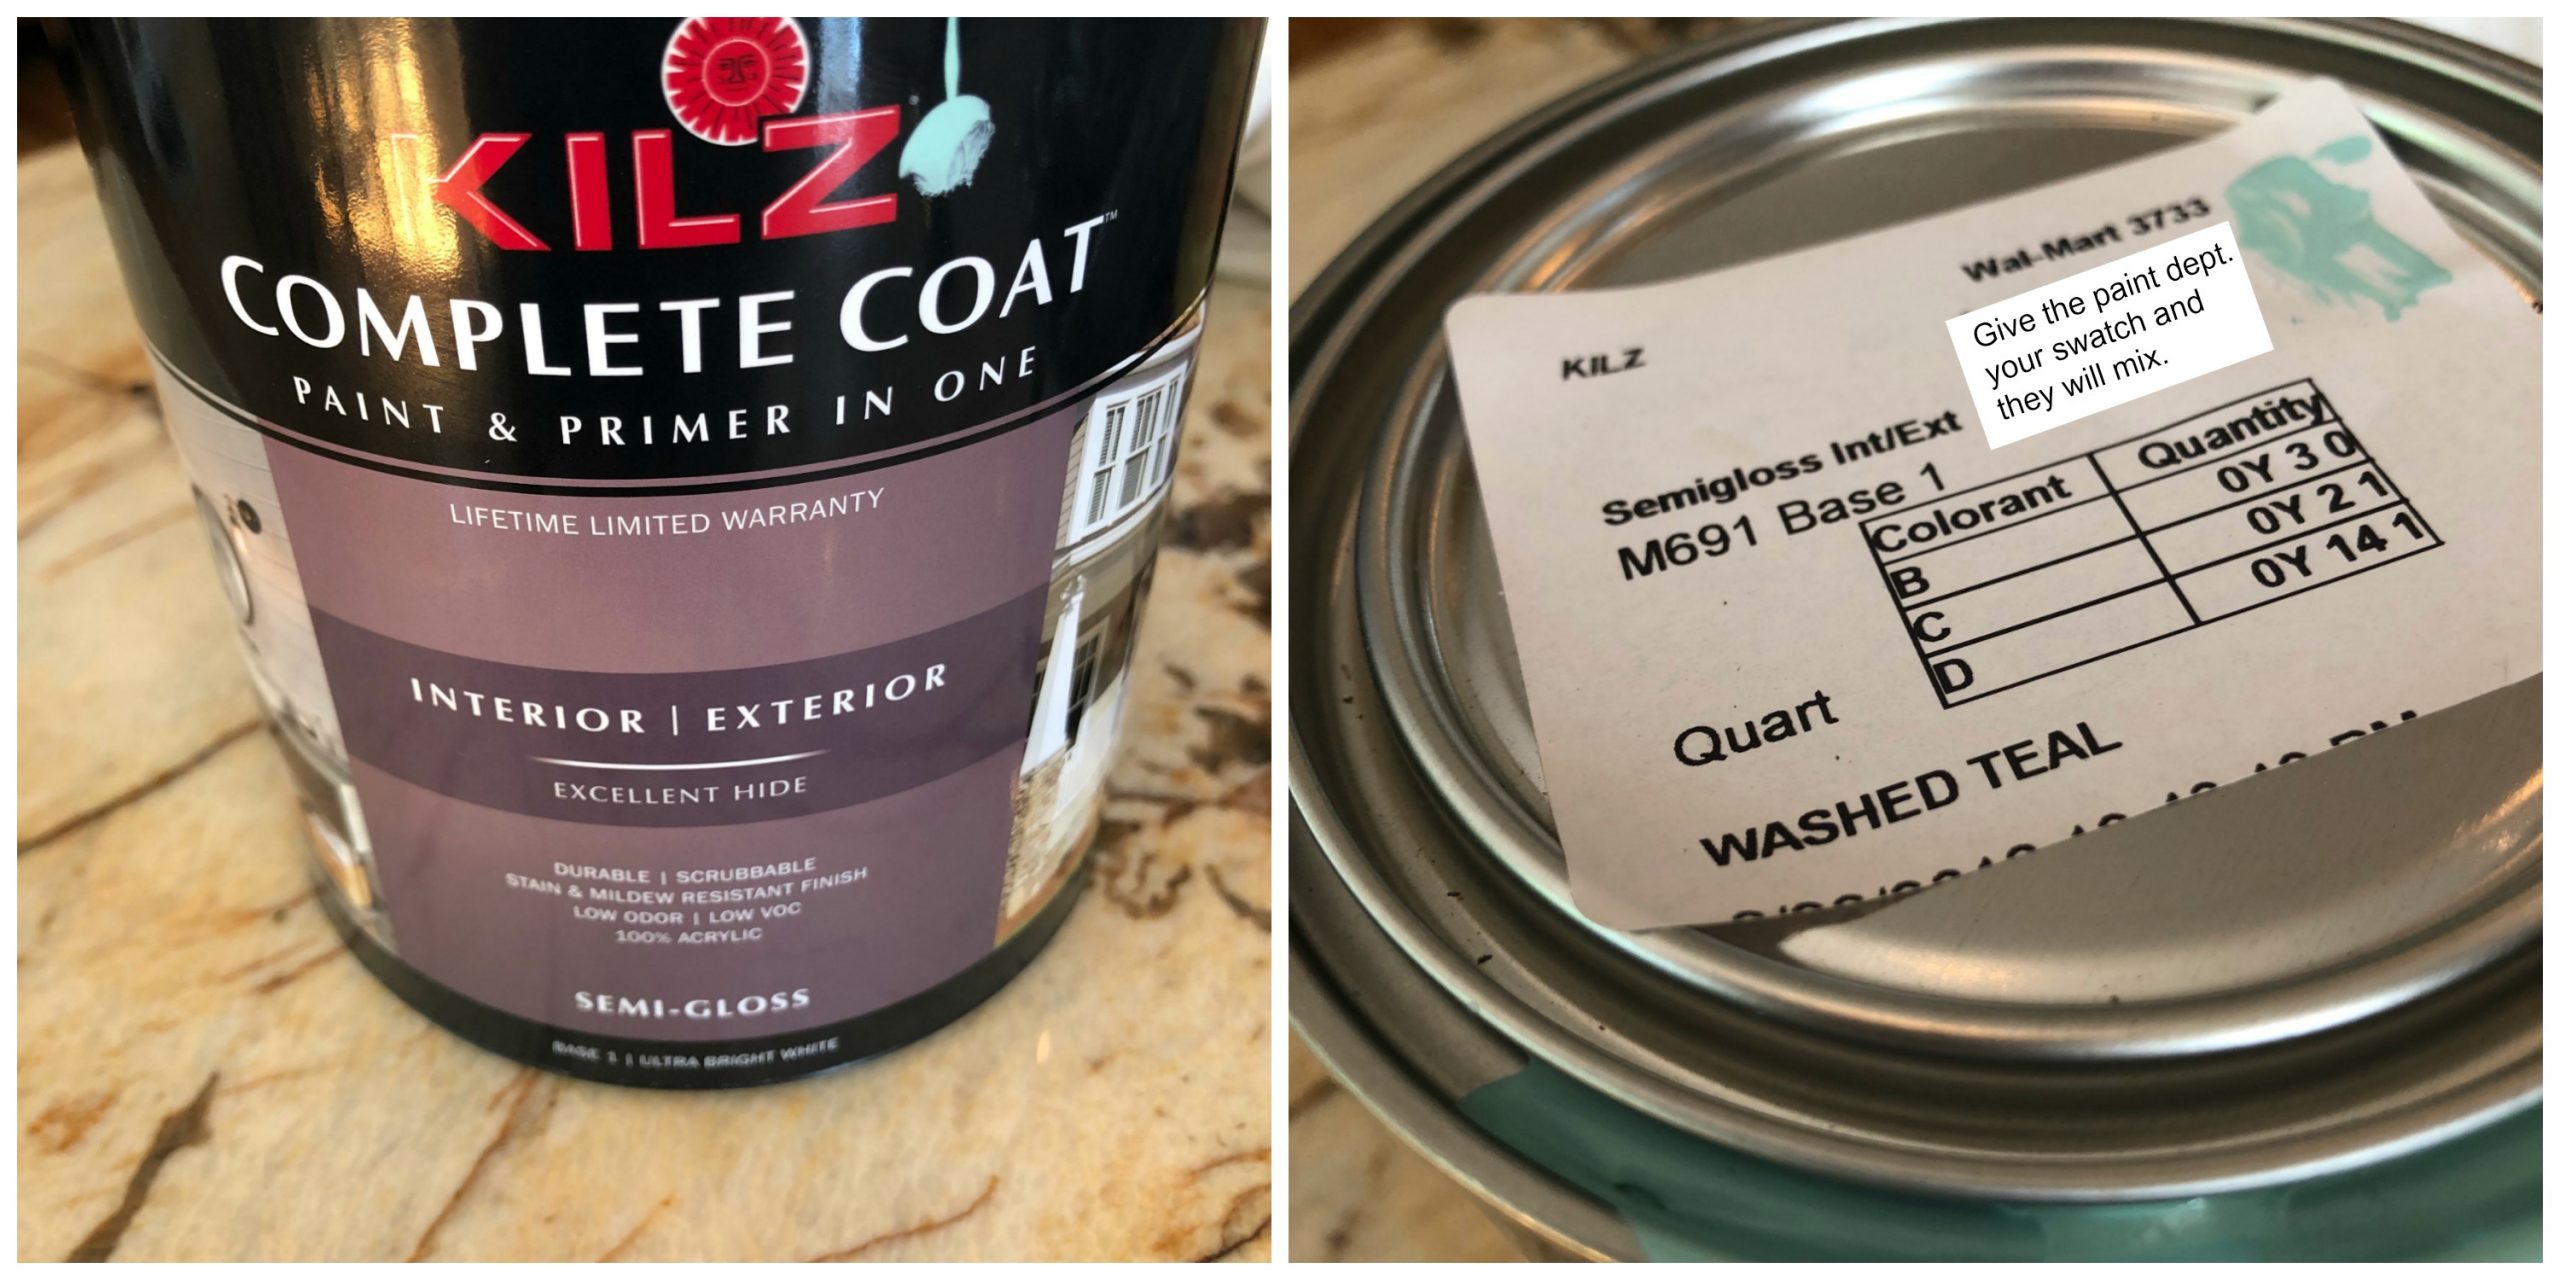
5. Stir the paint
Mix the all-in-one paint and primer thoroughly with a paint stirrer, making sure there are no lumps or clumps.
6. Apply the paint
Use a high-quality synthetic brush or a small foam roller to apply the paint. If using a brush, start by painting the recessed or detailed areas of the door first, using a smaller brush if necessary. Then, paint the flat panels, working from top to bottom. Finish by painting the horizontal and vertical door frame members. If using a foam roller, apply the paint in thin, even layers, working in small sections to avoid drips and runs. Be sure to overlap each section slightly to ensure consistent coverage.
7. Allow drying time
Let the first coat of paint dry according to the manufacturer’s instructions, which is typically around 2-4 hours. It’s crucial to let the paint dry completely before applying additional coats.
8. Apply additional coats
Depending on the door’s color and condition, you may need to apply two or three coats of paint for full coverage. Be sure to let each coat dry completely before applying the next.
9. Remove the tape

Once the final coat of paint is dry, carefully remove the painter’s tape to reveal clean edges around your hardware, glass, or trim.
Conclusion
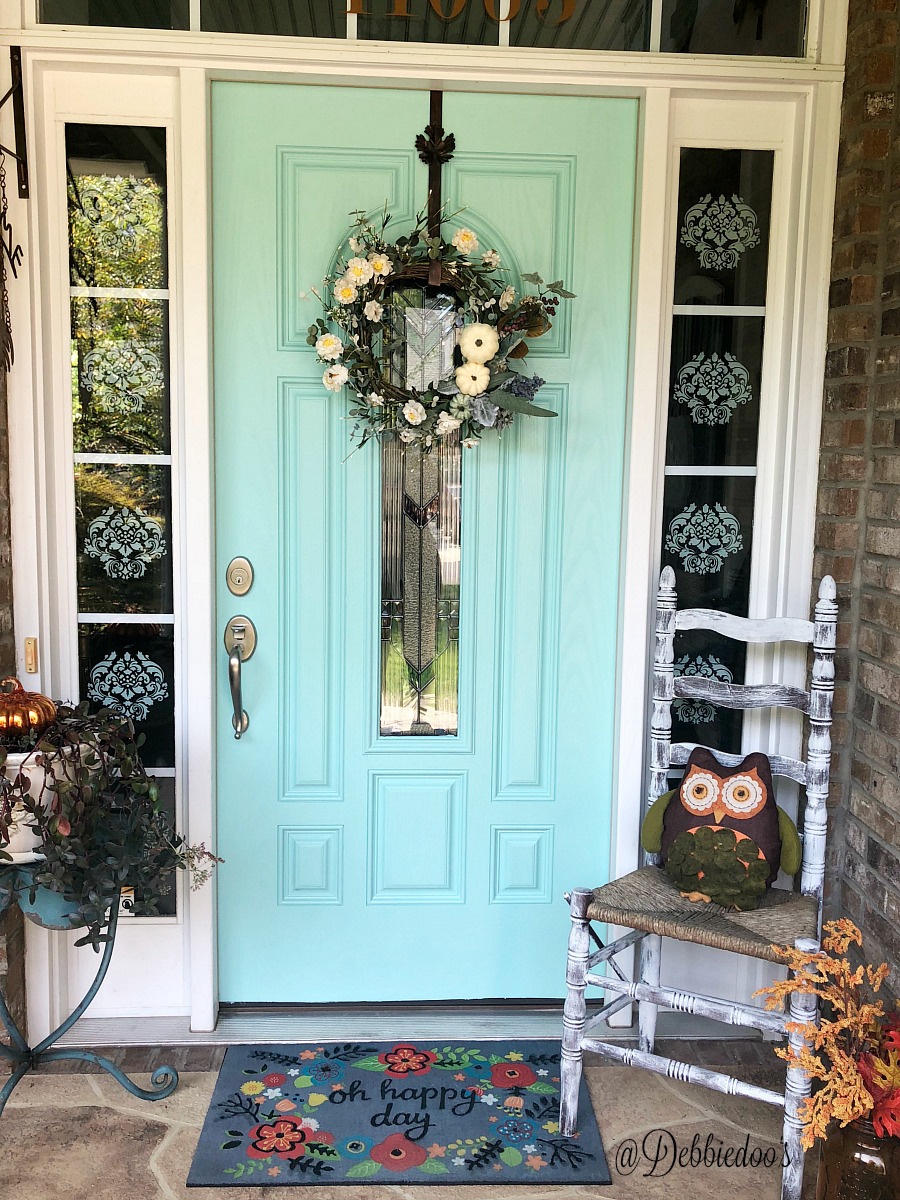
Refreshing your front door with a new coat of paint is a simple yet transformative project that can be accomplished without even having to remove the door. By following the step-by-step guide outlined in this article, you can achieve a professional-looking finish with minimal effort and cost. Preparation, patience, and attention to detail are key factors in ensuring a successful outcome. The end result will not only enhance the curb appeal of your home but also offer a warm and inviting entrance to welcome visitors.
If you prefer painting a door to look like wood, check out our intuitive guide.
Your home is gorgeous, and the door is perfect!
Thats a great color.
That’s the color I have thought of. How beautiful! The wreath pulls it together. Elegant.
Looks amazing! How long did you wait before closing the door? And no problems with the paint sticking to the door frame where it seals when shut? I’ve been wanting to do this in the interim til we find the “perfect” door. Love the color!!
I only did the front panel. I did not do the back or the sides.
Thanks! It’s gorgeous!
This is gorgeous! You have inspired me. I need to paint my front door and love this color.
I love it,lol same color as our front door. Of course I love all shades of blue too. Good call on the color looks great with house color.
Thank you so much!
LOVE your door. I’d like to paint mine, but the townhouse “rules” say no! Whatev! I go for a colorful indoors and ignore the boring beige!
Hey Debbie, so happy to see you painting something. That’s when I first starting with you; you were crafting with paint and did your rocker on the porch a beautiful shade of soft yellow. I really love your ‘new door’. The color is a beautiful change. Hubster will love it too.
That is one Beautiful front door. Marie Goodson
Very pretty color! Really sets off the entrance to your home.
I loved it on Instagram and love it here too! It’s such a nice improvement! The color is gorgeous!
Absolutely gorgeous!!!!!
I used this paint on my granddaughter’s desk. I loved it. I was refurbishing a white desk that had Red drawers on the inside. It was a breeze with this paint. Love your front door. The color is perfect.
You rebel you! It turned out awesome! Have you been wondering why you didn’t do it sooner? Thanks for the inspiration! I love Fall too!
Yes Heather, I did wonder why it took me so long. I was nervous it I couldn’t do a good job. I should have known better LOL!
Wonderful transformation and I love it! Thanks for sharing this amazing post.
I love it! The color is gorgeous with your house. I just bought some samples of the Kilz Paint & Primer in One Paint looking for a color for my living room walls. I want the “perfect” gray. I’m also contemplating painting my front door, which is very similar to yours. We have a blue roof and I was wanting to reflect that in the door color. What sheen did you use and did you need to apply a topcoat for durability? Our door, oddly, sees a lot of wear from pre-teen boys to severe weather, so durability is a must. It is protected by our porch over-hang but stills seems to get knocked around a lot! My husband, sons, and their friends seem to bang into it, scrape it and scuff it with dirt all the time. I’ve never known a door to get so much wear and tear!
Looks great!!!
Great Job well done Debbie,,,looks stunning indeed
Debbie, that looks great! So much better than the drab brown. You did a great job! Funny, you should post this as I have been thinking recently about painting my front door. It’s good to know about the Kilz paint and primer all in one. Guess I’ll look for some.
Thanks for the inspiration!
Love the front door, color and story! It inspires me! On my to do list for the fall as well! Thank u for sharing
Turned out Beautiful! I just painted mime teal, and it was scary! Love your home!
Your door is gorgeous! I have a front door almost identical to yours that I’m also wanting to paint a shade of blue to match our blue roof. I’ve bought samples of the Kilz paint & Primer in One trying to choose the perfect gray for our living room but hadn’t thought of using it for our front door. What sheen did you use and did you need to apply a protective topcoat? Our front door is somewhat protected by our porch overhang but, oddly, it gets major wear and tear from my sons, their friends, and my husband. Somehow it gets banged up, scratched, knocked into, and scuffed with mud on an almost daily basis and am wondering if this paint, without a topcoat, will be washable and durable enough to withstand their abuse. I’ve never seen or known of a lowly front door having to take such abuse! LOL! Our door is hideous and needs paint badly!! I think you’ve inspired me to put aside my list of paint projects and bump the door to the front of the line. Thank you!
I used semi gloss. It’s really great paint and I did not put a protective coat on it. Our door is covered as well on the porch so it should be fine. Best of luck, you won’t regret it.
That pop of color is what your beautiful home needed.
Hi, very pretta front door! U did a great job!
Thanks Loretta! Glad you like it.
This sounds doable though I’m definitely not a DIY person. If I only paint the front of the door, not the top & sides, can I let it dry while closed? I have pets & live in a large city di leaving it open is not practical.