
If you’re tired of your old countertops and want a budget-friendly kitchen update, consider painting your countertops. The Giani granite paint kit is a fantastic solution for different materials, whether you’re planning on painting Formica (laminate) or granite countertops. In four steps, discover how to paint kitchen countertops using the Giani granite paint kit.
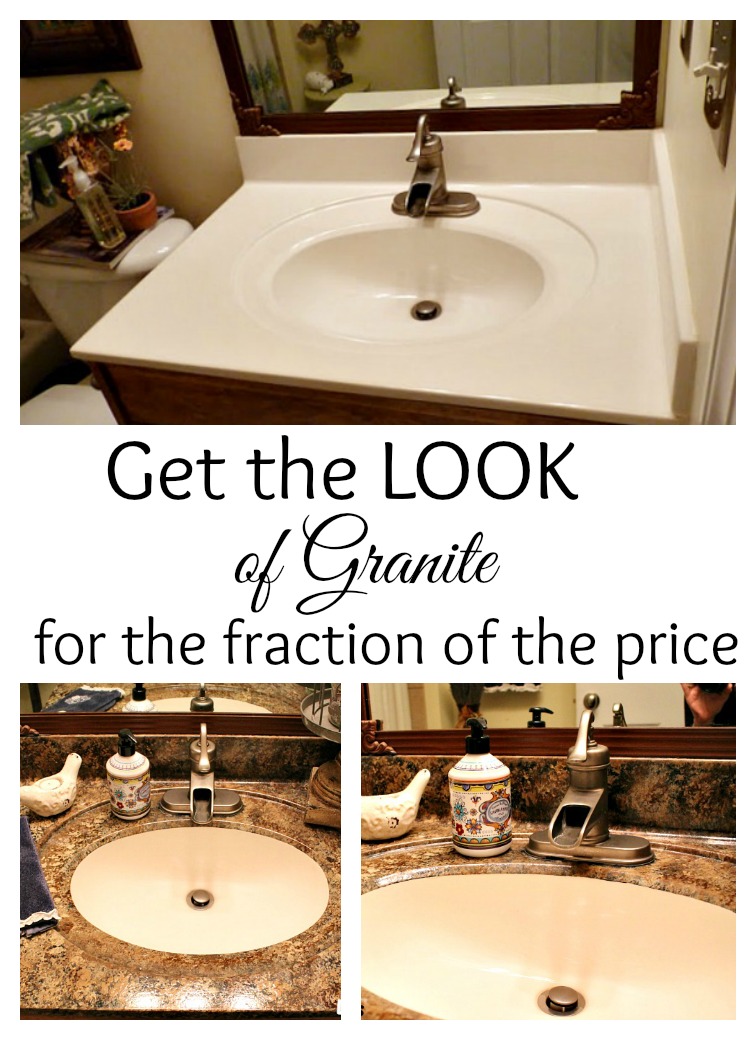
The Giani countertop paint kit is a versatile product designed to bring new life to your countertops. Compared to Rustoleum countertop paint or other brands, Giani stands out due to its exceptional quality and durability. It might just be the best countertop paint out there. To prove its durability, here’s a 2-year-old project that shows how our Giani-painted countertops are holding up impressively well.
1. Prepare your working area
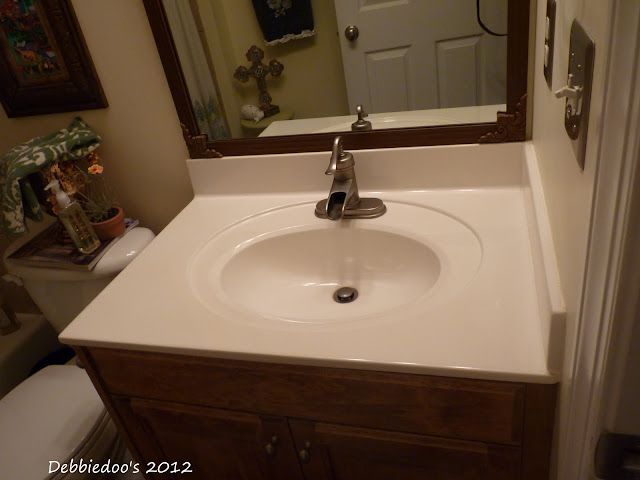
Clean the countertops and lightly sand them with 600-grit paper to create an ideal surface for the paint to adhere to. It’s also a good idea to lay down old newspaper or a tarp to protect the nearby surface from painting spills.
Open the windows or strategically place fans around the room to create a well-ventilated area. Additionally, be sure to wear protective gear, including coveralls, gloves, face masks and respirators, and eye protection.
2. Paint the countertops
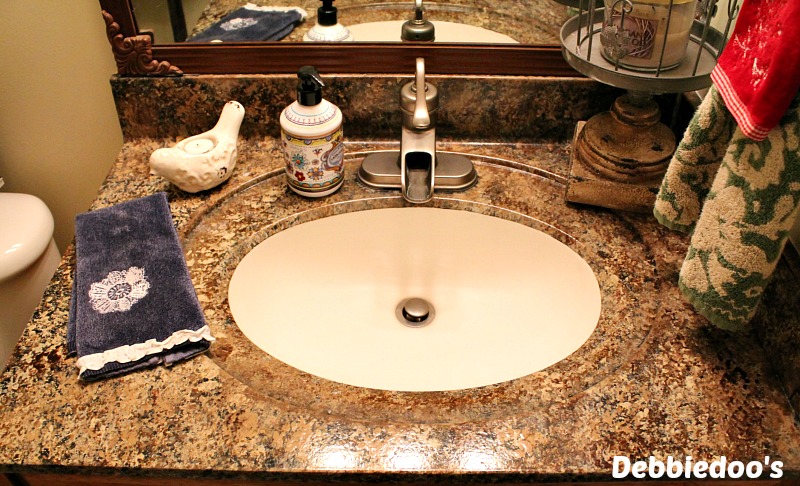
Before starting the paint job, choose your preferred color. We used a luscious chocolate brown from the Giani granite paint kit. The kit comes with a sponge that lets you create different textures on the surface so you can add a personal touch. You can achieve various styles with the right techniques, including the desired Spanish rustic feel.
3. Tape and paint the inner sink area
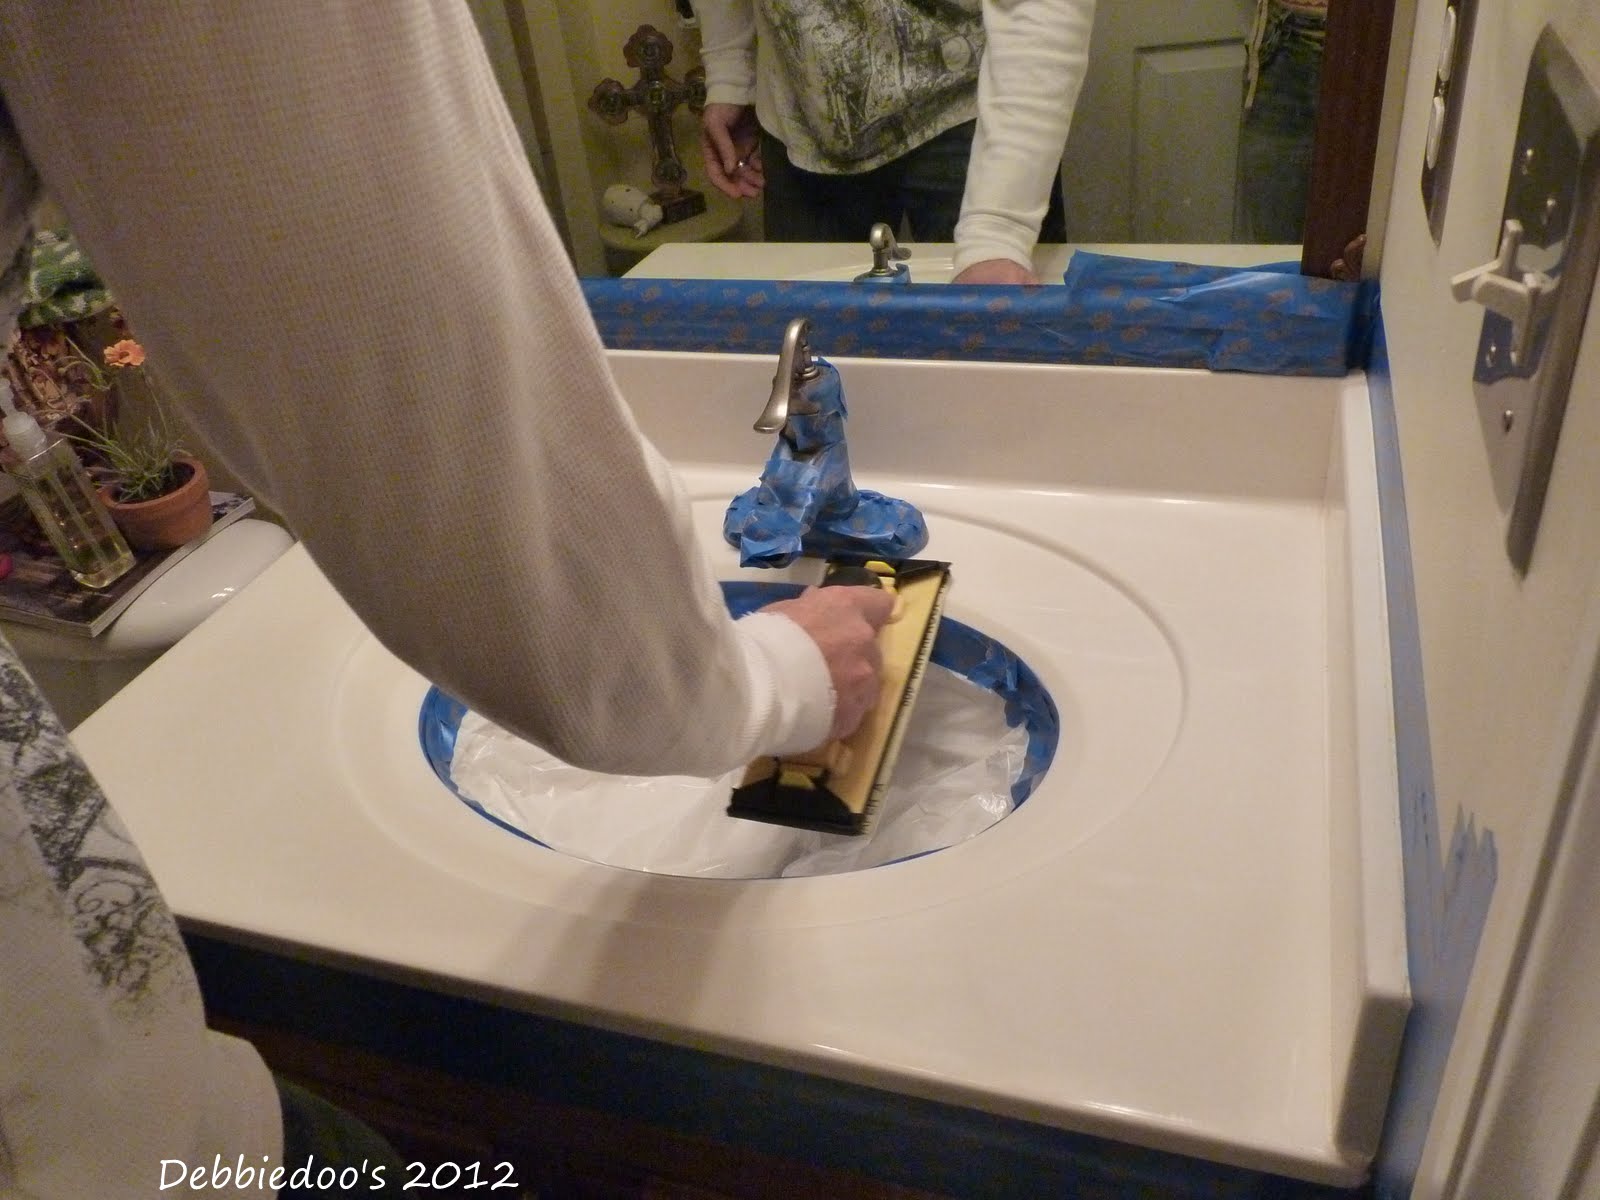
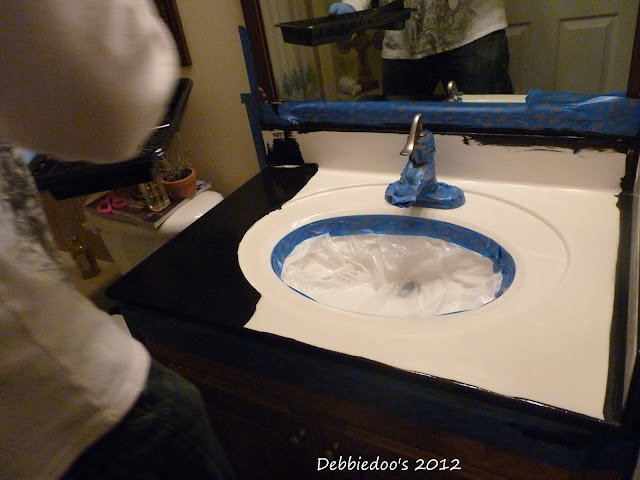
Taping off the sink area is vital for the outcome of your project. It’s particularly tricky to tape around a sink bowl from the inside. Even with careful taping, you might find that the paint bleeds a bit – but you can easily fix this problem in the following step.
4. Apply post-painting corrections
After the paint has dried, check the countertop and sink area. You might notice spots that need correction, such as uneven paint or slight bleeding around the sink. Don’t worry since you can quickly resolve these issues. With a bit of touch-up paint, you can achieve a neat and even edge around the inner sink area.
What about painting countertops with other materials?
Giani’s granite paint kit isn’t the only solution for revamping countertops. For example, marble countertop paint adds a more luxurious feel, while epoxy paint for countertops creates a glossier and highly durable surface. Choosing the right paint for your countertop material can make all the difference in achieving your desired finish.
What’s the longevity of Giani painted countertops?
Our home project shows that the painted countertop is holding up splendidly after two years. Giani might be more expensive than other paints, but it saves you money and effort in the long run since you don’t have to reapply the paint often.
Maintenance and care tips for painted countertops
With regular maintenance and care, your painted countertops will last even longer, ensuring that your kitchen continues to dazzle with its new makeover. Here are some tips:
- Use mild cleaning agents: Strong chemicals can deteriorate the paint finish over time. Instead, use mild soaps or cleaning agents that are non-abrasive and gentle on the paint.
- Avoid cutting directly on the surface: Although the Giani countertop paint is resilient, it’s not foolproof. Avoid cutting food directly on the painted countertops, as tempting and convenient as it may be, as you can scratch the paint and chip it. Just use a cutting board instead.
- Protect from heat: Placing hot pans directly from the stove or oven onto the painted countertops is damaging. Make sure to use trivets or heat-resistant mats to protect the surface.
- Wipe spills immediately: Any spills, especially those from acidic substances like vinegar or lemon juice, should be wiped right away to prevent paint discoloration or other damage.
WOW! I can’t believe that is PAINT! Incredible job!
PS — I really think you should provide a tutorial for those of us who are too afraid to make the move to WordPress. Your blog looks fantastic! 🙂
Debbie,
I missed this post the first time around…WOW gorgeous girl! Can’t tell that is is faux. Looks like I may have a future project with this!
xx
Anne
Deb, It looks FABULOUS!!!! I love it and love your color choice. I know you are thrilled that you did this! XO, Pinky
Great look Debbie. Has it held up well?
Yes Carlene,holding up great.
This is fabulous! I’ve been wanting to do this for such a long time,but was just afraid to tackle it. Maybe now I’ll get the courage to try it! Thanks for the great post and pics!
Gorgeous! I haven’t used the Giani kit. I just used regular paint in the bathroom. I’m looking to use the Giani in the kitchen, though. 🙂
Kelly
Very nice. Is it from Rustoleum kit?
No the kit is Giani granite paint kit. Thanks for stopping by.
I am just now seeing this fabulous post. Oh my! I am ready to start today! I have a question about the odor. I have parrots and they are extremely sensitive to odors. For that reason I can not even paint with them in the house. What is the odor like on this project?
Thank you for an option for the ugly, builder grade stuff in all my bathrooms. Fall projects!
Little odor, very surprised at that, but it really is not bad.
WoW you did an Amazing Job!! And 2 years later it looks Great!! This is Incredible!! /
Love Love Love It!!!
Lisa
That looks fabulous Debbie!! Great job and what a difference!
Hugs
Karin
We have a standard Home Depot sink and cabinet in our bathroom that I would love to try this technique on. Yours is absolutely beautiful. I’m sure it was a lot of work to perfect the layering of colors. You make it look so easy!
Does this paint product work on hard surface countertops or is it only for laminate countertops ? I want to try this but I have hard surface counter tops
This surface was cultured marble.
Where do you get the Giani kit from?
You can get it at Walmart. Other places may carry it and I would google to see:)
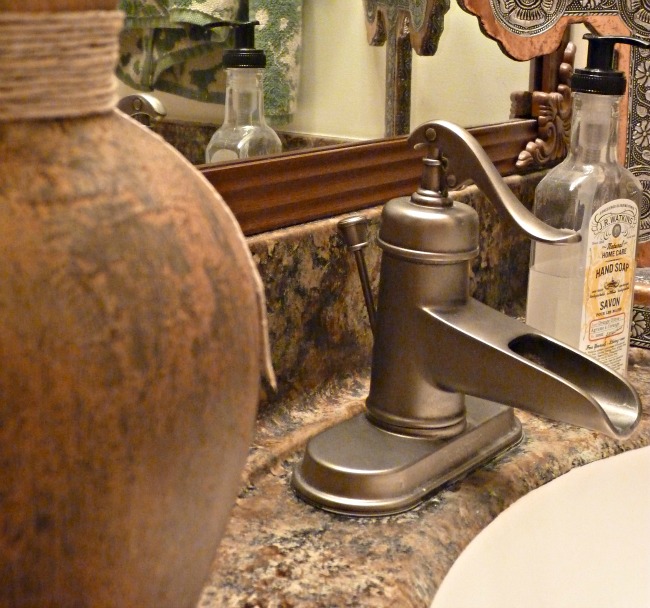
Where did you get your faucet i love it 🙂
Home depot:)
Hey Debbie! I’m looking to do this for a friend of mine. How did you fix the drop bowl sink look when it bled under the tape? That’s what I’m worried about the most! Well, and not taping off a perfect circle!
Hi Erin, my husband did the taping off which was good because he has a steady hand and good eye. It wasn’t hard though. The bleeding was very little to speak off and a paper towel and finger nail did the trick. Just watch the video at least three times before you start. It was simple, and holding up great.
I have a older countertop that I would like to try this on but was wondering if you can do this on the inside of the bowl or will it not hold up to cleaning?
Not recommended for inside the bowl.
Great results. I’m sold! I have the same faucet!! How do you keep yours so clean? Mine has a ton of hard water build up!
I have used vinegar to get those off. It does get watermarks on it too.
Hi-
I know this post was a very long time ago but I am about to start painting my countertops. Did you take your faucet off or just tape around it when you painted?
thanks!
tamara
Ha…. ignore my last question… I just saw your first post and saw that you taped around your faucet! 🙂 wish me luck!
Good Luck. Just be sure to watch that DVD at least 3 times:) You got this.
Looks great. I did a marble look on a long dresser with paints and eveyone swears it is marble. For marble you use a feather to drag color through the paint to get the marble looks. Doesn’t look like much till you put the polyurethan on and then WOW it comes to life. You need patients between coats being sure it dries well. Maybe I’ll try my sink now too. Great job!
sounds wonderful!
I cannot believe this fabulous invention has been around so long and I just barely heard of it today from your blog. Well, I was never interested in making changes because it required *work* or *money*…. or both….. and I stumbled across this while looking for ways to paint my shower tile. I am so glad you shared this because I was considering getting the kind you can roll and stick on top of your countertops but I wasn’t fully sold on the finished product, or that I could do it seamlessly. THIS…. is something I think I can manage.
I have user Giani in a kitchen and bathroom both. I love how it looks and stands up. In the kitchen, I put 3coats of sealer on, and after 6 months, three more coats. It had last 4 years when we sold the house last year. I only had to do one repair, when my hubby accidently set a hot pan on the kitchen counter. But it was very easy to repair. I am going to do it agin in the house we just moved into. I have already done my guest bathroom in this house!
It’s truly a remarkable product for the price! I am happy to hear you had great results too!
Very pretty! Great job!
That is soooo BEAUTIFUL..I’ve been wanting to do that but never think i can since i don’t have a hubby to help…by the way how were you able to get the kit free to review…i would like to try that in my master bathroom…thanks
You can do it!
Does this work on kitchen counters?
Absolutely!
Hello! I just discovered this project on Pinterest! Fantastic job! I will be tackling my kitchen counters and hope my finished product will look as good as yours! Quick question: what is the name of the hand soap pump in pictures 6 and 7? I love the bottle but cant enlarge the pics enough to see the brand name. Thanks so much—you have a new fan!!
Gosh, I wish I knew. That soap is long gone. But I do remember I found it at Home goods, they have a whole cute section of hand soaps! Good luck on your project.
WOW. That is truly an amazing job. It looks so great!!!
Hi Debbie,
Thank you for posting this – I love it! I found it by searching for a faux painted sink with Giani countertop paint. Turns out that we have the exact same vanity and same Giani kit – and nearly the same faucet to!
Anyhow, if you’ll humor me, my question is how long did you wait between painting the sink and the countertop? I should also ask how you kept the Giani from bleeding into the white sink and/or how you handled the bleeds.
Again, thank you for posting and being willing to guide all of us taking the leap for the first time!
Jeanne
Hi there Jeanne, My husband watched the DVD that came with the kit at least 3 times. He followed the exact, so I don’t recall how long he waited. As for the inner sink, he taped around the inner bowl a few times around and it kept the line clean and looked like a drop in.
OKay. I think I’m doing mine the other way around. I taped it off and resurfaced the sink part first. I did that three days ago. I’m chomping at the bit to paint the countertop now, but am concerned that applying tape (even Frog Tape) will peel the sink paint. Just thinking that being a long weekend it’s the perfect time.
I’m grateful for your input and posts. I’ve enjoyed your blog. ?
Jeanne
You can’t paint the inner sink. The inner sink is left natural. It won’t peel where you taped off as long as it is nice and dry.Please be sure you follow the instructions to exact that came with the kit. It clearly states you can’t use the paint in the sink area.
I didn’t see your reply until now. The paint end of the project is done, so now I’m onto the new fixture.
When I was talking about the paint in the sink I was referring to the epoxy tub and tile refinishing paint, which i did first. It all worked out well though. It looks fabulous!
Thank you for sharing your project and offering insight. This was a fun project!