
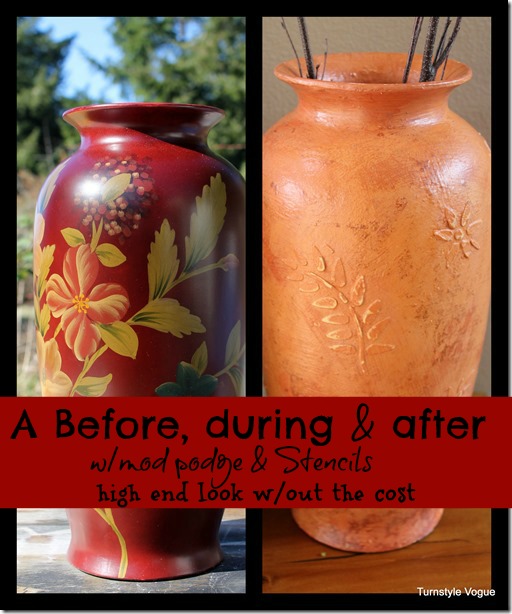
Good morning to all of you! I apologize in advance for this post lacking all the photo’s it should. This was a guest post some years ago and sadly the blogger who shared no longer has her website. The photos disappeared to this post when she removed her site. The step by step directions are however given. Plus, I left a few of my OWN projects down below using plaster of Paris.
Have you noticed the beautiful ceramic and clay pottery that is all
the rage right now? Perhaps you have seen a piece in your favorite
high-end décor store?
Today I’m going to show you how you can get the same look on the cheap.
There are a lot of pictures – but don’t freak out on me. It really is
super simple – there are just a lot of mini- steps that I want to make
sure I show you.
Here is what you will need…
* Paint – I chose two colors, Georgia
Clay and Mesa Sunset by CeCe Caldwell, but you can play around and get
creative with any color combination you want. Some type of mineral
paint will work best.
* Mod Podge – I used matte finish, but a
gloss finish would be great as well.
* Elmer’s Wood Filler – I suggest this
brand because the filler has a creamy whipped texture that makes
application a breeze.
* Stencil of your choice
* Popsicle Sticks
* 60 or 80 Sanding block (or paper.)
* OOPS!! NOT SHOWN:
Crackle Medium (you can get this at any craft or paint store, or
online of course.)
I started out with this vase, but you can use any vessel of your
choice. Try to look at the shape of the piece – not the material, or
design – and decide whether it gives you the look you want.
1) Prime with a basic primer or a base color of your choice. I used
a buttercream spray paint as my primer.
2) Next, you will brush on your crackle medium (see above.) I didn’t
show this because you couldn’t tell it was even on in the picture. I
wasn’t concerned about full coverage since I wanted a random result,
but I brushed it on most areas.
3) KEY STEP: After the crackle has been applied for 10 minutes or so
– but before it dries, start brushing on your first paint color.
This will “push” the crackle around on the vase creating a variety of
textures in random places. You can see in the picture below how it
bunched up in areas under the paint and how you hardly notice it in
other areas.
This is what mine looked like after the first coat of paint dried and
the crackle started forming – and even chipping some of the paint off.
4) After the first coat is completely dry, brush/blot on another coat
of the first color – but do not cover the entire
piece. Let some of the first coat/crackle/chipping
show.
5) Get your stencil, popsicle stick and filler ready…
6) When I stenciled the filler on, I used a very small amount on the
end of my stick and then spread it in each cut out like a thin-set
application. The great thing is that you don’t have to worry about
any bleeding like you might with stencil paint!
7) After the stenciled filler is completely dry, brush on a coat of
Mod Podge. You definitely want complete coverage here and even a
little thicker coverage over the filler.
This will seal the crackle and the filler so that no further chipping occurs.
8) Now it is time for the second color to be applied. Again – it is
random and not complete coverage. The idea is to create the look of
texture and depth with each layer that you apply.
You will want to make sure you paint over the stenciled design
completely – for now.
After my second color – Mesa Sunset – dried, here is what it looked like…
Almost done!!
9) Now you will want to use your sanding block and sand over the
stencil lightly to remove some of the paint to get an aged look.
10. The final step is more Mod Podge. I only did one more coat but
for added texture, you can apply additional coats.
And after it dried…
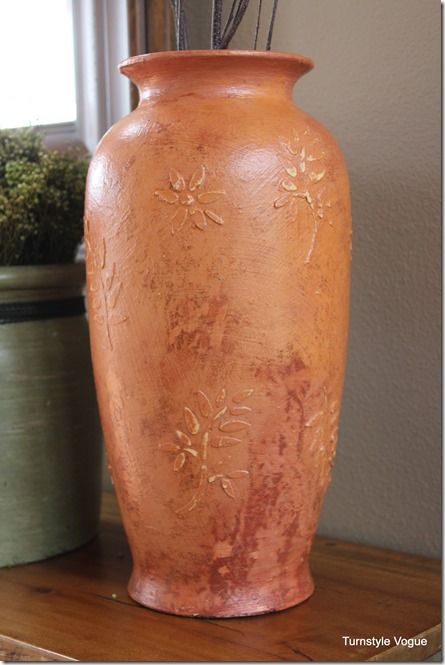 It may not be the real thing, but I think it is close enough!
Again, this is a very easy project. The application of each layer
only take a few minutes. The hardest part is just waiting for each
layer to dry so you can move on to the next step!
There are so many variations that can be done with this technique.
Just think of the color combinations, variety of stencils to use, and
texture building. Use your imagination!
Thank you so much for visiting with me today.

Stenciling with plaster of Paris HERE
If you are new here, welcome! I am also very excited to share my new stencil line with you.

[envira-gallery id=”32693″]
Thank you for your visit today!
To view my stencil gallery projects you may check out my Debcreates.com page.
I share all things, thrifty home decor, crafts and a recipe or two on occasion.
I also have an Etsy shop!

Sign up today and receive a few freebies. 12 months of seasonal printable art.

If you would like to commit to becoming a subscriber, I would love for you to join me.
That turned out great.
Love it!
Wow! What a cool tutorial!! Very clever!
That looks great! You make it sound so easy, smear a little of this, some of that, a coat of mod podge, yada yada and voila…. Love the stenciling and wood glue part, genius.
This is awesome! Pinning this!
looks awesome!!
WOW! What a transformation! That looks great!
I love this idea…. Very nice
Ah, Shari, where is my vision?! How could I doubt you?! When I first saw the flowered vase on your blog, I thought it was the finished version–eek! Reading further, I zoomed over to Debbie’s fun blog and saw the transformation step-by-step and it is beautiful and so rich looking. Well done!
Blessings
Sindy
Wow-weee! Awesome job and I love the step by step! Thanks!!
Lovely! What a great redo, can you just imagine a collection of these outside and planted with herbs? Gorg.
Time to open the closet and get out all the unused vases I didn’t know what to do with! Great inspiration!
Wonderful tutorial Shari. Looks amaaazing!!!
Thanks for featuring Shari’s wonderful project Debbie.
Hugs ladies,
Gee
Wow- That turned out great- looks nothing like what you started with- xo Diana
Wow! What a makeover. It’s such a pretty after. Now, I’ll have one more thing to scour for at the GW 😉
This is so cool! Great job.
Perfect new look:)
Oh my, that is amazing! I love this project! I would love to try this on some pottery that has seen better days, the effect would be stunning. Thanks for the tutorial, I’m pinning this!
Debbie 🙂
I love this project and can’t wait to try it. I have nearly everything I need, too, including more than one vessel that I can use. I just need the crackle medium and paint colors. Wonderful tutorial!!
Wow, I love this , I have just the vase, I been holding on to this vase for years because I love the shape and size,outgrown the color. Now I can “fix” it. Thanks so much for the idea and inst.
Just discovered Blogs ” I have several new Best Friends”
Take Care, Johnni