
Hi everyone! I’m Shanna from Restoration Redoux here for my monthly post.
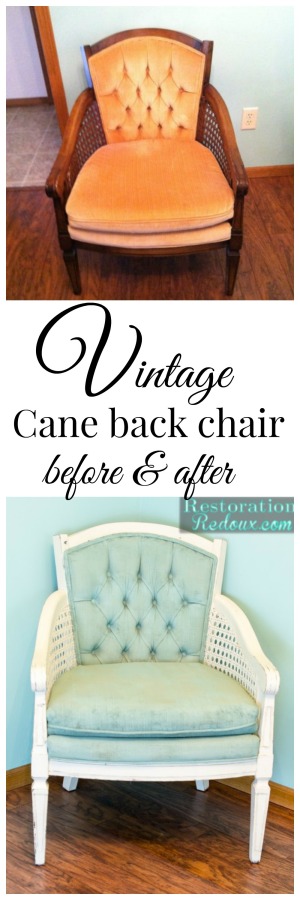
Today I am sharing a vintage cane back chair makeover.
Can you believe summer has already arrived? Only a few days of spring here in Kansas. We went from freezing temperatures, straight into the 100 degree weather.
I am a summer girl, and I love having my teenager home with me. As a blogger, you can get kind of lonely home, all by yourself most of the time, so it is nice to have her here.
We are both total night owls, and we love to stay up late watching old movies. For the last two summers, I have made her watch the classics with me (apparently movies from my generation are classics according to her): Sixteen Candles, The Breakfast Club, Say Anything, Ferris Bueller’s Day Off. She complained about having to watch them, but afterward she actually admitted to liking them, and I have even caught her watching them on her own a time or two.
I love not forcing her stay on top of her homework, and she loves not hearing me nag (not as much anyway).
I love grilling out and not having to wear a sweatshirt to paint in.
Kids playing outside until dusk and hearing the splashing of the pool behind our house.
I love yard sale season, drive-in movies and lightening bugs.
Speaking of yard sale season I got this great cane back chair at one the other day. It looked dated and the peach velvet was faded.
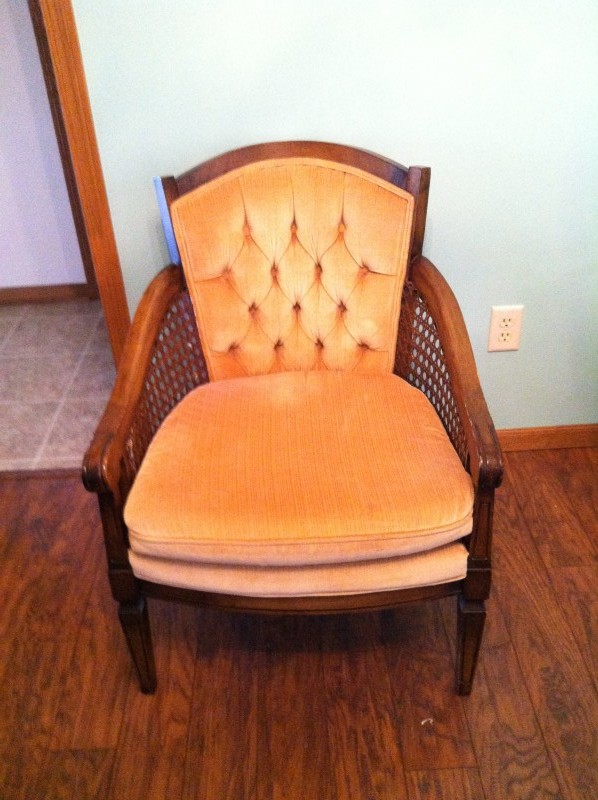
First, I cleaned years of filth and grime off of it.
Next, I removed the seat cushion and painted all of the wood with Plaster Paint in Sweet Cream.
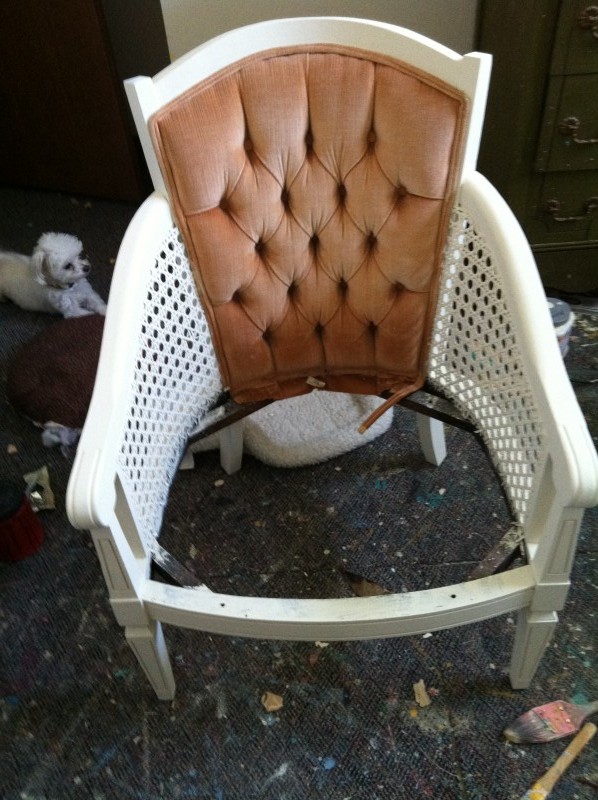
After two coats of paint, I distressed the entire piece, coated with a clear wax, and the I buffed it off.
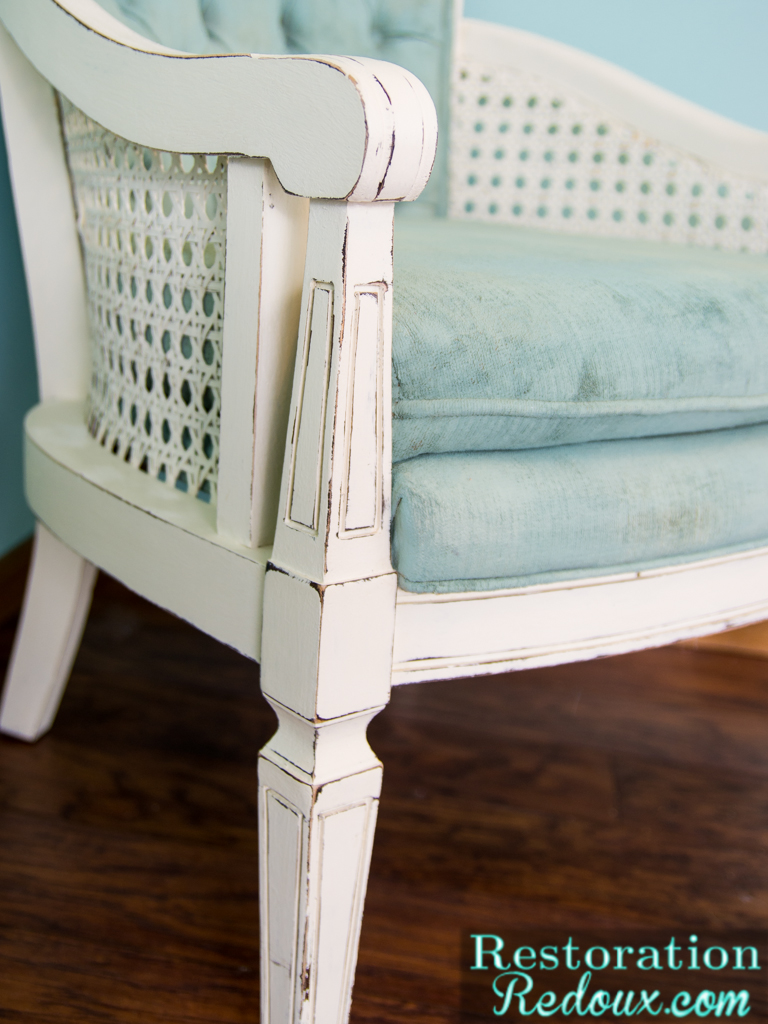
Next, I took Plaster Paint’s SeaBreeze and made a 50/50 combination of paint and water.
I then used a squirt bottle filled with plain water, and I sprayed-down the surface of the chair (to help it take the paint better), and then I painted on the 50/50 mixture.
I went over all of the upholstered parts twice, once with the 50/50 mixture, and twice with just straight paint.
I then went back and touched up any areas that needed it.
I’m not going to lie, I had to use a lot of paint.
At that point the fabric had become crunchy, so I then coated all of the fabric with clear wax which softened it right up!
This was my first time painting an upholstered piece and I was a little weary of how it would turn out but I was really happy with it! It looks a heck of a lot better then it did before!


If you would like to see more of my craft or furniture projects please check me out at any of the links down below! See you next month!
This came out just Beautiful. You did an Amazing Job.
Thank You for the Share.
Lisa
it looks great~!
next time prime it with kilz:) I add flotral to my paint 25/75 and it goes on smooth.
1 prime n 2 coats of paint always works for me and I too use clean wax after its thoroughly dry… sofa and chairs I did are still in perfect condition, 4 years later and the ability to wipe them off with a damp rag makes them dang near perfect for kids and pets.
that should have been Clear Wax:)
Thanks Sonny! I will have to try the Kilz next time!
Thank you so much Lisa!
I love this tutorial. I have cane chairs that I have been wanting to paint, and my mom actually is a distributor for Plaster Paints, so I am excited to paint them, especially the upholstered part. 🙂
Thank you Gretchen! I have totally converted over to Plaster Paint! Works just as well as some of the other brands and is a lot less expensive.
That’s amazingly beautiful who would’ve thought that ugly chair would turn out to be a beauty great job thank you for posting that it was very inspirational
Thank you Linda! It’s amazing how a simple coat of paint can totally transform a piece!
I never knew you could paint the upholstery. I would have thought it would ruin it. Is it a paint designed for upholstery?
No it’s not for fabric in particular. It’s almost exactly like chalk paint in my opinion. Before you put the wax on it it is crunchy and hard, but the wax softens it back up.
That is so beautiful. Love seeing this style chair made over especially, they look so gorgeous updated!!
Thank you Shannon!
Debbie this chair turned out great. I am always a bit skeptical of painting furniture cushions. I must live under a rock, I never heard of plaster paint. Could tell me more about the paint?? Thanks
Cynthia
Hi Cynthia! I am going to link you to the FAQ page of the Plaster Paint company. I have used many different types of chalk paint and in my opinion it is just as good as Annie Sloan. Plus it is only $25 a quart instead of AS’s $36. http://www.theplasterpaintco.com/FAQ.html
Those are my colors! Love it. I didn’t know you were from Kansas until this post. I am originally from Kansas also.
Thank you Joni! Us Kansas girls must like the same colors!
I’d like to know how this wears over time. Also, if it is a hot summer day, will you walk away with paint or wax on your legs when you get up? I’m just wondering how this will work out.
What a beauty! You did an amazing job on the makeover. I know this takes talent!
That’s a fabulous makeover! Love the color!
Learn something everyday! Never knew you could paint the cushion part. Turned out great though!
What type of clear wax did you use at the end of the process? I have the same chair and am hoping to give this a try 🙂
This was a guest post,however, I am almost certain she used either Annie Sloan wax or perhaps minwax makes a clear one as well. Any clear wax will do, so find one that is the cheapest option for you.
Beautiful chair! Try making your own chalk paint with plaster of paris. 1/3 cup plaster of paris, 1/3 cup water- mix until smooth then mix into 1 cup of any latex paint. This amount will cover about a 6 drawer dresser. It has a smooth not grainy finish
Hi! Did you put painters tape on wHite paint in order to do the cushions in blue? I’m working on mine but I’m afraid of the tape hurting the white I painted on.
This wasn’t my project, it was a contributor. I leave her source in the post. I would assume that is what she did. Painters tape usually works great and does not remove existing paint, unless it is wet.