Debbiedoos

Thrifty home decor, dollar tree crafts, stenciling, decorating blog.

  • Home decor projects using stencils
  • Boho Farmhouse Etsy Store
  • Dollar tree Spring/Summer
You are here: Home / DIY / Repurposed door mat to cover and ugly wall vent

Repurposed door mat to cover and ugly wall vent

By 18 Comments

FacebooktwitterpinterestFacebooktwitterpinterest
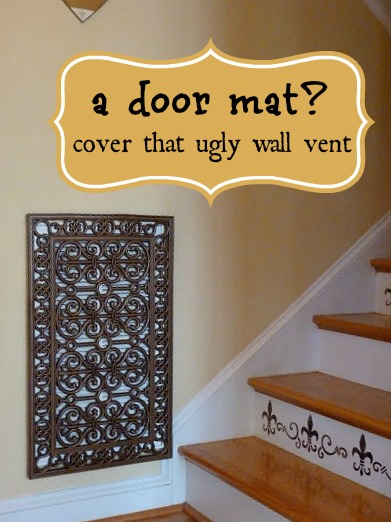
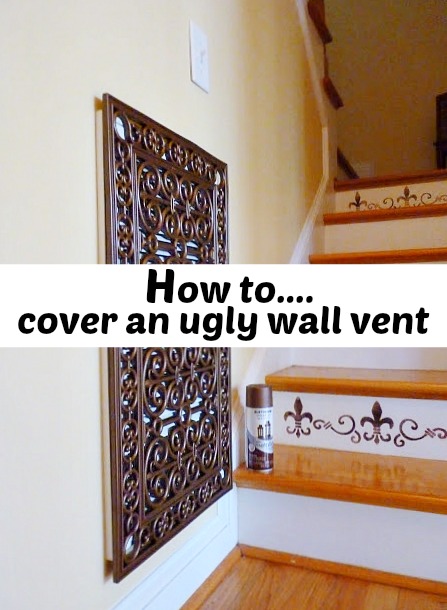
Hello everyone!  Today I am sharing how to cover and ugly wall vent. 
 Easy DIY project that anyone can do on the cheap.
 
repurposed door mat
  
 My friend Tami  from curb alert  originally posted about it here. 
I have since found other upcycled door mat projects!
People are spray painting them white and using them as art work on their walls, in all shapes and sizes.
    First off, do you know what this is?
ORNAMENT IRON COLD AIR RETURN VENT - ROCOCCO
Van dykes Restorers
{retail value $500.00}

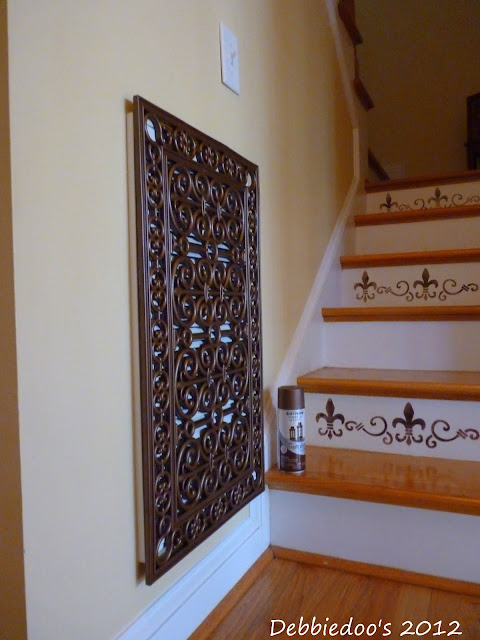
This is a vent cover.  A lot of us have  the ugly white vents on our walls. They certainly are not the most attractive looking.  In fact, they can be an eye sore.

First let me show you what Tami did with hers…

She took her door mat and simply placed it over the vent…so much better right? 
So I had to run right out and copy this idea…. 
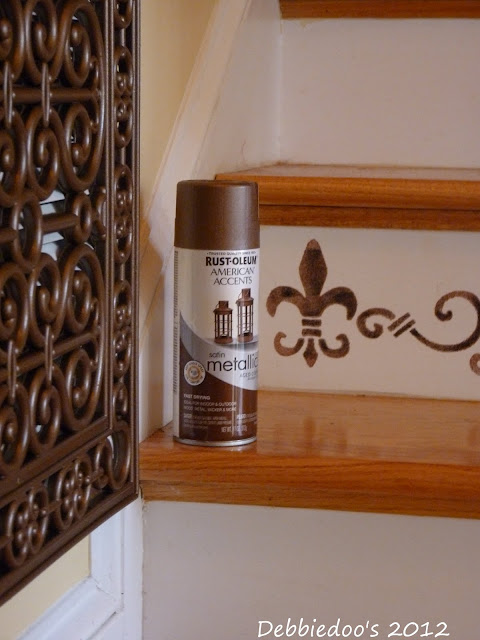
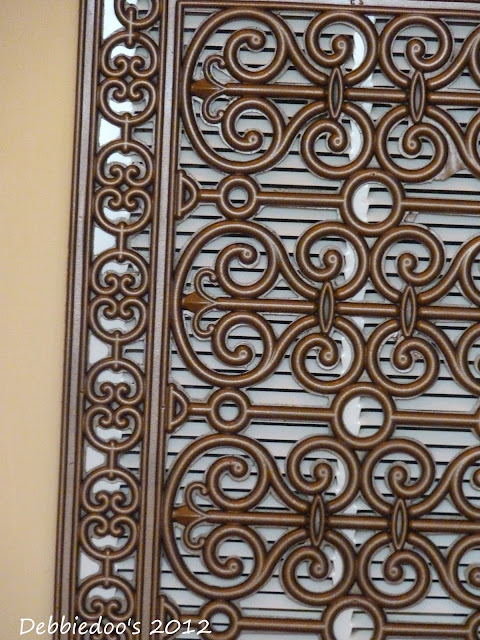
 Of course, I had to spray paint mine first.  This metallic copper was the perfect choice!
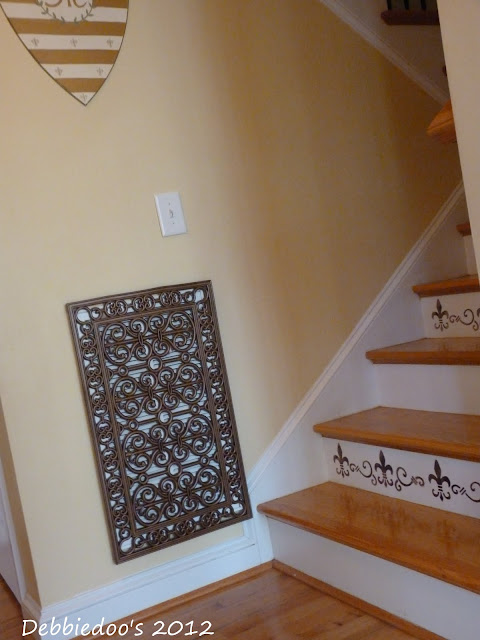
  
 
 Ugly no more!
We just nailed  two small nails on top to hang the mat.
Cost of the mat, $13.00, spray paint $5.00. 
Pretty awesome!
Thanks Tami for this wonderful idea and for sharing.
 
how to cover an ugly wall vent
 

Thanks for stopping over today. If you are new here, I would love to see you back again where I share all things Heart, home and a recipe or two on occasion.  All easy peasy stuff here:)

Check out my DIY gallery

gallery of ideas by Debbiedoo's

recipe gallery too!

Recipe archives

and if you like budget friendly, I have lots of DOLLAR tree craft ideas!

dollar tree gallery of ideas


Related posts:

Simple Fall Porch Decorating
How a rug can change a room
How to restore your leather couch (diy)
FacebooktwitterpinterestFacebooktwitterpinterest

Filed Under: DIY, spray paint projects

Comments

  1. Debbie says

    October 3 at 1:21 pm

    Great idea! I love the colour you used on yours, matched the stencilling on the steps perfectly! I’ll have to check out Tami’s and pin a couple times. Thanks!
    Debbie ๐Ÿ™‚

    Reply
  2. Anne says

    October 4 at 11:07 pm

    Where did you find your mat? I love it!!!

    Reply
  3. Suzanne says

    October 12 at 12:48 pm

    Does the heat or AC still travel through the vent? Or is this hung when the vent is not in use?

    Reply
    • debbiedoo's says

      October 12 at 2:18 pm

      Yes it does, no air restrictions at all.

      Reply
  4. Jerri says

    November 2 at 9:14 am

    What a creative idea! Looks great!

    Reply
  5. Beverly says

    May 27 at 9:18 pm

    Love it! How difficult is it to change the filter?

    Reply
    • debbiedoo's says

      May 28 at 6:56 am

      Not difficult at all. You just remove the rubber mat and the rest is the same as you would normally change your filters.

      Reply
  6. Kristin says

    July 16 at 8:28 am

    That looks nice. You might also want to paint the vent the same color as the wall and then it will blend in even more. I always paint my vents but now might have to go find a cool doormat! Thanks for the idea!

    Reply
    • Andrea says

      March 7 at 11:17 am

      How did you hang it? How is the paint holding up? Thanks!!!

      Reply
      • debbiedoo's says

        March 7 at 1:47 pm

        Holding up great. We used two small nails above the vent.

        Reply
  7. mckenzie says

    March 29 at 12:14 pm

    How hard was it to find the correct size mat? Or is it as easy as getting a standard size mat?

    Reply
    • debbiedoo's says

      March 29 at 1:33 pm

      Standard, not hard to find anywhere:)

      Reply
  8. Vonda says

    August 27 at 2:17 pm

    How did you take it down to change the air filter?

    Reply
    • debbiedoo's says

      August 27 at 3:03 pm

      I had it hung on two tiny nails above the vent so it is easy to slip on and off. I kept the main cover on the vent.

      Reply
  9. Jackie says

    September 25 at 10:33 pm

    Love the idea of mat over air duct return. How did you secure it to wall vent

    Reply
    • debbiedoo's says

      September 25 at 11:03 pm

      I put two nails on each side of the wall and hung it from there.

      Reply
  10. Jo says

    November 12 at 8:31 pm

    That looks incredible!
    I would love the exact mat you used here…where did you buy yours?

    Reply
    • debbiedoo's says

      November 13 at 5:14 pm

      I bought that Mat at Lowe’s some years ago.

      Reply

Leave a Reply Cancel reply

Your email address will not be published.

This site uses Akismet to reduce spam. Learn how your comment data is processed.

Social butterfly

FacebooktwitterpinterestrssyoutubeinstagramFacebooktwitterpinterestrssyoutubeinstagram

Looking for something?

Follow me

FacebooktwitterpinterestrssyoutubeinstagramFacebooktwitterpinterestrssyoutubeinstagram
Privacy

Recent Posts

  • Dollar Tree Tinsel Bunny and Egg Makeover
  • Dollar Tree Spring Carrot Wreath
  • Rustic Boho Christmas Decor
  • Farmhouse-Boho Fall Kitchen
  • Boho Chic Guest Bedroom

Printables & Images Policy: Please do not use my printables for anything that is sold or alter them in any way. Please do not post one (or more) of my printables on your site without my permission. If you would like to feature one of my images, please ask first. This includes, but is not limited to, other blogs, round-up sites and magazine publication sites. I can be reached at debbiedoos43@gmail.com

Debbie Manno (Debbiedoo's) is a participant in the Amazon Services LLC Associates Program, an affiliate advertising program designed to provide a means for sites to earn advertising fees by advertising and linking to (Debbiedoo's) (amazon.com). I also grant ZERO permission to use one or any of my photos/printables or any other content here within my website for features or "round ups" without prior permission. Thank you. I also would like to credit Pixabay.com for their CCO use of images. Noting that I can download, modify, distribute, and use them royalty free for anything I like, even in commercial applications. ANY recipes of mine that have inspired you to make and create, please always reference to finding the original recipe on my site and not sharing the entire recipe on your site for no incentive to visit the original creator. Thank you.

Copyright © 2021 Debbiedoo's ยท Log in

This website uses cookies to improve your experience. We'll assume you're ok with this, but you can opt-out if you wish.Accept Reject Read More
Privacy & Cookies Policy

Privacy Overview

This website uses cookies to improve your experience while you navigate through the website. Out of these, the cookies that are categorized as necessary are stored on your browser as they are essential for the working of basic functionalities of the website. We also use third-party cookies that help us analyze and understand how you use this website. These cookies will be stored in your browser only with your consent. You also have the option to opt-out of these cookies. But opting out of some of these cookies may affect your browsing experience.
Necessary
Always Enabled

Necessary cookies are absolutely essential for the website to function properly. This category only includes cookies that ensures basic functionalities and security features of the website. These cookies do not store any personal information.

Non-necessary

Any cookies that may not be particularly necessary for the website to function and is used specifically to collect user personal data via analytics, ads, other embedded contents are termed as non-necessary cookies. It is mandatory to procure user consent prior to running these cookies on your website.

SAVE & ACCEPT