
I feel like the mad scientist on this project.
What happens when you mix mod podge, rit dye and then paint it on glass.
Let me show you!
First, let me say, sorry for my lack of presence. The boys are home, and keeping me busy.
In fact, I am starting to teach Alex how to drive. Fun, fun, fun…
NOT!
This project was an interesting process and one that came to fruition two days later.
I had mentioned how interesting this process was on Facebook on day one.
Honestly, not sure how it was going to go.
btw I am using my old camera, and I can so tell the difference in my photos.
I lost my battery charger and had to order a new one.
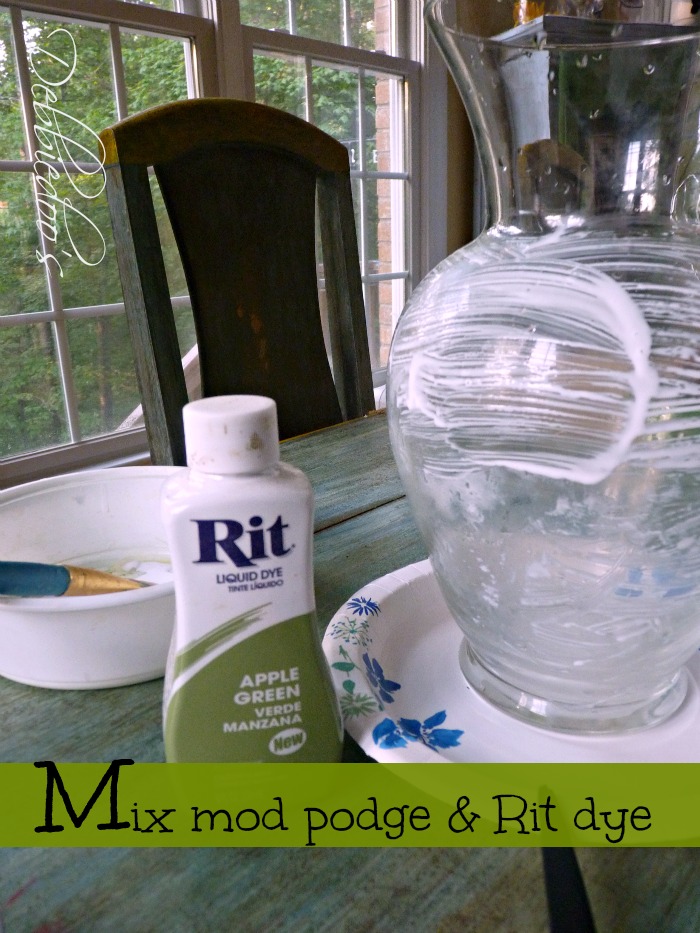
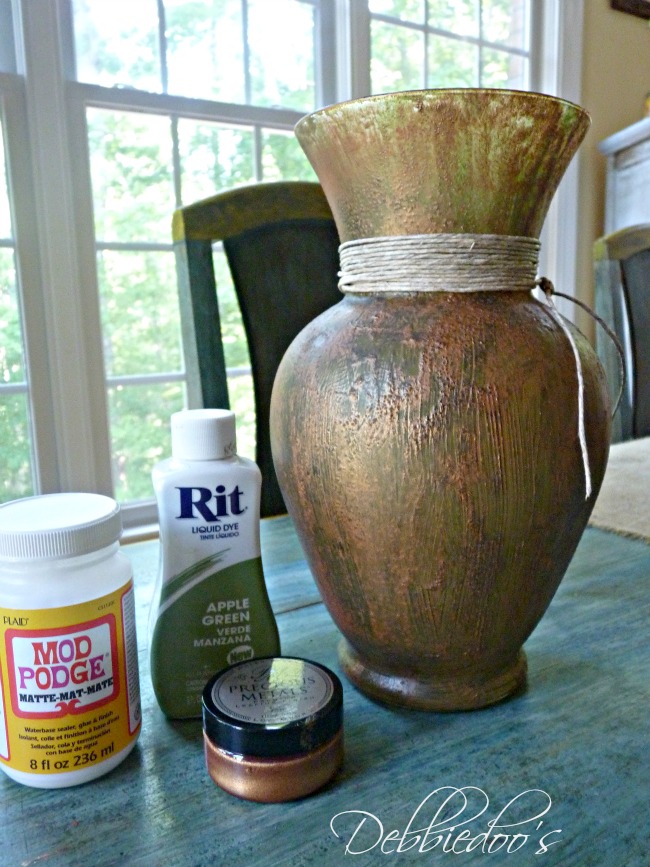
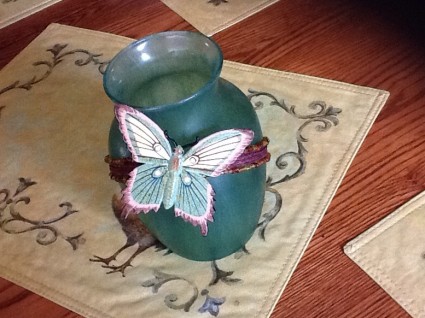
Here are my supplies:
Old vase from flowers Mike had sent me.
Mod podge
Green apple color rit dye.
I used rit dye for the first time last Fall and you may see
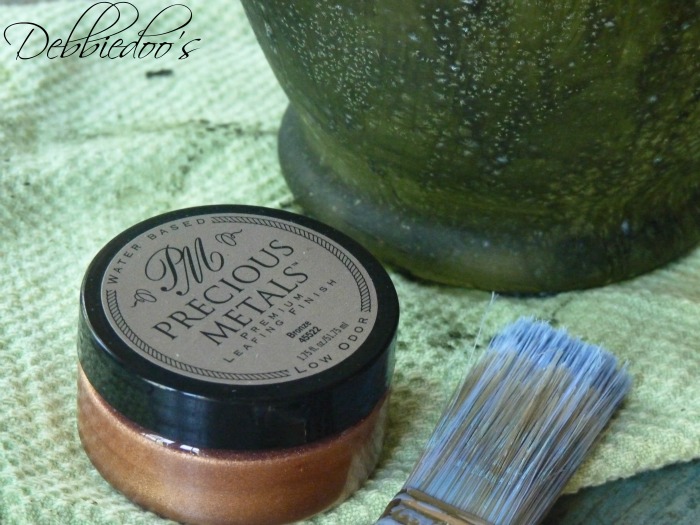
I also used this leafing finish as a last minute as it needed a little something, something!
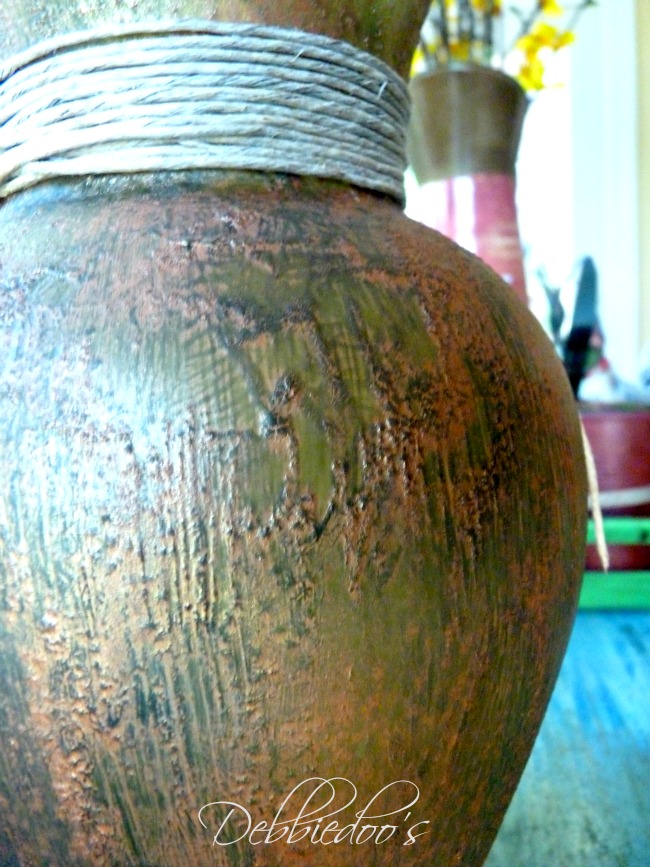
I love how the inside of the glass looks as well.
Almost looks like blown glass to me.
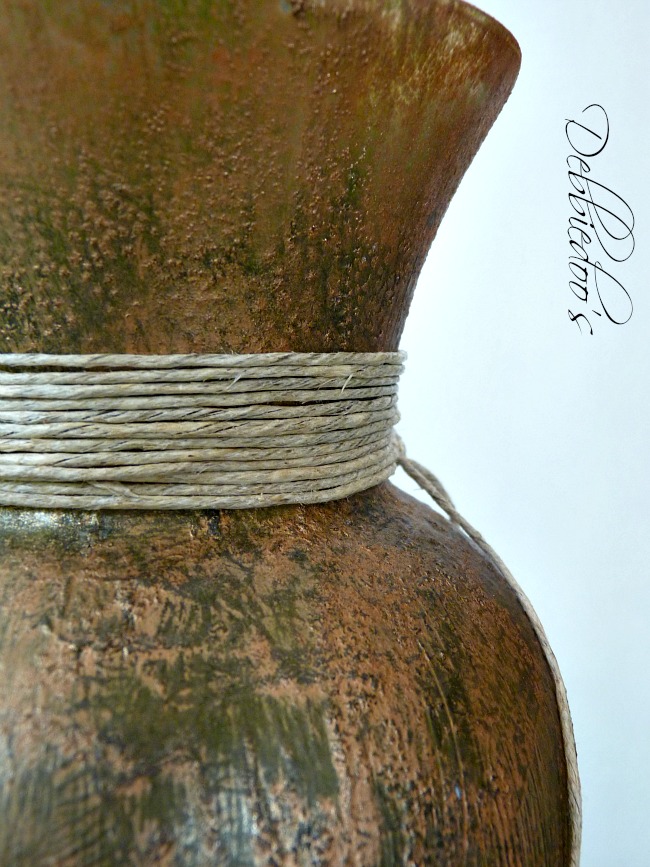
Loving the finish
and the texture look it left.
I simply mixed the rit and mod podge in a bowl
and painted it on the vase.
Did several coats for two days as it sat on our kitchen table.
After that I added the leafing finish as the final touch.
My husband liked it, although, he did say, that took you a while…
well, yes, but I am slow these days.
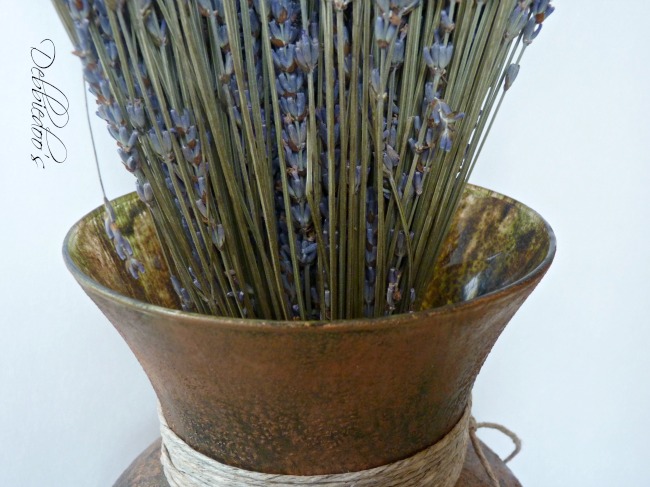
Now where will I put it?
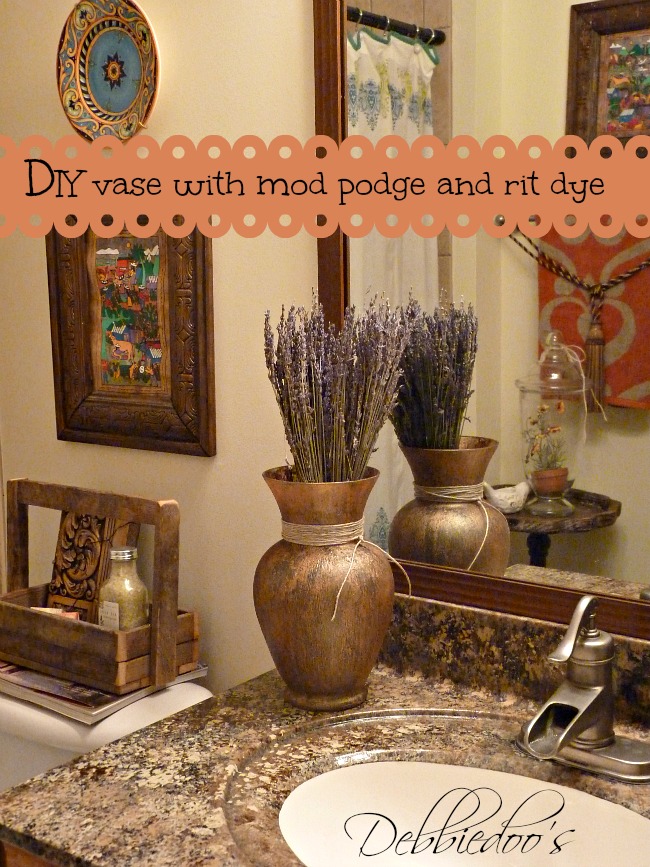
It goes perfect in our guest bathroom which is a Spanish style look.
Our Giani granite painted counter top is holding up well too btw.
I think it is going on two years now.
So that’s the deets on Mixing mod podge, rit dye and painting on glass.
It’s a process but in the end a little gem.
Virtually free project, as I had everything on hand.
Thanks for stopping by today!~
XO
If you like Mod podge, check out my
Mod podge gallery of ideas!
Better yet, check out the RIT dye gallery, and I am working on some new ideas as well to come!
I am also sharing a readers work of art that she shared with me.
She made her vases for a fund raiser using my technique.
They are beautiful!
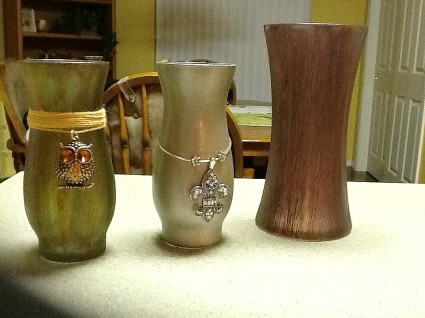
Just thrilled I sparked someone else’s creativity to give it a try.
Thank you so much for visiting with me today.
If you are new here, I am also very excited to share my new stencil line with you.

Farmhouse/rustic stencil line by Debbiedoo’s HERE
Thank you for your visit today!
I share all things, thrifty home decor, crafts and a recipe or two on occasion.
If you would like to commit to becoming a subscriber, I would love for you to join me.
Absolutely love this and will be trying this……on so many different things! LOL. Thanks!!!
LOVE!!! Wow…who knew. I have some red rit dye in my closet right now. I can see a project coming on!!!
Right, who knew is right, it is fun to make something up. I know rit and modge has been mixed before, but I never saw it painted on glass:) Perhaps I am the first ever, doubt it, but I never saw it. Thanks for coming by.
It turned out amazing. I have a couple of plain clear vases…need to try this on them to jazz them.
Any ideas how to reuse something that has mod podge on it?
Ummm…give me a little more to go by…like what is it, what is the surface, etc. Thanks.
Picture frame. Can I soak it for a short while and scrape it off? I really love using mod podge and will probably use it again, but my decor has changed. Thanks!
Do you want to just repaint the frame? I have never tried removing mod podge off, and I am thinking not easy to do without ruining the surface. It’s glue, and it hardens pretty darn well. I would try to work with it, perhaps paint, and embellish the frame for a different look and keep the mod podge on.
Love your vase. I’ll see what I can figure out!
Wow, I can’t believe how that turned out. I would have never guessed it would look so great. What a clever idea.
How fun is that. I love it. what a great color. Hugs, Marty
Oh Debbie this is so you…and perfect in your bathroom. Love the added touch of the twine!
Debbie..this vase is a perfect fit in your guest bath..I have a couple of these around here,now I know what I will do with them..thanks.
Such a fun idea, Debbie! So many great color combos available, too…yours looks wonderful!
Very nice Deb…I love it! You have me thinking now lady!
Deb, Is the metallic leaf liquid and if so, how did you apply it? Craft impaired person here! Never heard of this process using Mod Podge. The vase sure looks good now!
P.S. I still pronounce it ” Modge Podge!” Must have heard it wrong all those many moons ago!! LOL
I applied it using the brush you see in the pic. It is a metallic and I bought that at Hobby lobby. You can use any finish or craft paint to your liking though. And you know you probably heard MODGE podge from me LOL..that is what I use to call it.
Does it matter how much rit dye is used? Btw your work is Awesome!
Not really! Make it whatever you want it to be. I usually wind up doing two coats. Thank you.
You did a perfect job on this vase. Looks so professional. I LOVE LOVE LOVE your hair.
Thank you Val:)
Ditto for the hair!
That looks cool Deb! Almost like a pottery piece now with all the texture. The metallic touch sealed the deal. Pretty cool!!
That’s really fantastic, Debbie!! What a neat idea! And I think your pictures are great, as always.
xoxo
Debbie, I love the effect of the leafing.. The vase turned out beautifully and looks expensive!
This is so great Debbie. Love the vase in your bathroom. Looks great.
Kris
It looks great I am shocked. Amazing what a little momgenuity and mod podge will do
I am pinning this as something I am going to do! Sooo pretty Miss Debbie 🙂
Hugs
This looks great. Looks very expensive. I have tons of those vases. Maybe I should send them to you since you are soooo good at these things. Thanks for sharing this great project. Your hair looks absolutely gorgeous. Have a great summer and gook luck with the driving lessons. Sheila
aww..thanks Sheila!
That looks wonderful, Debbie! It has the perfect patina!
Now this is something else! Finally something to do with all those florist vases. Turned out great and looks fabulous with the countertop.
Question, Can you wash the vase now, not that you would need to?
xoGinger
Not sure Ginger, probably NOT:) I won’t try it, just in case.
This looks beautiful!
Love the vase! So clever of you. Good luck on the driving thing. Be sure to install a break on the passenger’s side! I still act like I have my own when I ride with my oldest daughter, and she’s 23:-)
LOVE the results of your mad scientist experiment. Fingers are crossed with the driving lessons. You must have the patience of Job.
WOW! the vase in the bathroom really pops! I have two hurricanes I had no idea what to do with, now I know what to try. I still love the look of cracked glass. I wonder if I could do that with the modge podge and dye.
You have nothing to lose:)
I am wondering if your potion could be painted inside something for a reverse look with the glossy glass smooth side out?
I pinned this project. Your vase turned out fantastic Debbie!!!
Debbiedoo…..that was so creative! Looks like an expensive clay pot now.
My goodness, where do you get these ideas? This one is incredible, the vase looks amazing! It looks perfect in your Spanish bedroom. Wow!!
Debbie 🙂
love this idea but i think i missed the recipe for the mixing of the dye and mod podge somewhere. What are the amounts of each used or do you just mix dye to the mod podge until you have the shade you want.
I don’t have a recipe, I just poured the rit in the bowl with the mod podge, mixed and added til I liked the color it achieved, darker or lighter whatever you like. It’s all an experiment:)
When did u put the leafing finish on it? Do I wait till its almost dry?
Yes, just about when the piece was dry. I brushed it on and then wiped it with a paper towel as I went.
Debbie, this looks amazing. So amazing I have already started one! Can you tell me how long you waited between painting each coat on? Did you wait until each one was completely dry? How many coats do you think you did? Thank you SO much for posting this!
That Looks Gorgeous, like a very costly Vase!! You are so Creative !! Who knew with Rit Dye?
I would Love to see Off course flower of your choice But a large Bought of apple green hydrangea
in that Vase to make the Green in the Vase pop and Your Beautiful bathroom Pop also!! Your My
Creative Diva lol, If I don’t smash my mirror in the Master bath maybe I will consider framing and
I was thinking of etching and design is reverse maybe some Rit and Mod Podge by the way never
used that. You will have to give me a 101 lol
Lisa
Where do I find the leafing finish?
Hobby lobby has it. If not Martha Stewart makes one too.
Awesome work! What kind of mod podge did you use?
Matte:)
How long was the process? Could you finish this in a hour if you wanted to? Wondering if a hair dryer could speed up the process??
I can’t say exactly, but I think total it was longer than an hour. I would not use a hair dryer on it because of the glue:)
I absolutely loved this so much, that I did one myself. I used teal Rit Dye with the bronze metallic leafing, and loved the results! I even did some Patron bottles using the same technique. FABULOUS!!!
Awesome! So happy to hear this.
Debbie, I love this technique! I can’t wait to try it out. I have some glass vases that I have kept for crafting purposes. I think this will be a great use for them! Thank for posting this project!
this is awesome! food coloring works too! oh and my grandma had a counter top like that in the 70s-80s.
This is brilliant!
What do you think about using Rub n Buff versus the leafing finish? Is it a similar product?
I would say yes, should work out fine:) Remember this is and was all an experiment,but all good in the end. Have fun!
Thinking of doing this with 2 lamps that I picked up at Kirkland. Made out of wood or ceramic, not sure. Want to pop out a little of the dark teal with camel or maybe the bronze over it. Would this be a good idea for lamps?
Yes, it probably would work. Although, I would do a dry run first on a cheap dollar tree vase before you dive into lamps. Chalk paint is always a great alternative rather than this technique.
Do a lot with Chalk paint already…need more in master room for these lamps. Looking for a different look and just a pop of the dark dirty teal . Any other suggestions? (right now the lamps are painted a light greenish blue and they look boring.)
Judy, read this post. I just tried a new craft paint, and I LOVED it. I am thinking that will work. http://www.debbie-debbiedoos.com/2016/02/experimenting-with-new-craft-supplies-and-paint.html
This looks awesome, will check it out for the right colors and practice on a glass vase. The teal blue is the perfect pop, then want to add dark caramel or even some bronze to it. Now I need to find the product-thanks so much.
Good luck on your project.
how did you apply the leaf finish
I painted it on with a little brush then lightly dabbed it with a paper towel. I think that is what I did. This project is older and I forgot exactly what I did. Most of the time I am experimenting.