
This was yet again just another experiment of mine.
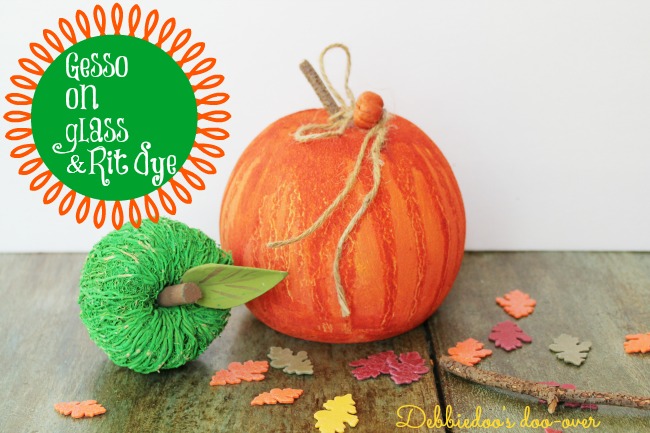
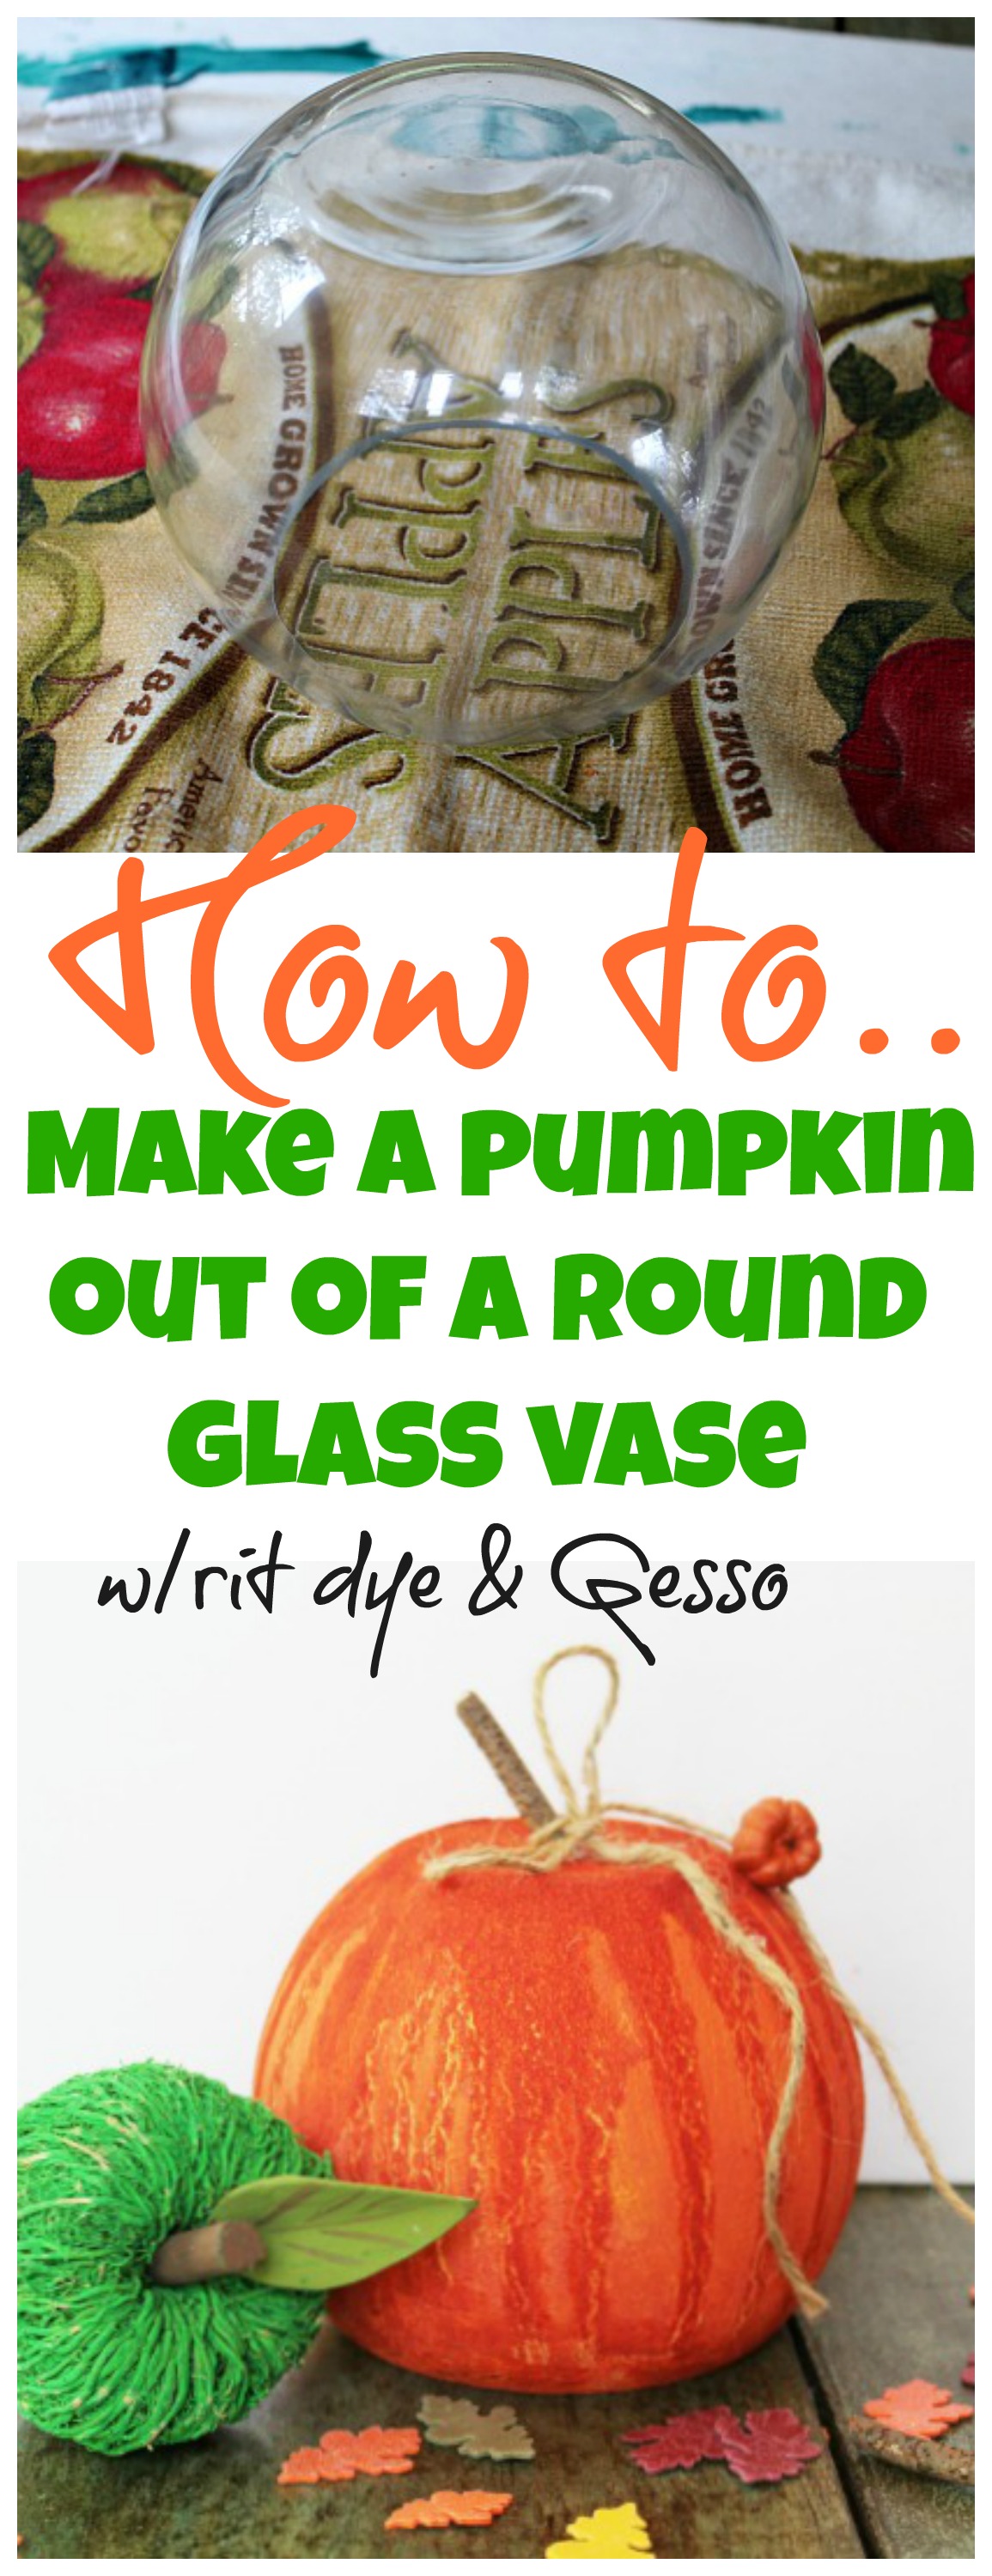
You want to learn how to make a pumpkin out of a round glass vase with Rit dye and Gesso?
I gesso you do, you are here:)
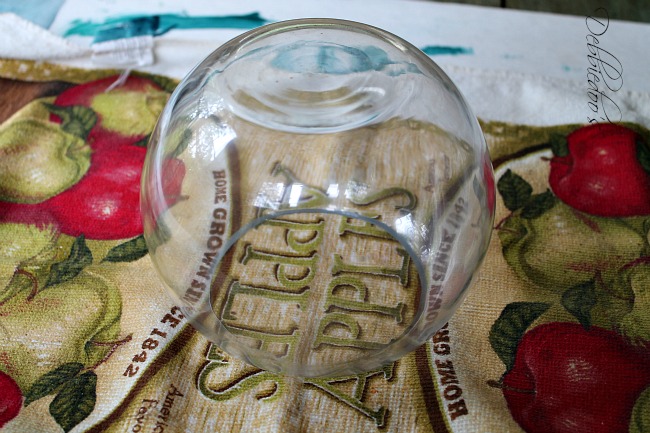
My friend gave me a bunch of vases she had that she does not use anymore.
She knows I am on an experiment run and why go out and buy them?
So here is a cute little round, almost fish bowl type of vase.
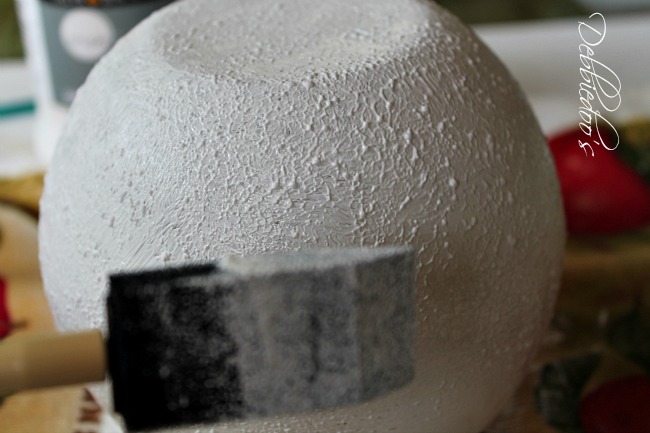
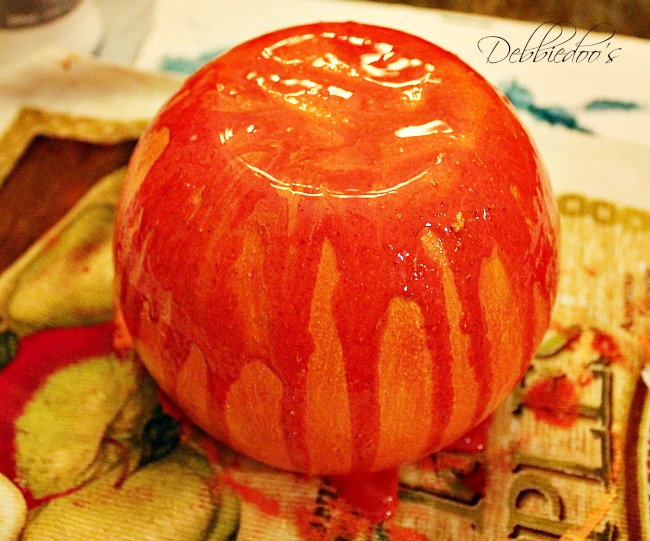
I got out my gesso and started painting on the glass.
You remember my last Rit dye gesso vase?
It was really cool, looked like a pair of denim jeans on a vase.
So after I painted the vase with gesso, let it dry,
I took my sunshine orange rit dye
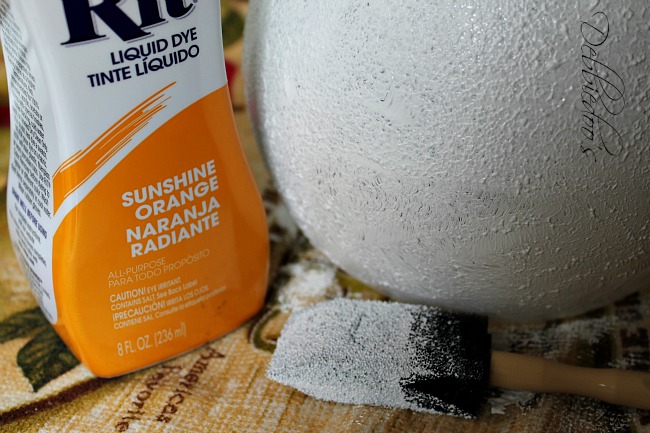
And painted on the vase.
Let it just about dry and took the remainder of the rit dye
and simply poured it on top letting it dry naturally.
Seriously I am having so much fun experimenting and trying different ways to use Rit dye
on glass.
I have said it before, you can make it your own.
Get creative and play.
No two are ever the same.
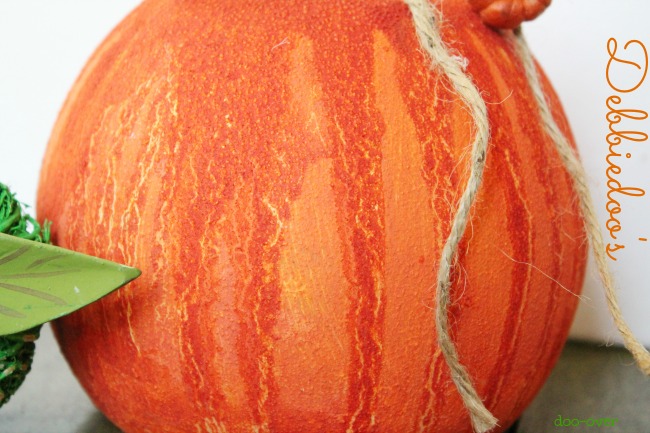
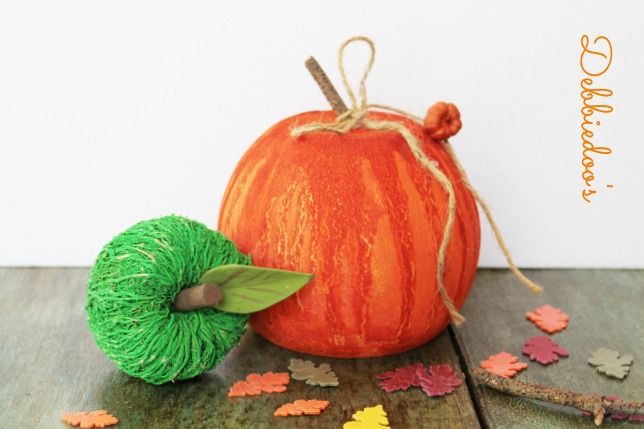
As you can see the texture and how it dries.
Really neat!
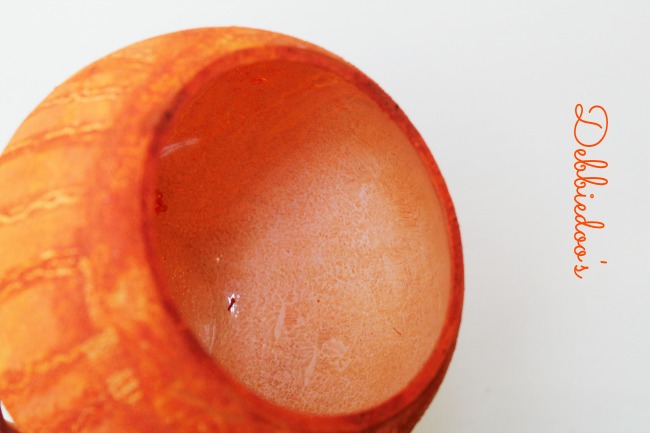
This is the what the bottom and inside look like.
I will add a flickering candle under it.
Thanks for stopping over today.
Oh and I used a stick from the yard for the stem. You could also use a cinnamon stick if you like.
Just hot glue it.
You can follow me anytime, anyplace.
Hope to see you again.
XO
Thank you so much for visiting with me today.
If you are new here, welcome! I am also very excited to share my new stencil line with you.

[envira-gallery id=”32693″]
Thank you for your visit today!
To view my stencil gallery projects you may check out my Debcreates.com page.
I share all things, thrifty home decor, crafts and a recipe or two on occasion.
I also have an Etsy shop!

Sign up today and receive a few freebies. 12 months of seasonal printable art.

If you would like to commit to becoming a subscriber, I would love for you to join me.
Check out my DIY gallery of more Rit dye ideas
visit my DIY GALLERY.
 And if you love easy, tasty recipes…I have plenty of those.

I am also a huge Dollar tree fan and do lots of fun crafts per season.
And if you are in the mood to house gawk. Check out my

I LOVE IT!!!
Ok Debbie this one is amazing. What a transformation and what a cute pumpkin. That was a great experiment because this came out great. I love this..
Kris
This one came out great, Debbie! I love it!!! Off to pin!! 🙂 ~~Ang
OMGoodness!!! Girl, you slay me, you really do!!! 😉 That turned out so awesome!
Thanks Donna, that is awesome to say!
That’s amazing!
Wow You have done it Again!! And You have shown us so many ways to use Rit Dye!!
Something of the Past You Have made New Again. I know I will be purchasing some.
Thank You This Came out Incredible
Lisa!!
This would be perfect for a battery operated tea light. I think I might make some for my mantle and light them up! Great Idea, DebbieDoo!
Awesome, so creative….It’s time for Halloween & Fall crafts already, the stores are full of decor too – love this idea, I can see it in a crafting magazine for sure!
Aren’t you clever? I love it! Such a cute idea!
I love this! Terrific idea… love the texture when it’s done. A battery operated tea light would definitely look awesome under it.
I adore all things FALL and pumpkins are top of the list! This is such a cute idea!!! I like the candle inside it idea as well!! Amazing!
Well Debbie … this one is over the top. Just REALLY love it and will make some for Fall decorations. I am sure I can find plenty of those round vases at the Thrift store for 25¢ each.
You are so talented.
Hugs,
Audrey Z. @ Timeless Treasures
what a great craft easy and pretty to boot i love the way it looks and the orand rite dye is the perfect color .Who would have ever thought you could do this work of art with rite dye . 🙂
That turned out so cute! I love both projects! Great job!
Hi Debbie, love your pumpkin, very festive! What was that you put on first?
It is called gesso and it is something artists use to prep their canvas. I tried it on glass and LOVE it.
Your pumpkin looks great Debbie. This morning was feeling like Fall and the sun was shining. It won’t be too long until you are putting out the pumpkins and Fall decor!
Oh my goodness, Debbie! This is one of the cutest pumpkins I’ve seen…LOVE it!
Brilliant!! This little pumpkin is so stinkin cute Debbie 🙂
xo, Tanya
Debbie, I love your pumpkin! Yes, when it dried it crackled and looked real……Take that, tossed off glass vase!
Carol
Too cute Deb! Love it. I like how it looks textured like a real pumpkin!
Hugs,
Debbie
Oh Debbie this is so very cool!!!! I love this and going to save this to try when we are in our new home!!! I don’t really have a place to do this kind of project now but I am making this for sure. Thanks a million girl!!! Can you tell how much I love this and the excitement with all the exclamation mars.
Cynthia
Oh my!!!! So ADORABLE!!! We actually just filmed the Coffee Bean Rooster Craft yesterday, for sew-craftykids.com can’t wait for you to see it!! 🙂
xoxo
Debbie…the pumpkin is too darn cute…you certainly have created the most exciting things with the Rit dye!..just love your projects!
yep, this is pretty cool……I think I just may try this one!
Well, isn’t that pretty darn cute. Very clever Debbie:)
Hi I had to pin this before I commented that it is AWESOME!!!!!!!! Totally cool. The color is so vibrant. Man, this and the coastal vase are tied now. Hmm… not sure which I love more!?
Debbie that is, for real, one of the cutest things ever. LOVE it. Pinning!
xoxo
Well I’ll be dipped in Bandini! Cute!!!
xo Kris
Very cool, Debbie!
It’s not only so darling, it’s also doable. Thanks for the idea & “how-to”, Debbie!
Thank you Rosalyn and nice to see you over here at my blog.
Well I gesso Debbiedoo!! We are going to have to crown you the queen of gesso and Rit dye…dang girlfriend is there anything you can’t do with that stuff?? I love this with Halloween and Thanksgiving coming up…they are really awesome. Thank you for sharing! Hugs ♥
Such a cute pumpkin! I like the idea of a battery tea light underneath! Love your experiments!!
Thanks, now I have to go get some of those tea lights. I have a feeling I may be making some mini pumpkins too!
That is cute! You are coming up with some very unique ideas.
Debbie, Love the pumpkin. You do great work…..Can’t wait to see your next project. I may try this pumpkin… <3
This is my fav Rit dye project.
Wow, this is amazing, Debbie! I love how it turned out! I have gesso and vases, I am definitely putting Rit Dye on my shopping list because I really want to try this! Thanks for all your inspiration.
Debbie 🙂
this is so darn cute – I think the idea of putting a battery light vs tea lite, candle probably is better as well – just need to make sure it’ll be bright enough –
thank you so much – you are so creative
ok that post officially just put me in the fall mood….
Hands down, Debbie this is just too darn cute! I love it! I also like the shape of the glass….. a perfect pumpkin:) It looks so much like a real pumpkin and yet can be used as a candle holder…adorable! Thanks for always coming up with the most innovative ideas! Have a great weekend!Hugs,Poppy
Just found you on Pinterest, and must say this is unique. I love what you’ve done.
Thank you very much! And welcome to my page.
Absolutely adorable!!
I finished the little pumpkins and I think they are adorable! I used corks for the stemsand raffia to spruce it up. Now I just need the flickering lights. I bought some at Michaels but they are colored loghts, will be exchanging them today. Thank you for your ideas. I tried to upload a photo to your facebook but it failed.
Ohh please send me a pic, yay, I am excited to see them. [email protected]
Okay, I don’t know how, but I totally missed this the first time around — sorry! That is so cute and “my oh my” so clever! I’m now on the hunt through my stash for things to Gesso and Ritz — The Man and the cat better watch out!
Oh, so cute AND such a great technique that could be used on countless other objects. This has such a great texture and patina. Hey, when you say you are putting a light under it, are you going to put a battery operated one? Thanks for sharing your ideas with us.
Genius!