
Burlap is brown or tan, but you can color it to make your crafting projects more exciting and breathe life into your home. Whether you’re crafting vibrant table runners, eye-catching tote bags, or unique home décor, colored burlap will surely make your projects stand out.
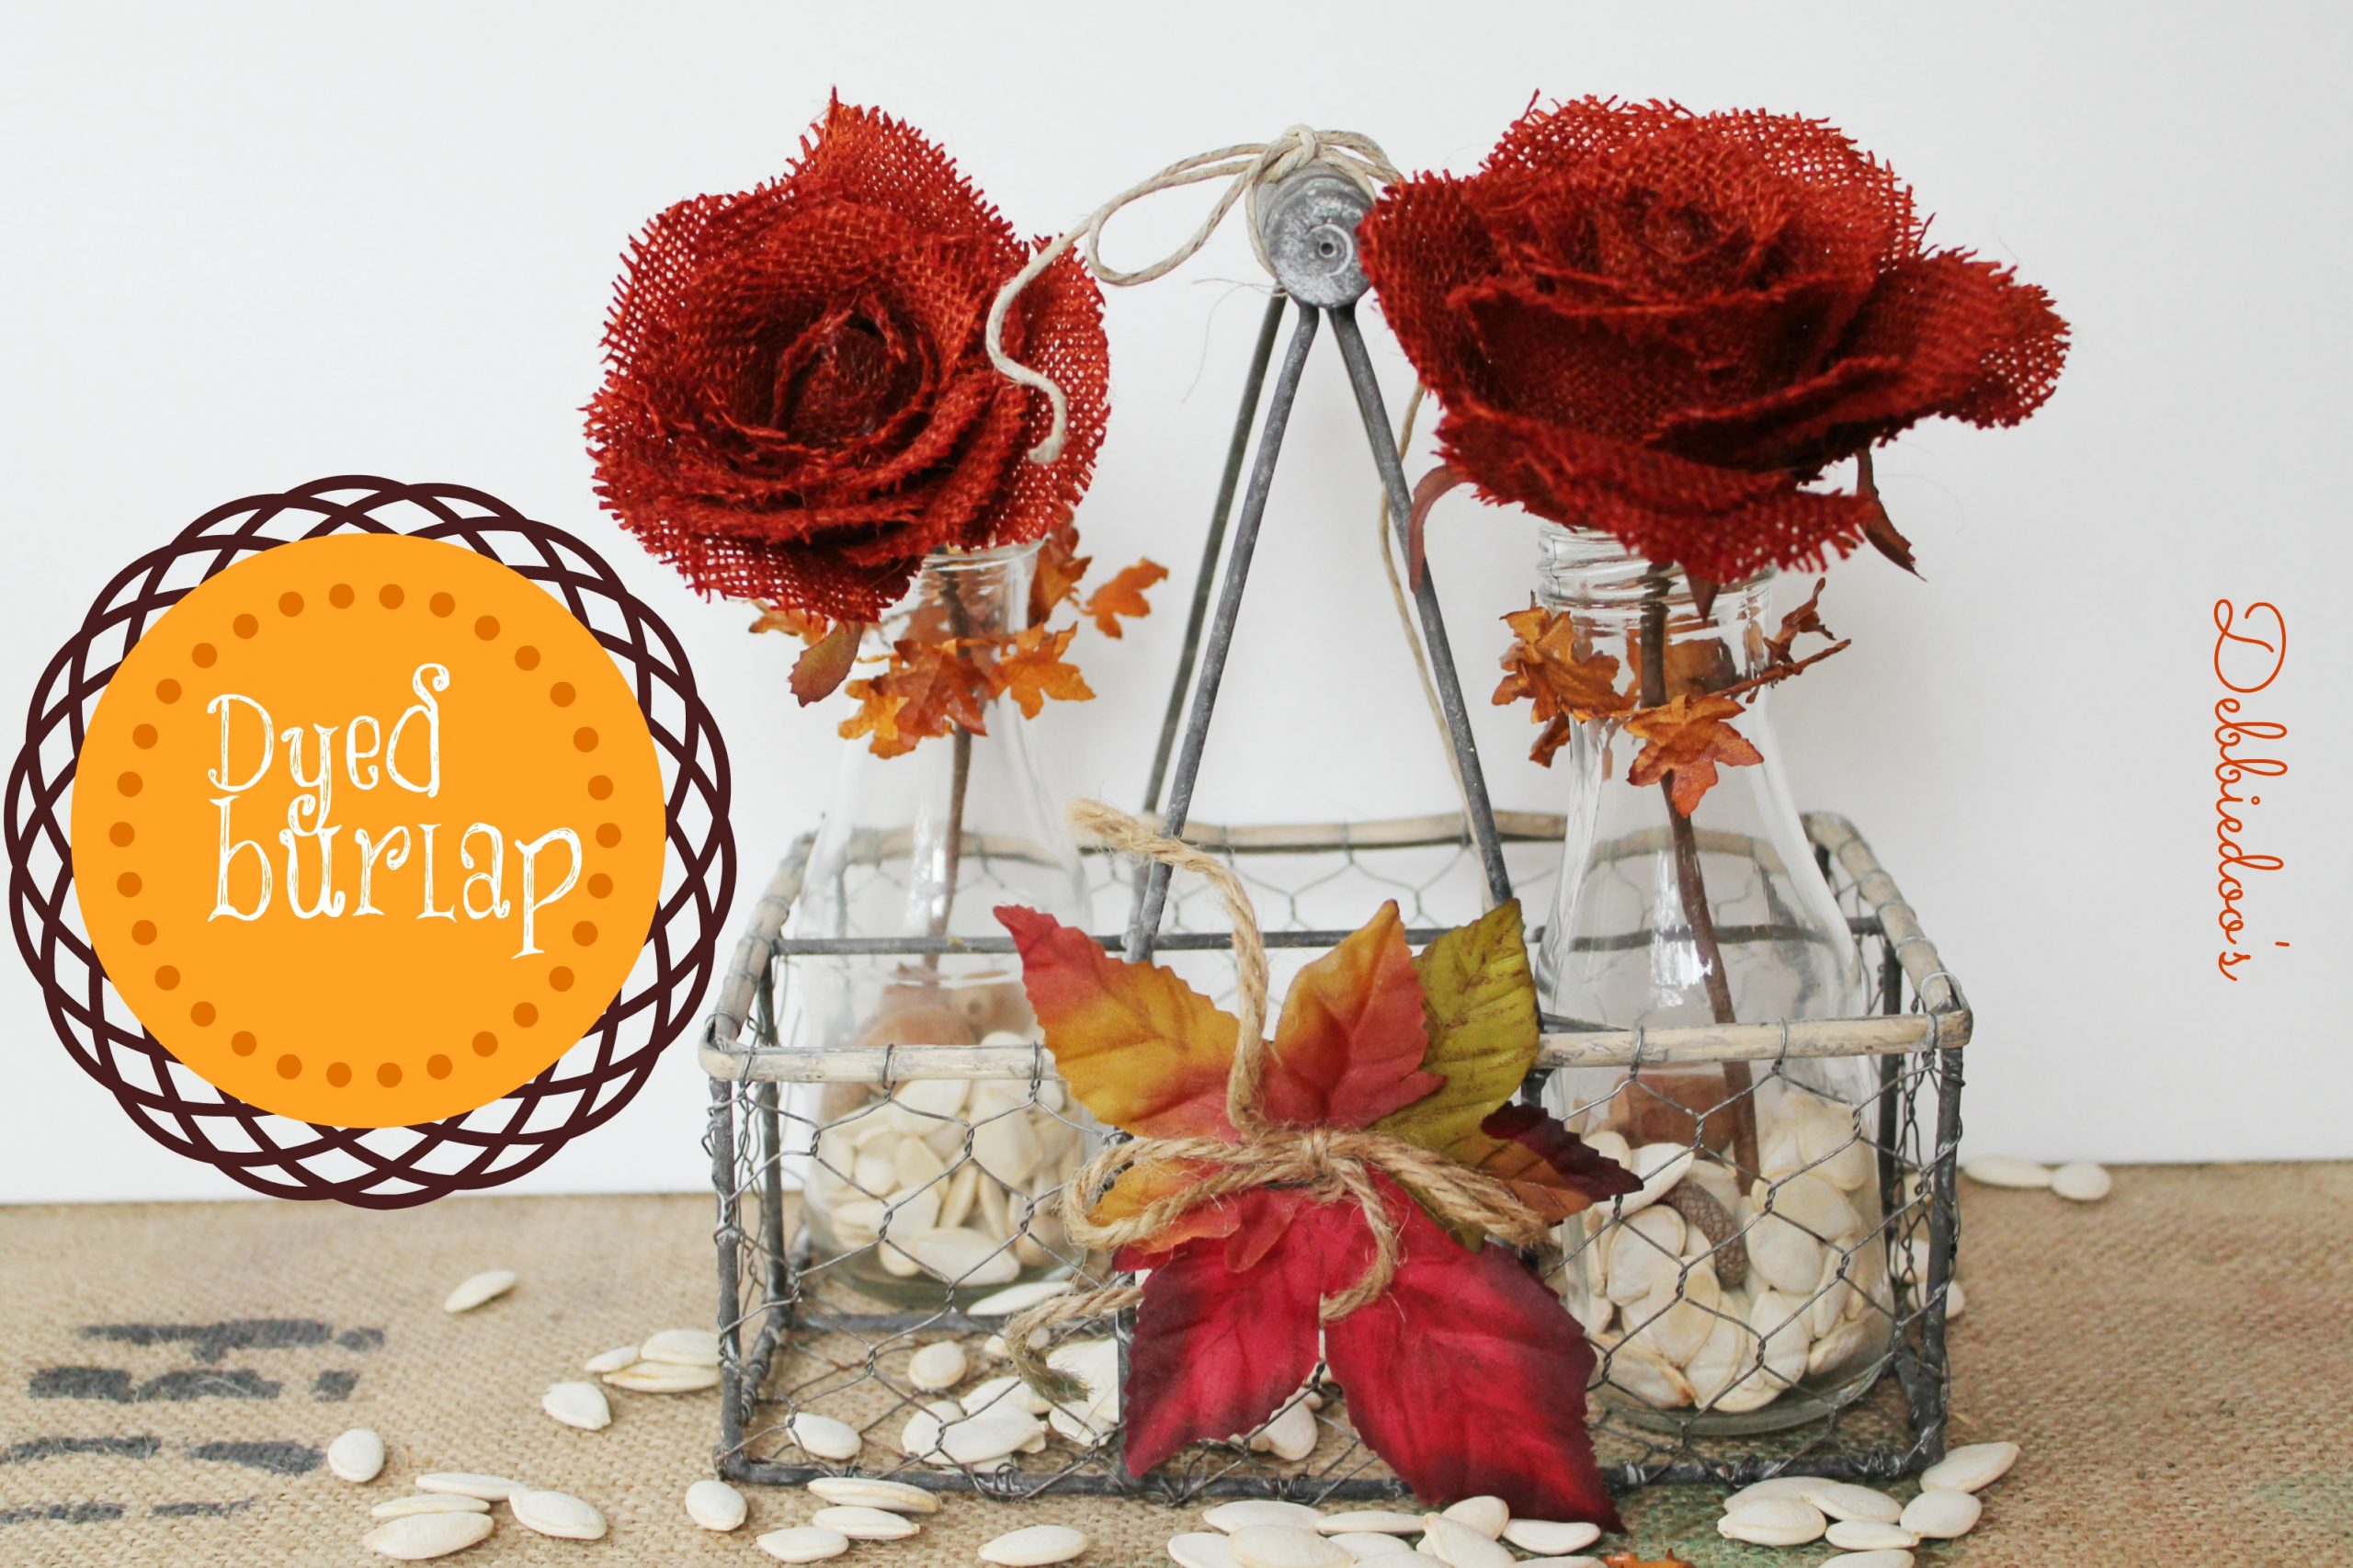
Burlap is a versatile and eco-friendly material commonly used for home decor, craft, and DIY projects. With its rustic charm and natural texture, burlap adds a unique touch to any project. One way to further enhance the appeal of burlap is by dyeing it, and Rit Dye is a popular choice for this purpose.
Rit Dye is a brand of fabric dye that has been around since the early 20th century. It is used to color textiles, clothes, and other materials made from natural fibers such as cotton, linen, silk, and wool, as well as some synthetic fibers like nylon and rayon. Rit Dye is available in various forms, including liquid, powder, and dye pens, and comes in a wide range of colors. It is popular among DIY enthusiasts and crafters for its ease of use and versatility, enabling them to create custom colors and patterns on fabrics, tie-dye projects, or for refreshing the color of faded garments.
In this article, we provide a step-by-step guide to dyeing burlap with Rit Dye, so you can personalize and transform your colored burlap projects with ease. You will need to gather the required materials, prepare the burlap for dyeing, mix the Rit Dye, dye the burlap fabric, rinse and dry the colored burlap, and consider post-dyeing tips and care instructions.
1. Gather your materials
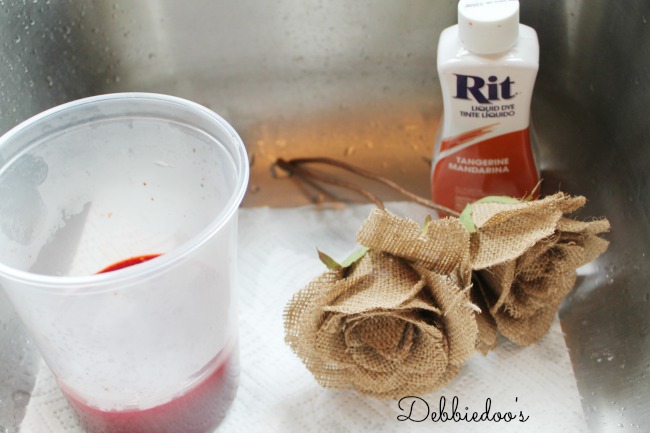
- Burlap fabric. I found burlap roses at Hobby Lobby for $1 each
- Rit Dye (liquid or powder). I used tangerine
- Large plastic tub or bucket
- A stirring utensil, such as a wooden spoon
- Measuring cups and spoons
- Gloves and protective clothing
- Old towels or newspapers for surface protection
- Plastic wrap (optional, for tie-dye effects)
- Rubber bands (optional, for tie-dye effects)
2. Prepare the burlap for dyeing
- Measure and cut the burlap to the desired size, keeping in mind that it may shrink slightly during the dyeing process.
- Wash the burlap in cold water to remove any dirt, dust, or sizing agents. Pre-soak the burlap in warm water for 30 minutes to help it absorb the dye evenly.
- To prevent fraying edges, consider sewing a simple zigzag stitch around the edges or using a fabric sealant.
3. Mix the Rit Dye
- Consult the dye package for the recommended water-to-dye ratio. Generally, one bottle of liquid dye or one box of powder dye is sufficient for 1-2 pounds of fabric.
- Mix the dye with hot water (140°F or hotter) in your large plastic tub or bucket. Stir the dye solution thoroughly to ensure even color distribution.
- For a more intense color, increase the dye concentration by adding more dye or reducing the water volume.
4. Dye the burlap fabric
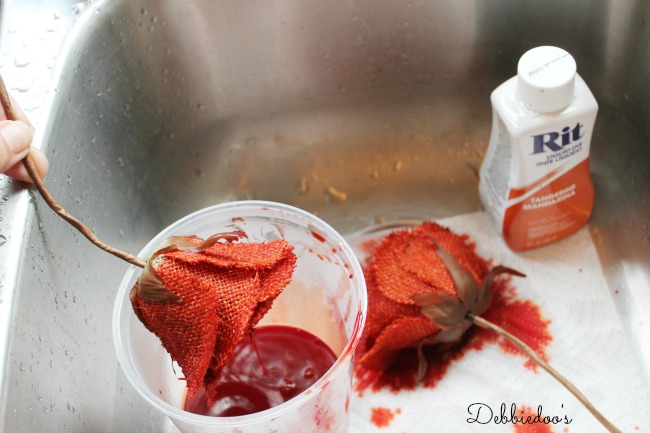
- Immerse the pre-soaked burlap in the dye bath, ensuring it is fully submerged.
- Stir the burlap continuously for the first 10 minutes and then occasionally for another 20-40 minutes, depending on the desired color depth.
- To create unique patterns, such as tie-dye or ombre, use rubber bands or plastic wrap to manipulate the fabric before dyeing.
5. Rinse and dry the colored burlap
- Remove the burlap from the dye bath and gently squeeze out excess dye.
- Rinse the burlap under cold water until the water runs clear, removing any unabsorbed dye.
- Gently wring out the burlap to remove excess water, carefully not to twist the fabric too tightly.
- Lay the burlap flat on a clean surface, away from direct sunlight, to air-dry.
6. Consider post-dyeing tips and care instructions
- Iron the dyed burlap on a low heat setting to achieve a smooth finish, placing a thin cloth between the iron and the fabric to prevent scorching.
- For future washing, use cold water and mild detergent, and either air-dry or tumble-dry on low heat to maintain the vibrancy of the dyed burlap. Store the burlap in a cool, dry place away from direct sunlight to prevent fading.
- To avoid color bleeding, wash the dyed burlap separately from other fabrics, especially during the first few washes.
Check out more Rit Dye projects.
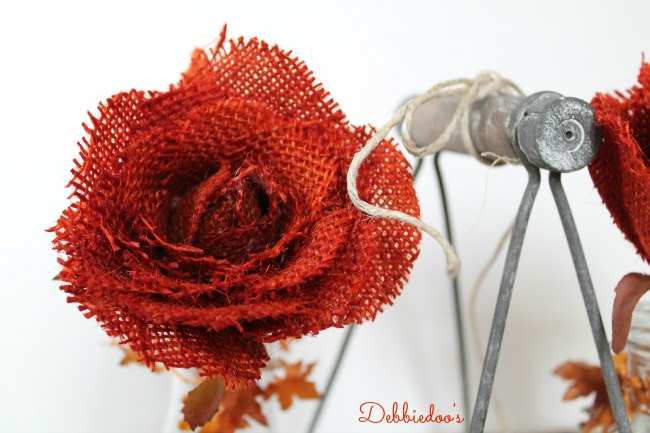
Those burlap flowers will be perfect for fall!
I love your roses! Such a fabulous color. I am glad to know burlap dyes easily!
Very easy! I can’t wait to go back for more:)
SO, if I needed to dye say 4 yards, just put hot water in a pail and swish it around for 10 minutes? Love your flowers!
I would say that would do it. You just have to be sure you get the entire fabric covered in Rit. I would go on you tube as well and see how they do that much.
Wow. Those are SO vibrant and the color took so well, really rich coverage. So fun for Fall!
Very cute Debbie and looks like an easy project to give ordinary tan burlap a new colorful look:)
Super cute Debbie! Great job!
Debbie just when I think you cannot do anything more clever you come up with something like these roses. They are adorable and I love the color. You are the queen of Ritz Dye lately. Love this idea. I saw those roses at Hobby Lobby and loved them in the burlap color too. Thanks for sharing.
Kris
Debbie, these came out awesome!! You are the RIT dye queen!!! I have ot get some of these. I have to wait until Monday now, because they are closed on Sunday. Rats!!
Hugs,
Debbie too
They’re the perfect color for fall…they look great!
Ha…I needed you at my house last night, Mackenzie had a pool party and wanted to make tie-dye shirts with the girls. Thank heavens they knew what they were doing because I was lost LOL!! You and I could have sat back with a Seagrams and watched:)
I saw those burlap flowers at HL and this little trick is the perfect way to get the color you want. Fast and fun is my kind of craft!
Debbie what a perfect fall color!!
These look fabulous, Debbie! I have to make a run to Hobby Lobby and see if they have those….$1 a piece??!! Love the color and the fall vignettes!!! Have a great day!!~~Angela
well i will be going to hl monday to get me a bunch cant wait to se what you come up with next 🙂
Debbie this just too cute!!!
Cynthia
Debbie this is such a cute Fall idea!!
xo, Tanya
Awesome! Love this and how easy to have so many different colors.
I love those burlap roses but they really pop when you dyed them! Looks easy! Can’t wait for the fall vignettes you’ll create with them!
Love these Deb. They turned out so pretty!
I love this!! It would look really awesome to dye some burlap for your burlap rag wreath tutorial (nice fall colors) or the kitchen wreath tutorial you recently had on your blog. Thank you “Rit Queen” for sharing this easy to follow tutorial.
I thought about dying the burlap rag wreath, however it would be too hard to take it all apart and start over again. I will dye more burlap in the future for sure!
This is really cute!
Lol glad to hear it isn’t Rit dye in your hair! The roses look awesome, perfect for fall. They are so cute!
Debbie 🙂
Love Love Love, Go buy a bunch more You could sell, all different colors!! LISA
What do you think about using spray bottle to dye larger pieces of burlap? Love your site <3
I did it…I was feeling ultra brave and it worked beautifully, no overspray (my concern) we shall see how it dries 🙂
So happy! It will dry well.
Yes I believe so. Just watch for over spray.
That rustic red RIT color is so brilliant & rich! Love it on the burlap flowers! I have burlap yardage everywhere … and can’t wait to try any number of colors for Halloween, Thanksgiving, & Christmas ~ look out!
I love this! Will have to try it. One question tho…does it have to be hot water?
Did the flowers come with a stem or did you attach them yourself?
The flowers came with the stem:)
Now that you’ve had these roses for a little while, did you notice any of the dye rubbing off? I’ve never used Rit on burlap and I was curious as to the color-fastness.
No not at all. I don’t have them in direct sunlight. They are still just as vibrant as the first day.
I’m thoroughly enjoying myself with all of your fab tips, DIYs, just the whole package! I have a question – how do I go about dying burlap that’s the size of about 3′ wide X about 6′ long? I’m wanting to make window treatments from the burlap and don’t care for it in its natural state. Would I do it in the bathtub? Rinse, leave in the tub so most of the water can drain away and then hang on the clothes line to dry?
Followed by cleaning the tub with bleach.
Thanks Debbie – I look forward to your reply,
Margaret
Hi Margaret, I would say do it in the kitchen sink preferably and let it soak for a bit. It does not take long for the dye to soak in. I think it would be easier clean up as well. Just be sure, one to have gloves on and two to prep the around the sink with some plastic garbage bags. Just make sure also you don’t splatter it somewhere. Good luck!
I need navy blue for corsages, would it run or transfer
Into clothing do you think?
yes I do think so