
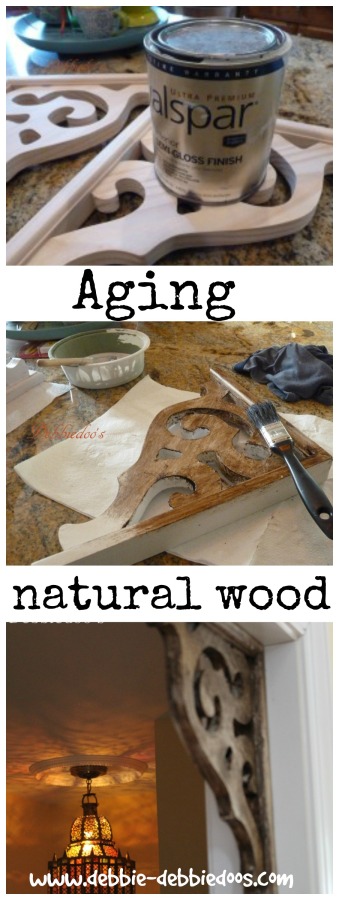
How to age and distress natural wood.
Ok, so now I am an expert. What, you didn’t know that??
I will be an expert on all things in the world,
huh, that is what I tell my family, I KNOW everything:)
While browsing {shopping} in Lowe’s hardware one day, I saw these plain wooden decorative (corbels)
We have all seen them before and they are used several different accent ways.
I picked up two and threw in my cart.
They were only $10.00 each.

I had no clue what I was going to do with them. My first thought was to use them in the kitchen under my island. That didn’t work out.
oh well, now what?
I decided to paint them white at first. I used Valspar doors and trim paint.

Then I decided the white was too plain so I got out some dark wax.
I looked around the house as to where exactly I could now put them up.

I found the perfect place leading into our hallway.
It really was quite that simple of a process.
FIRST:
Paint white, let dry.
Use dark wax of choice, brushed on, and I wiped as I went.
Let dry
Age and distressed using sand paper..grit of your choice. I used a very coarse one so the white would peek through.
*********
It’s always a good day when your husband says, “hey that looks good’!
Gee thanks Mike, glad you approve!

Funny story with the lighting. We found this piece at a local antique store for $10.00.
SCORE!
The other one, we found in South Beach, Florida, and that was our first one that we had purchased to compliment the Spanish retablo.

History of the Spanish Retablo
You may want to read about the piece.
Thanks for stopping over today. If you are not a regular, I sure would love to have you come back again.
XO
I agree with Mike..they sure look great!! You found the perfect spot for them too!! They all compliments each other! It is your year, baby!! 🙂
LOVE those Debbie! They turned out perfect and super super easy!
Those look good and you do have some unique lights.
They do look good! I love the lights too.
Debbie,
These really make a great statement…Mike has a good eye:) You should hop over and share them at my NTT party.
Blessings,
Linda
Those look great Debbie!! I like where you placed them.
Debbie,
They found the perfect home!!! I have to agree with the hubby too they do look good!!!
Kris
Those look great Debbie! How funny, I have 2 metal ones that I’m debating whether to leave as is or paint white…I’m veering toward leaving them as is. I saw this thing Pinterest (haha, story of my life!) where you can age new wood by rubbing apple cider vinegar on it…I’m too scared to try it though!
Looking good Debbie, love there now spot!
That looks so pretty and fits in with your decor so nicely! Another well done project!
Happy New Year, Debbie Dear! Oh, you’re just the best! Your little brackets look fantastic and I love where you hung them. You didn’t have to tell me. I already knew you knew everything! 🙂
Thanks for popping in to see me.
be a sweetie,
Shelia 😉
Perfect for your decor! You did a great job on these!
I love that you used them in the doorway, reminds me of an old victorian! Off to Pin!
Those are gorgeous and go so well with the decor of your home. I just love them and the lighting is beautiful as well.
They look great, Debbie. Nice deal on the lighting, btw.
those turned out reall good perfect place for them too great idea:)
Looks awesome Debbie! The finish is perfect for your space.
You are the expert!! Those would look so cute in my house!
Carol
Love this little detail Debbie! You are amazing!
xo Kris
You did amazing,these look fantastic,looks great with your decor.
Gurl how do you find the time to do “all” you do.
btw how did you attach?
~Jo @ LoblollyLane
Those look great, Debbie! I really like that look, but every opening in our home is arched, so nary a place to put any.
those turned out perfect! what a great deal on the light!!
Very nice, Deb…are they your granite counter tops you were working on? NOT!…photo shoot, right?
Great job as usual Debbie!!…you certainly found the perfect place for it…and love the light!!!
Debbie i tried this exact technique on some old antique windows & cant seem to get the walnut wax to dry?
Any suggestions?
Hi Rita, I just emailed you but I will also respond here. I noted I wiped the wax in as I went a long. Your paint needs to be completely dried before you apply the wax. It will dry eventually, it has to:)