
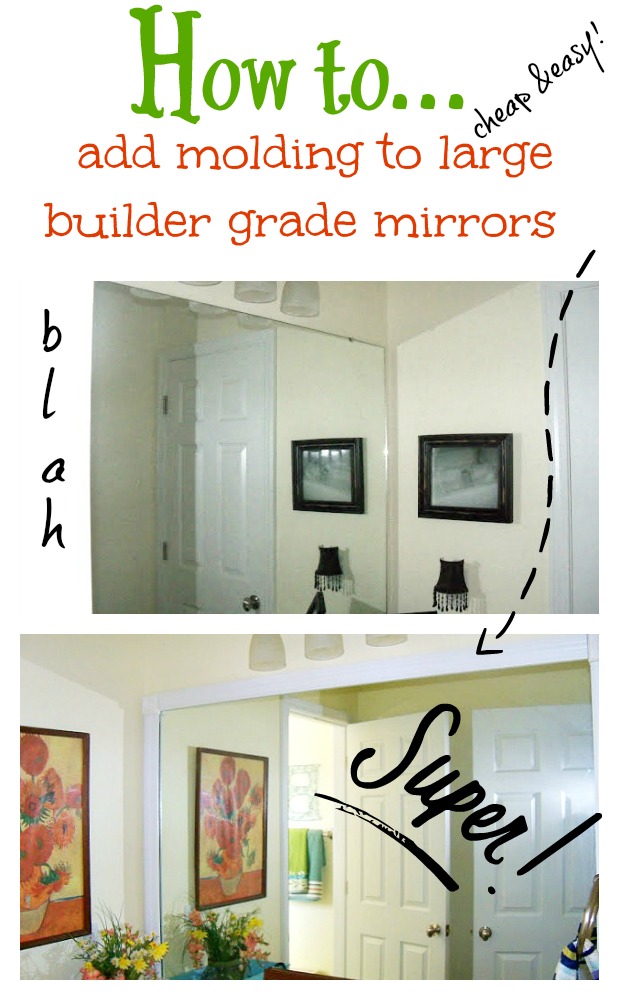
How to add molding around your bathroom builder grade mirrors.
One thing I hate about some of the newer bathrooms is the large builder grade mirrors.
Now…. you can rip them down, which in turn will cause wall damage, then you have to drywall and paint all over again.

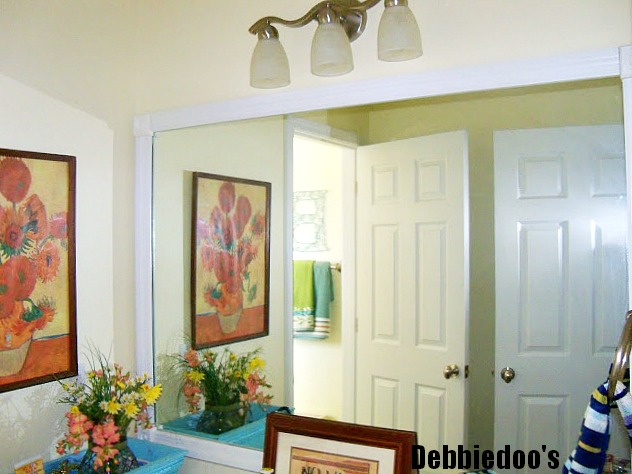
The boys bathroom was the last to have the mirrors not finished with molding.
This weekend hubs was OFF and he actually said he would do this project for me.
YAY! I love it when I do not have to beg. So here is how it went down.
1. First we measured the mirror.
2. Then a trip to Home depot to buy the already primed molding.
We also bought wood appliques to go in each corner…for one thing it just makes cutting easier.
You just do a straight cut.
A quick coat of white spray paint.

We USED two sided tape to adhere the molding around the mirrors. It was industrial type, and AWESOME!
You can find that at the hardware store as well.
We have used the glue in the past, and not an easy quick dry. And you have to stand there forever waiting for it to somewhat stick. So we skipped the glue.
The cost to do both mirrors was $50.00 total there and as you can see these are larger.

I am so happy to be done with builders mirrors. You too can do this project, even you gals on your own, it really was that easy. You can acutally cut the wood at Home depot, or Lowes.
 And if you love easy, tasty recipes…I have plenty of those.

I am also a huge Dollar tree fan and do lots of fun crafts per season.

And if you are in the mood to house gawk. Check out my

Debbie, did you bathroom mirrors have clips etc…if I follow your protocol (which is awesome) I will have to “carve out” where clips hold mirrors…
I pretty sure there is glue big time, holding them on. But clips are visible at top and a “channel” metal piece is where it sits close to the tile.
what’s your thoughts and what did you have?
My husband kept the clips on otherwise the mirror would fall off the wall.
Leaving the clips on though will keep the molding from resting on the mirror. I would cut the molding where it meets the clips.
The clips we have are tiny the molding rested perfectly flat on ours.
What is the name of the tape you used?
I believe it was by scotch. It was industrial strength two sided tape.
Hi There,
Old or new post, this is awesome! I have one and the tape is an awesome technique. So I’m assuming you measure the corner pieces and your mirror before buying the molding so you know how to have it cut. Awesome!!!
Yes indeed that is all you do! Good luck, it’s an easy project and very inexpensive.
can’t wait to try this! Awesome idea & directions!