
Hey, hey there! Today I am sharing how to edit your craft projects and make them more pinnable on pinterest.Your delicious bake goods, and delicious recipes you share as well!
OK, let me preface right here and now, I am no expert by no means on the photo editing, so you will only be getting the gist.
However, the gist on photo editing your crafts, small home decor, bake goods and delicious recipes may just about be all you need to get you on the right track.
You probably have already noticed, how many bloggers are totally staging their photos..
more or less they are called beauty shots, I think.
See I know nothing HA!
However, it took me about 6 months to get on craftgawker and for the life of me,
I was stumped.
You see craftgawker, likes super white, crisp, clear
money shots..strictly focusing on your project. In fact, I have never really seen one with a busy background, unless it is blurred out using creative auto mode.
Not to mention, pinterest LOVES those pinnable clear pics as well of your crafts.
sooo, here I go, giving you the simple low down, of how I have been growing on pinterest,
and believe it or not getting my crafts on craftgawker on the first try!
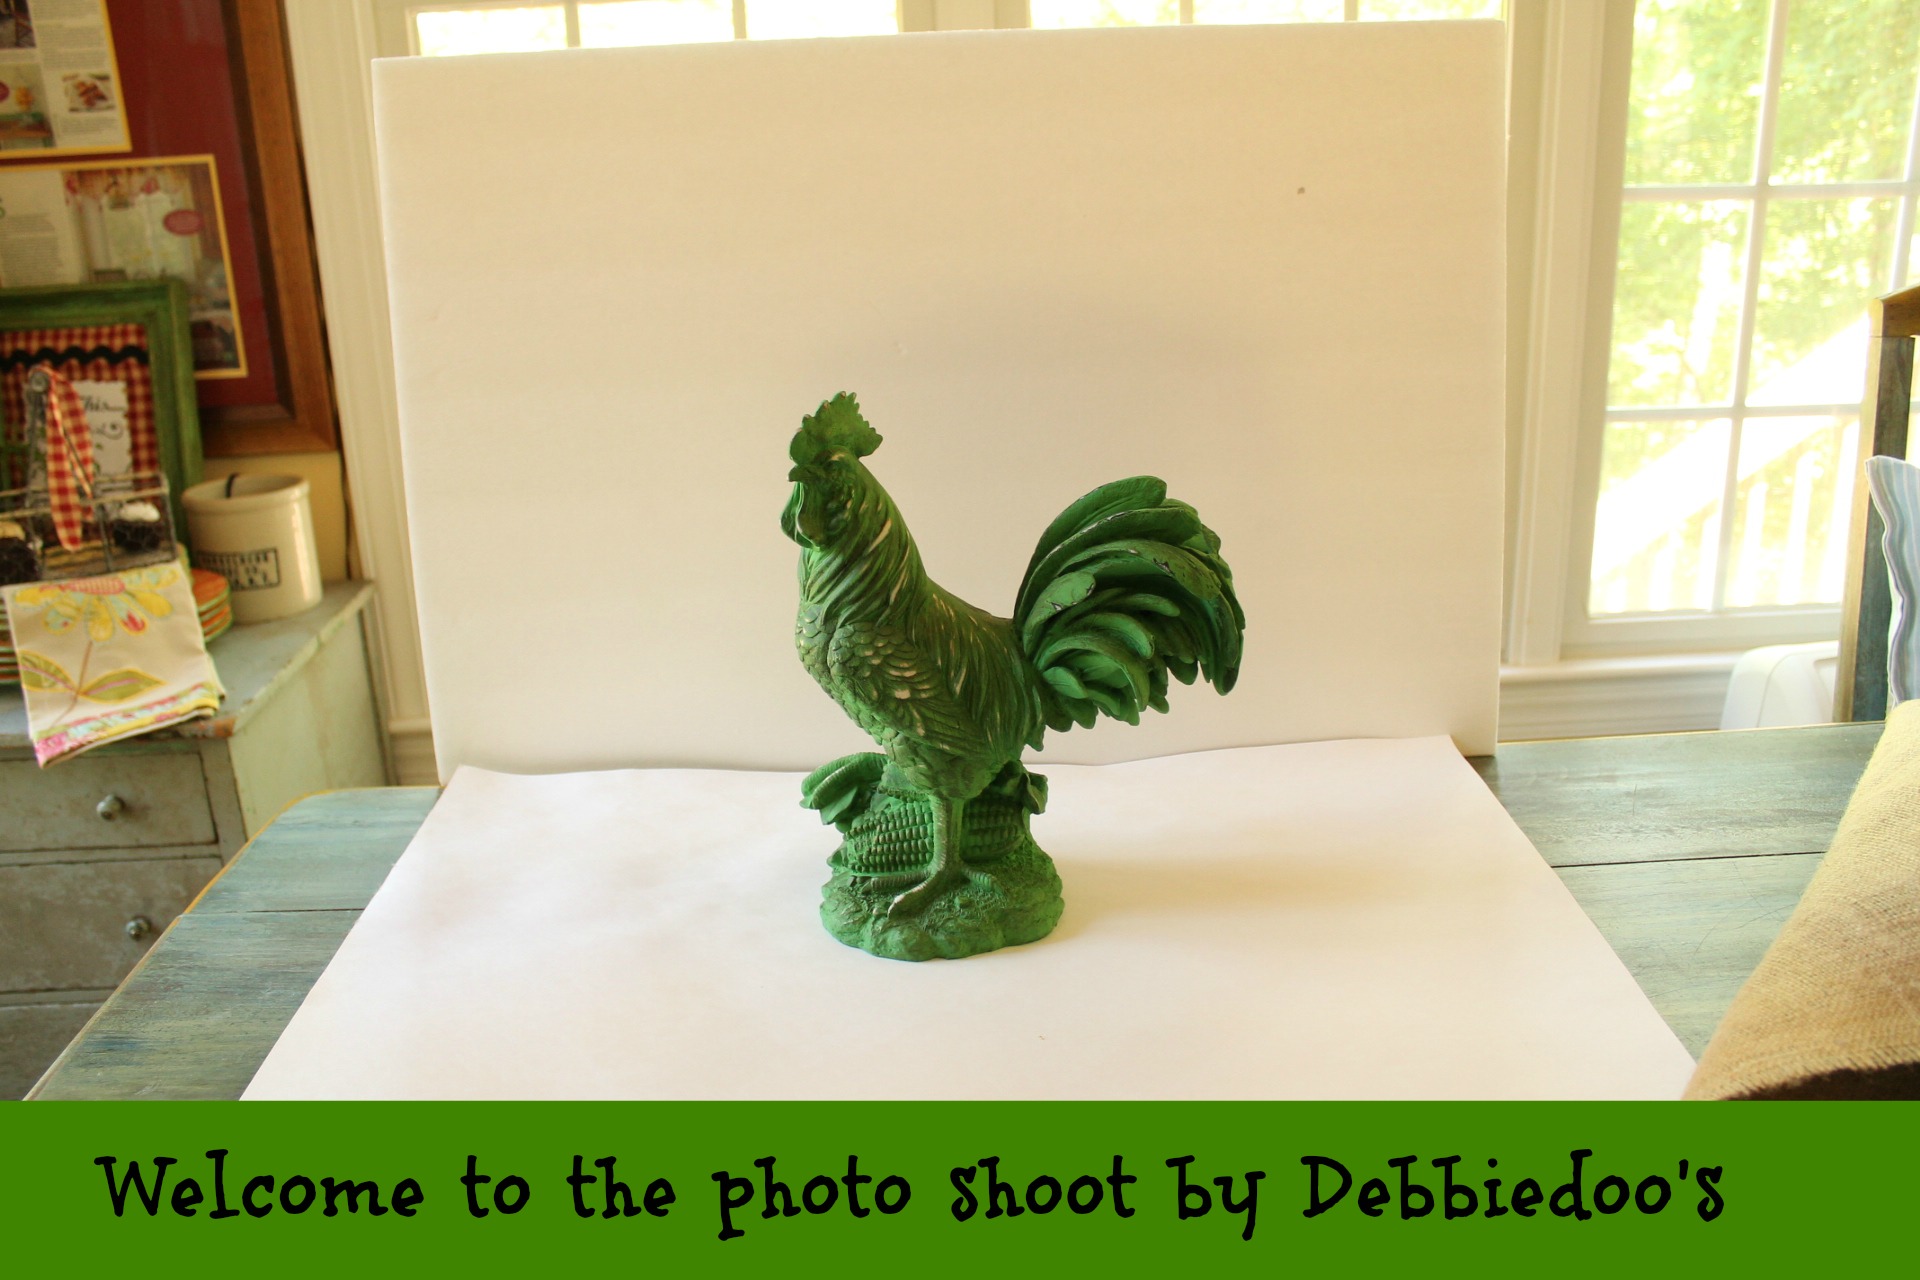
Pretty fancy photo studio wouldn’t you say?
Simple white poster board..I have both the paper {thicker} kind
and thicker more Styrofoam as well.
Now you don’t have to limit yourself to poster board all the time.
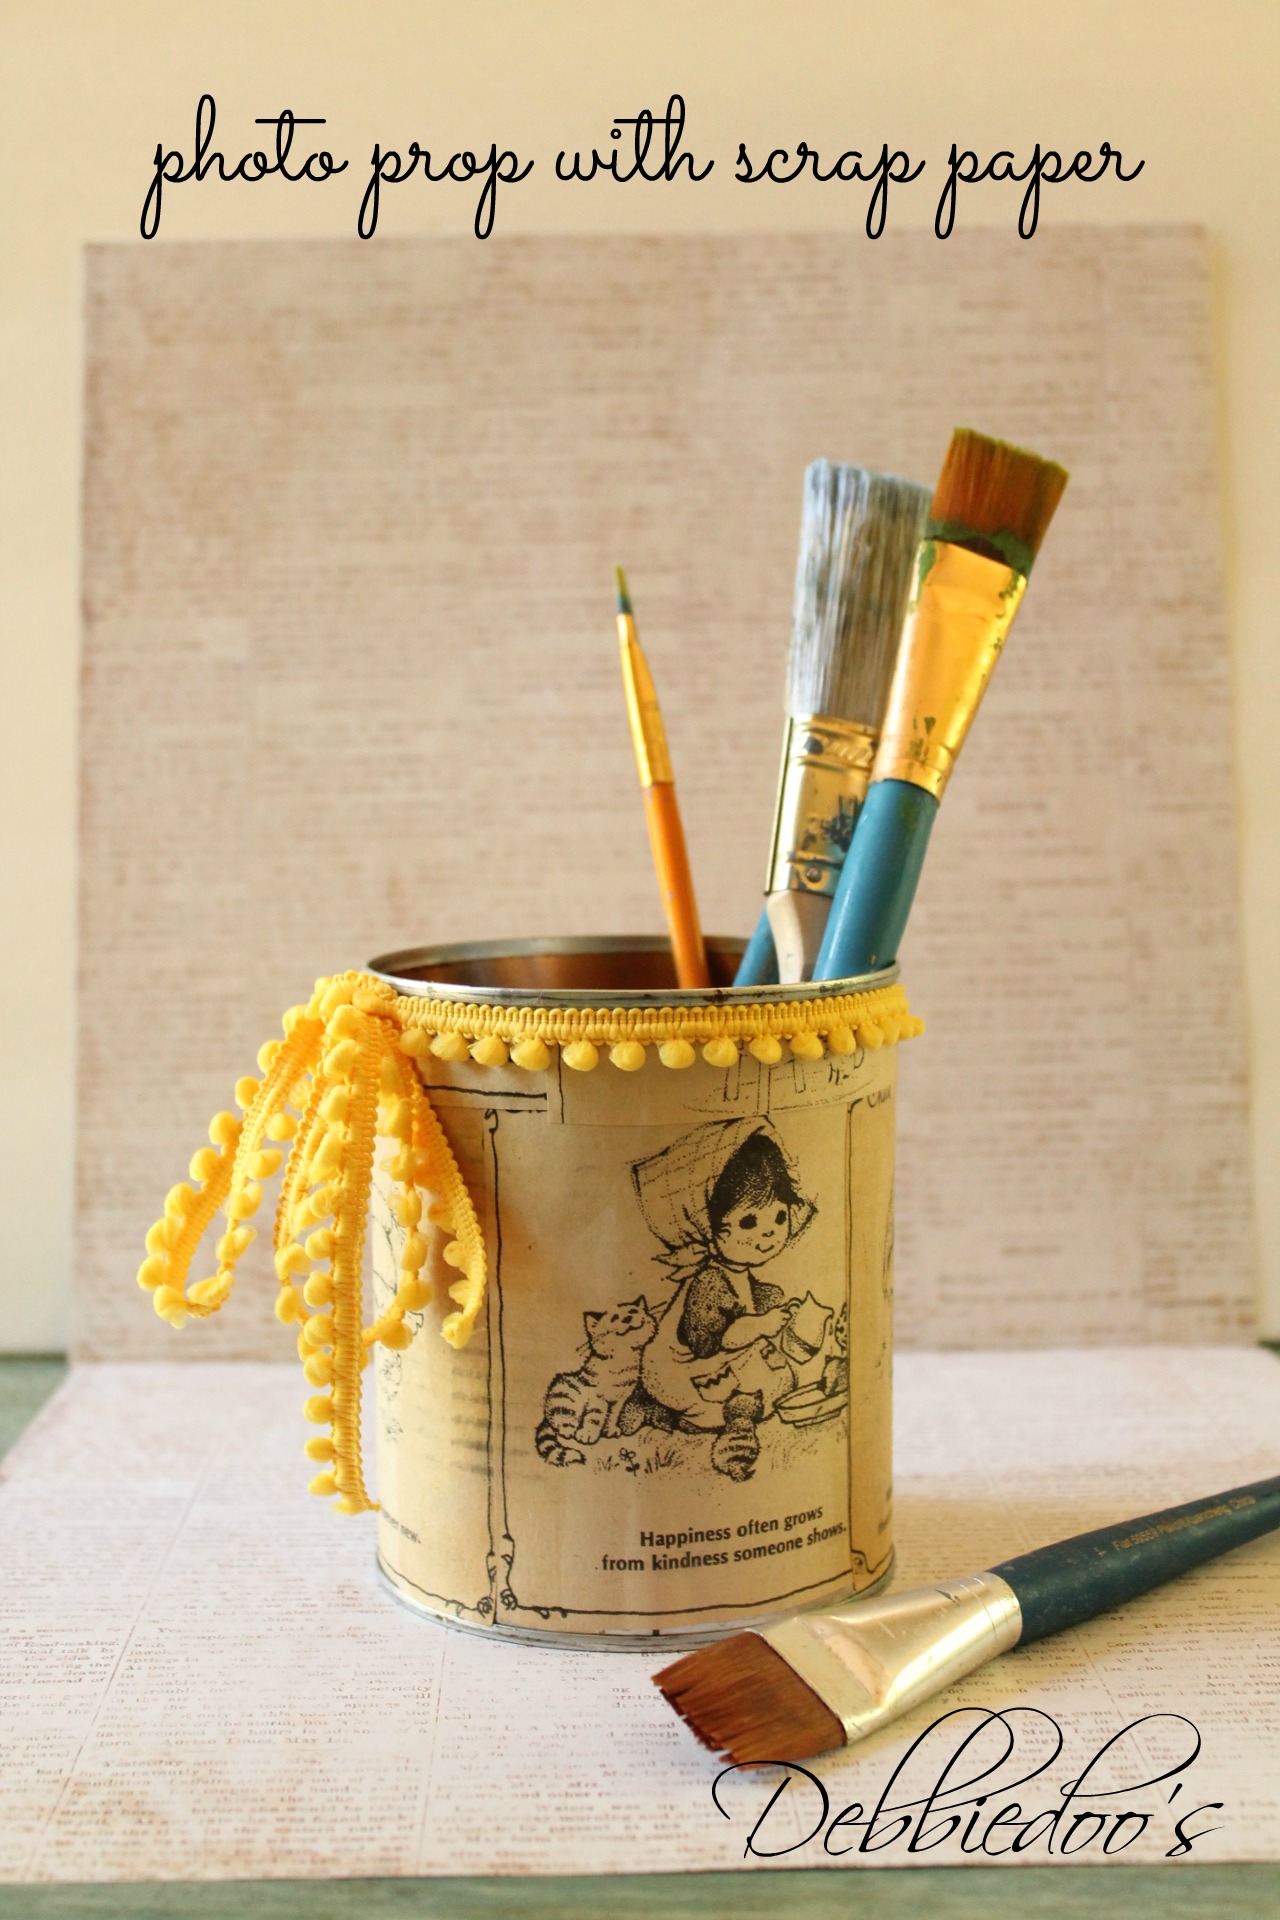
Scrap book paper is wonderful to use, and of course comes in all kinds of colors, textures and patterns.
I use picmonkey for all my editing and fun little graphics I make.
It costs around $4.99 month.
Well worth it indeed.
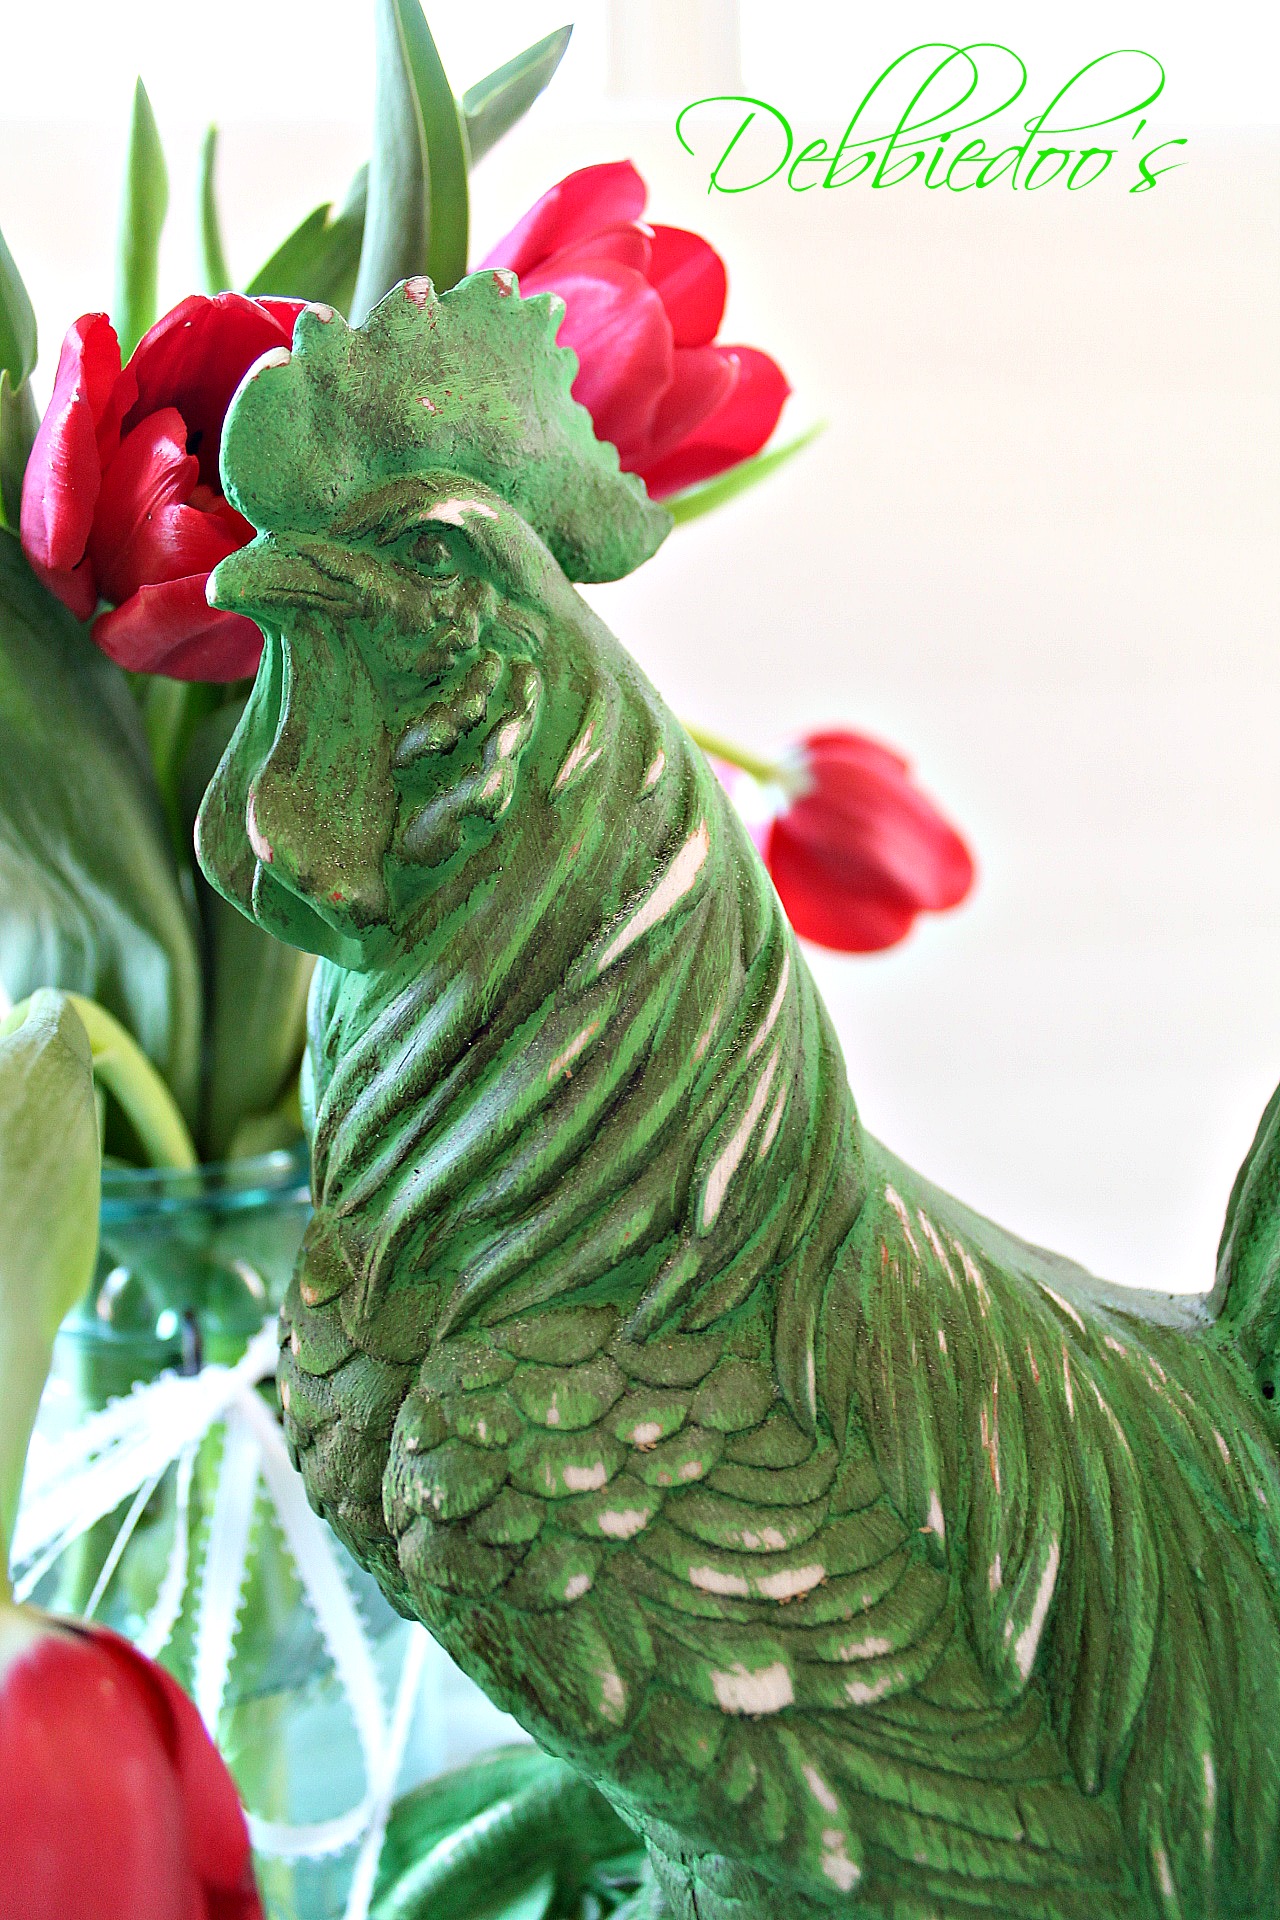
Now let me start with the roo, after I edited him/her
He was a simple updating your home decor project
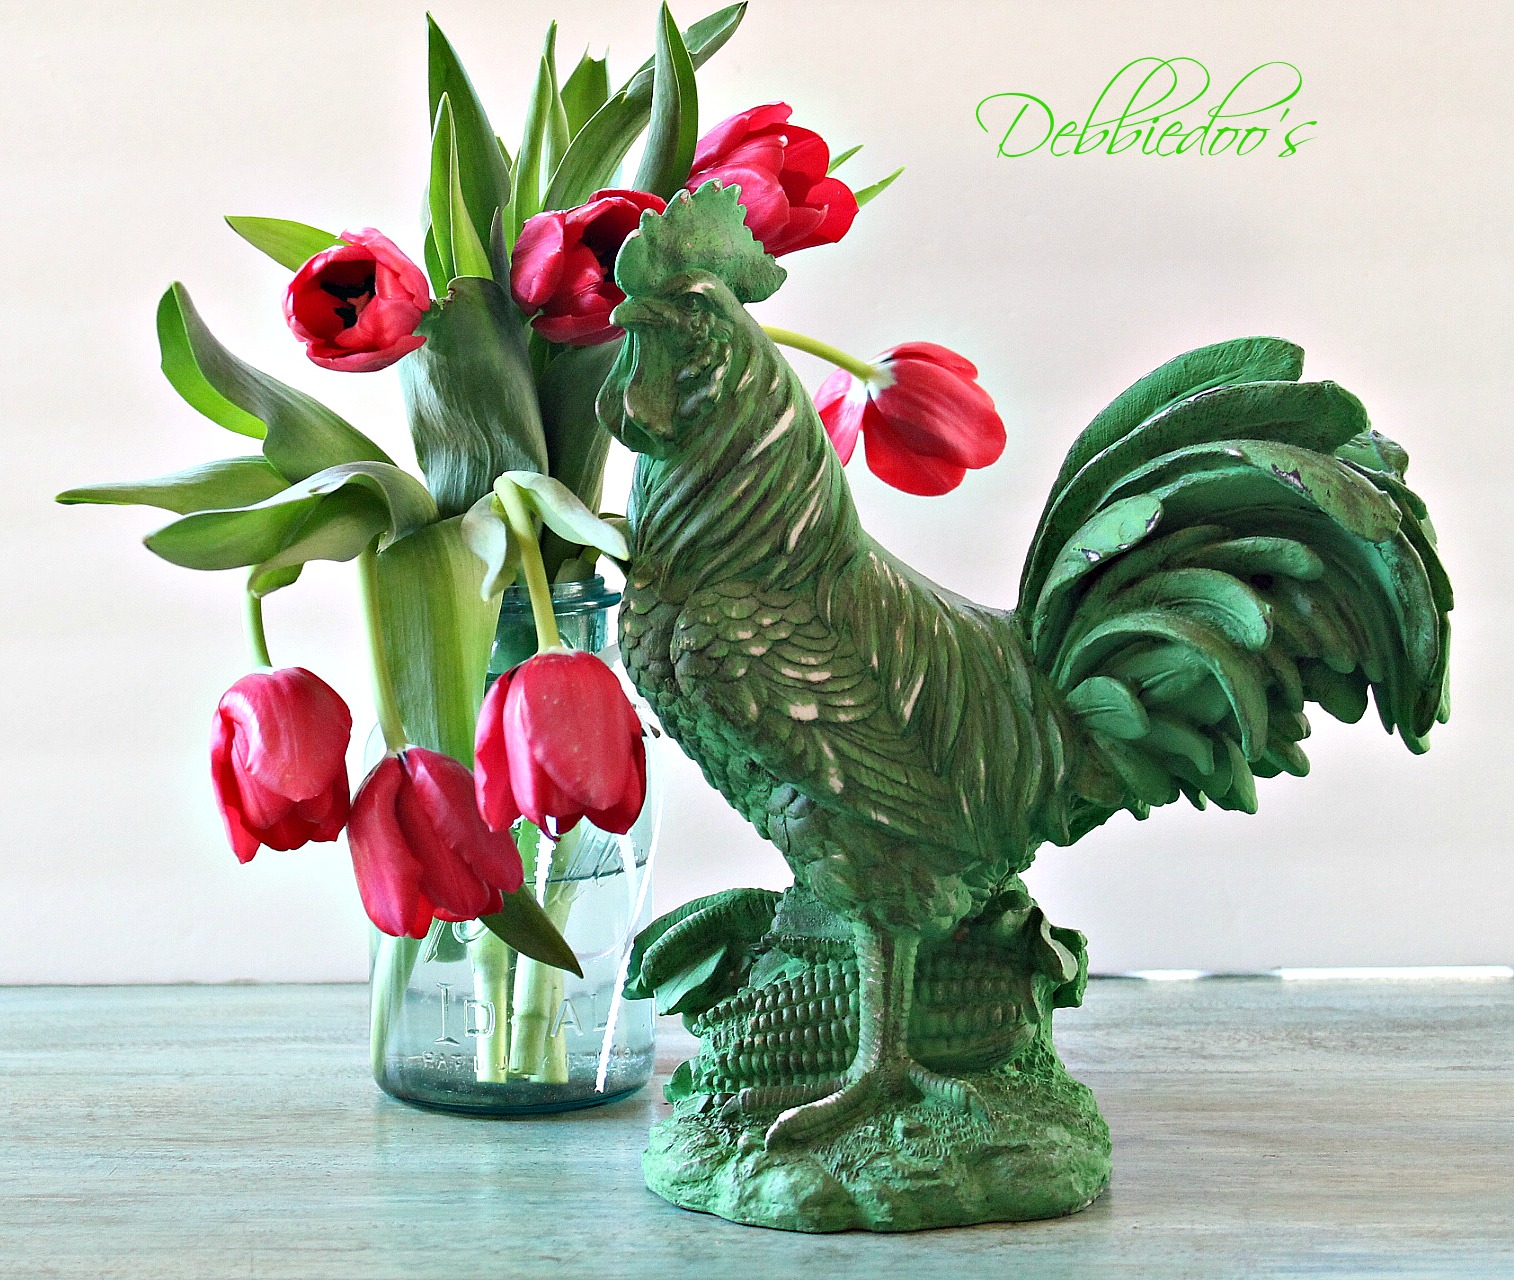
As you can see totally staged.
I used my natural table top on the bottom and placed the poster board behind.
First thing I do, is crop my photo accordingly, only showing the white of the board behind.
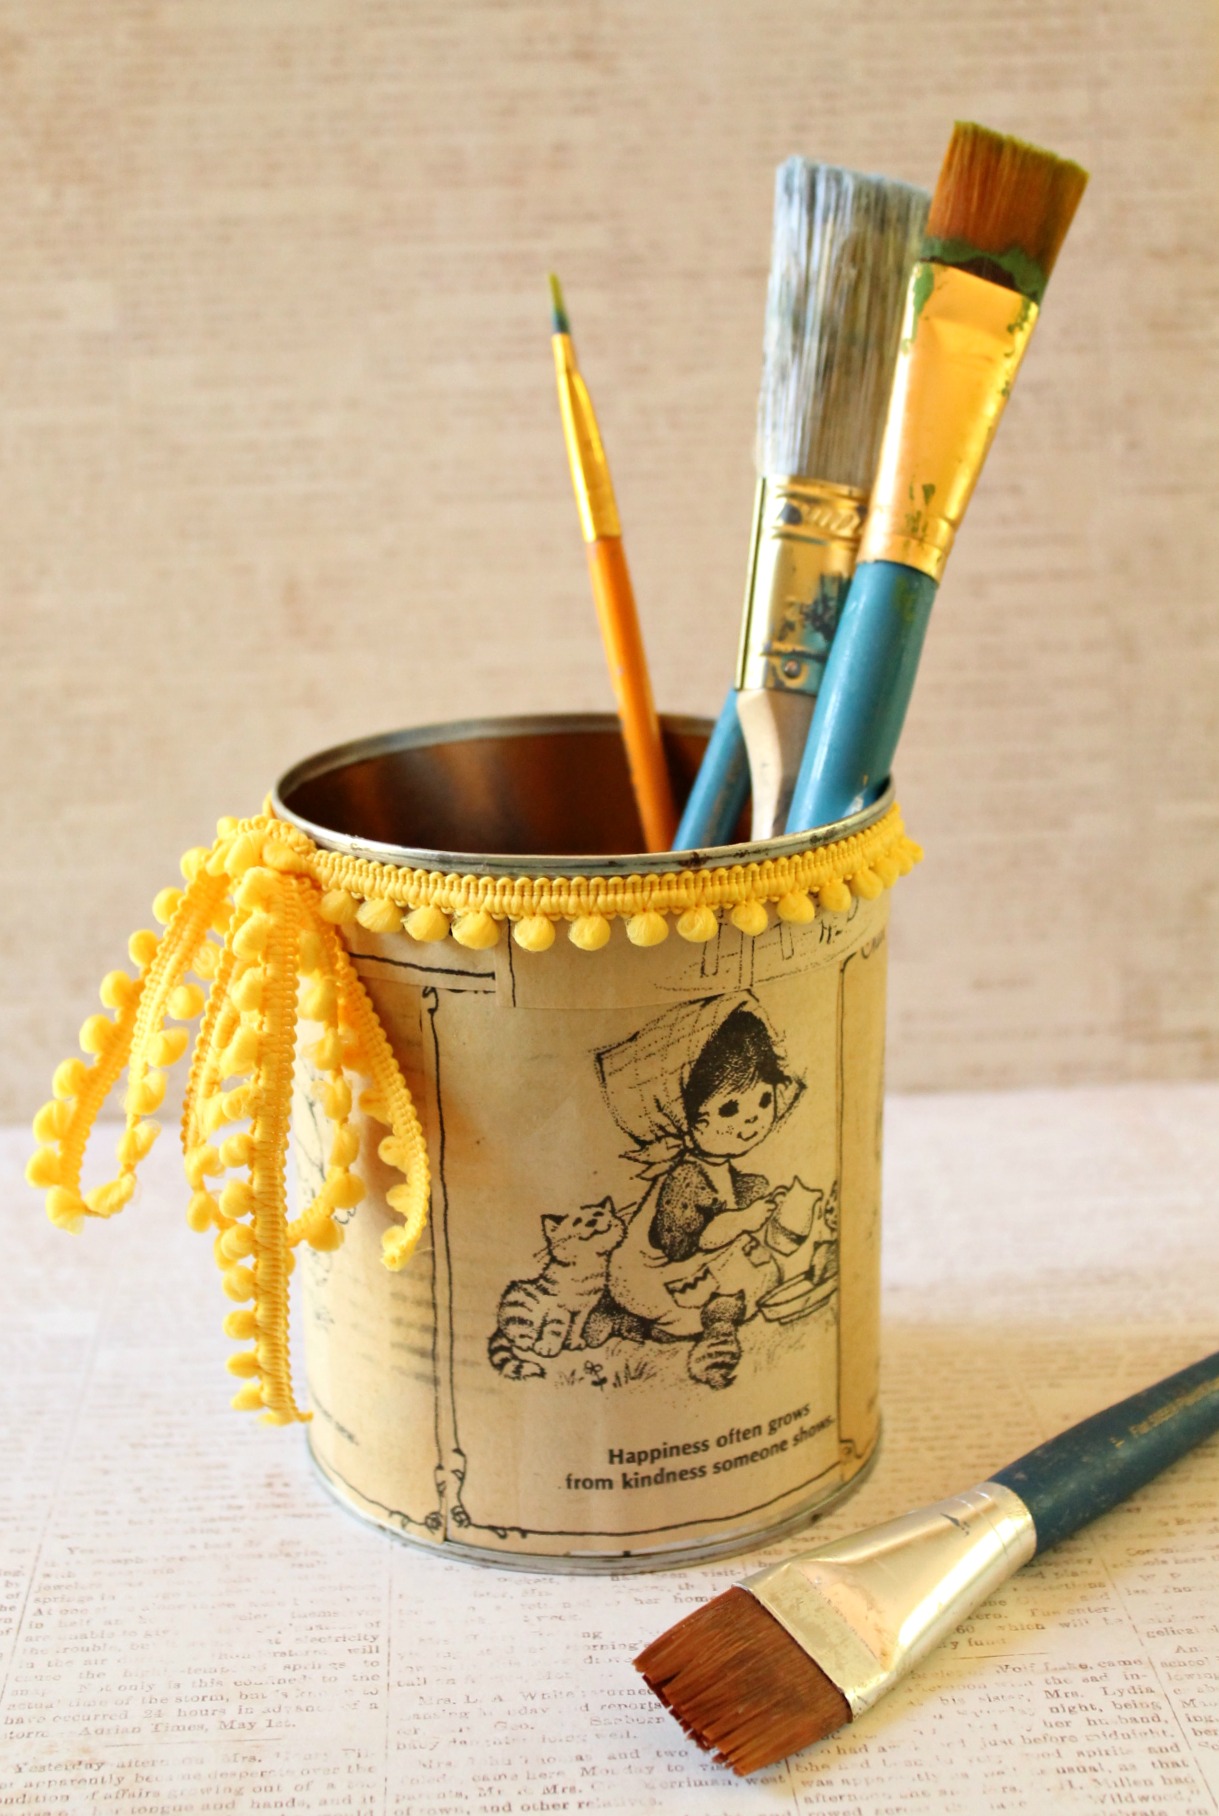
{I am just using my jar below to screen shot picmonkey and the editing for all is the same gist}
Of course if you are using scrap book paper, you are not going for a crisp all white look in the background.
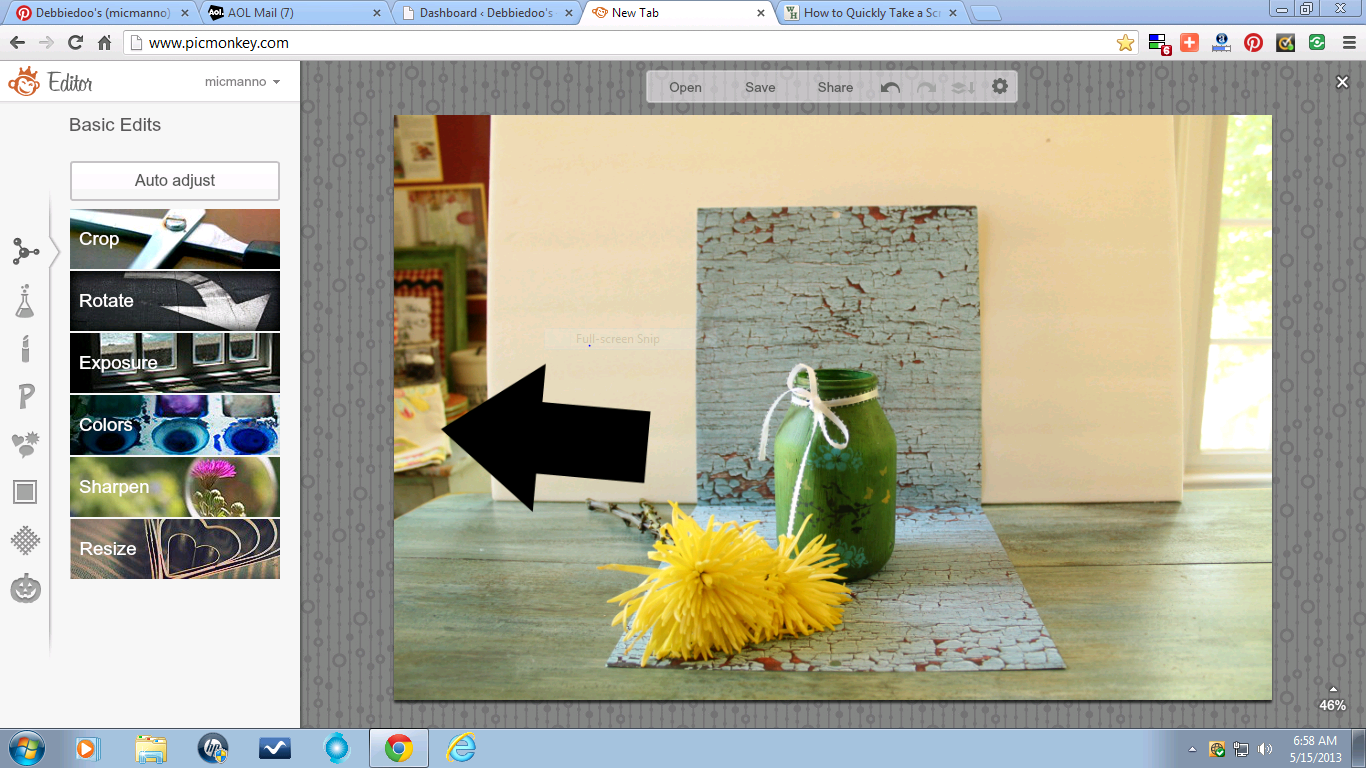
I then go to my photo editing tool
neutral picker under COLOR in picmonkey
Now you can also try auto adjusting first, and that sometimes makes the board nice and white as well.
If not
Click on neutral picker, and drag the ink pen to the board and click your mouse on the whitest part you can.
***Another trick I just learned is the curves option. It is a graph that you pull from side to side in the middle with your curser. I am LOVING that for white crisp clarity.***
Also, I am a huge fan of clarity and sharpen!
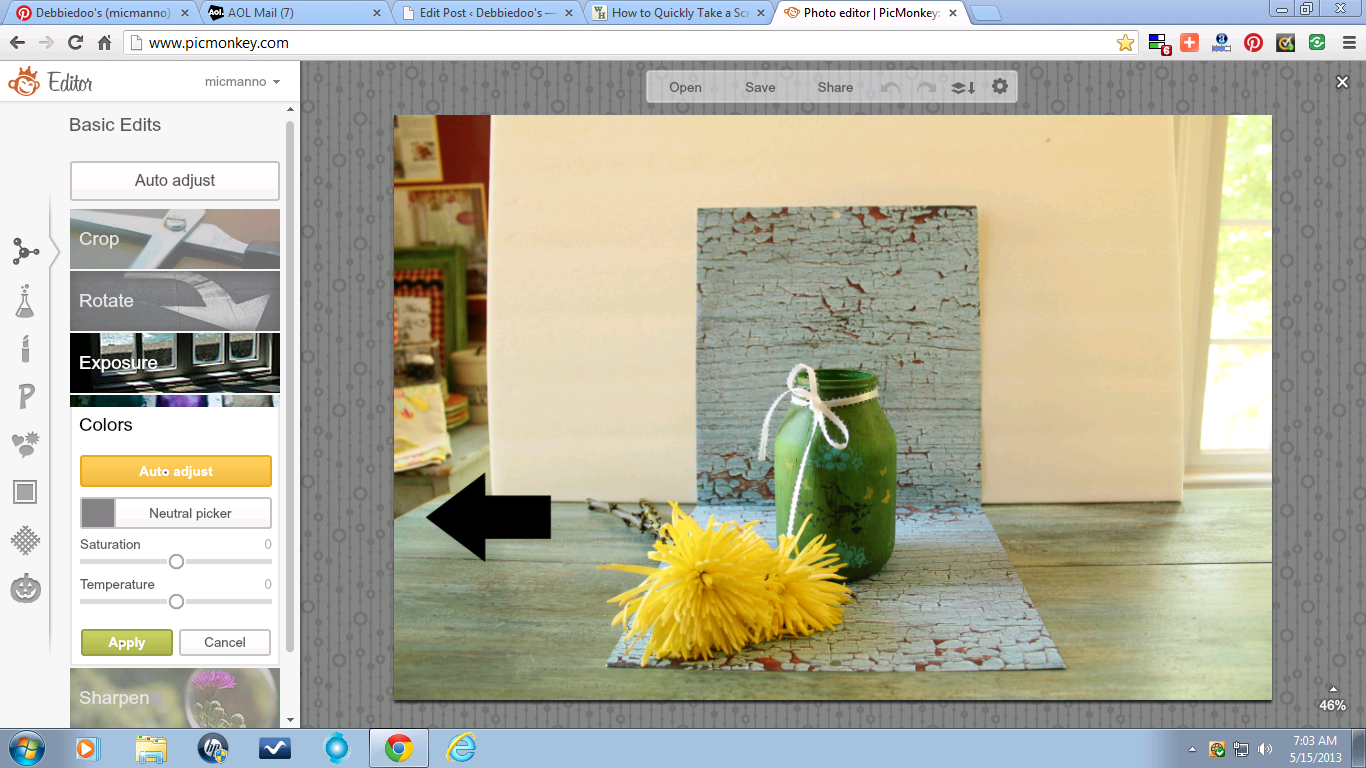
You then see the board instantly whiten up, hit apply.
Now move on to Sharpen and clarity. I adjust clarity first, and most times
I don’t have to use sharpen.
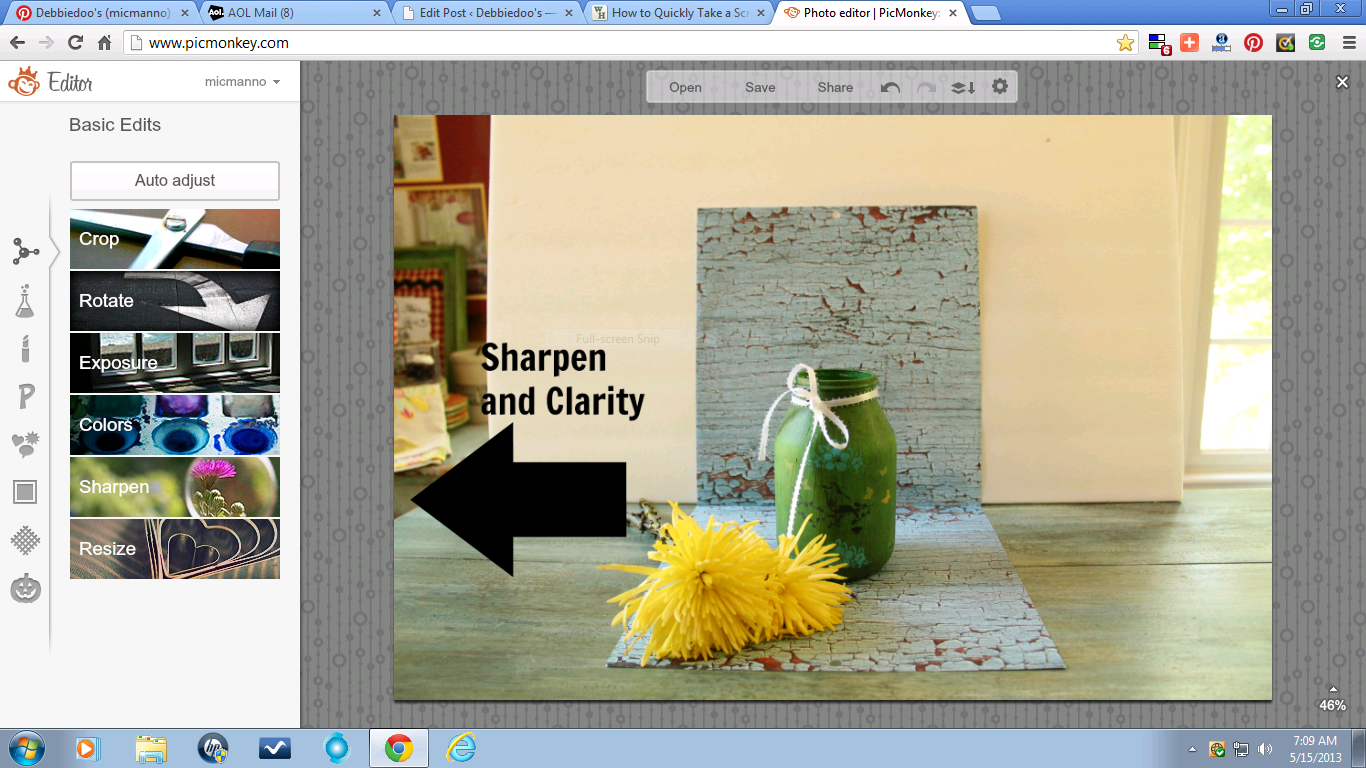
However, if you do have to sharpen it up,
you just drag the little circle to the percent of each that you think it needs.
and there you have the perfect, crisp, clear money shot. See all the detail, with a slight clarity and sharpen.
These are indeed the images people are drawn to see, pin and also for those party hosts to feature you if you so join their linky parties.
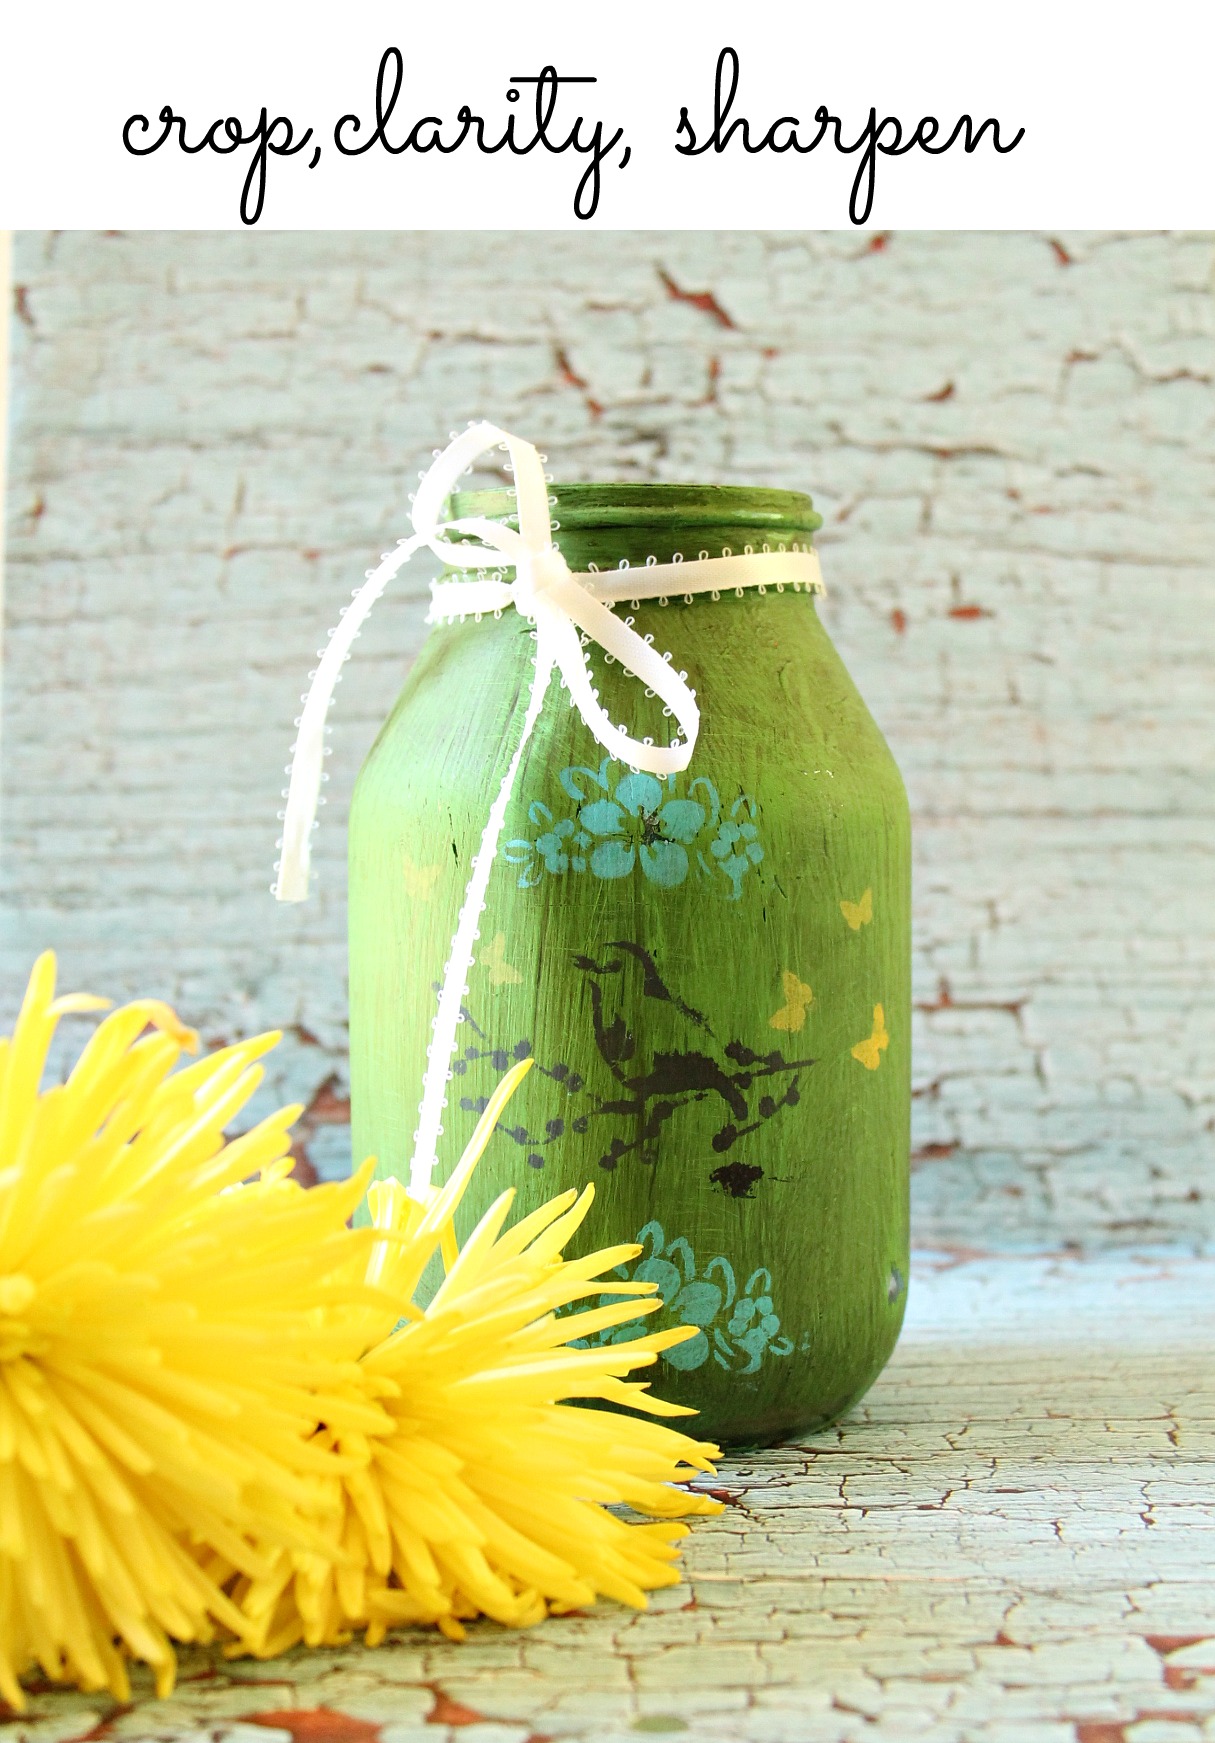
Now let’s look at the upcycled spaghetti jar
after editing, mostly cropping, and hitting clarity, & slightly sharpen on this one.

I will also note, if you are submitting to craftgawker
they do not like the composition too tight..
which basically means too close.
This photo was strictly to show you how to edit, and use scrap paper in your prop.
More than likely this would not get on craftgawker because it is too close.
Still a nice picture regardless to use on your blog.
However, this here little
would more than likely make the cut over there.
I cropped my photo
and only slightly had to slide the clarity option.
This one is a keeper and I am thinking craftgawker worthy.
Now onto food edit…
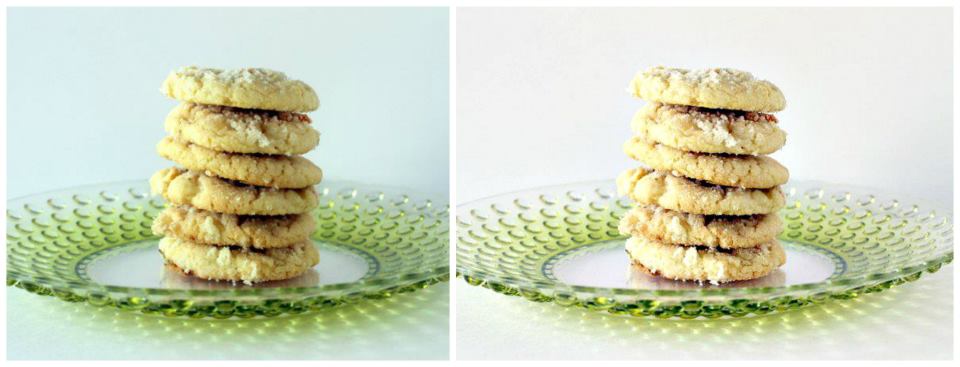
My friend Ann from over at On Sutton place tried submitting her delicious cookie recipe to foodgawker.
The photo on the left was rejected.
With just a few clicks in neutral picker on the white, to brighten the board,
adding a touch of clarity and sharpness,
her cookies got on their site for submission.
See the difference?
OH and another thing you can do in pic monkey, is straighten out your photograph with the rotate bar. It is wonderful and I can’t tell you how many photos I have had to straighten.
There is A LOT of trial and error and growth to be made in photography.
Especially on my end.
However, I thought I would pass on to you what I have learned thus far and because of it,
I have certainly grown in the process.
It truly is rewarding when you see your work being pinned, and shared. That is after all why we are out here, to share all our creativity.
Someone has to see it right?:)
I would also like to mention, that these longer collage graphics are highly desirable on Pinterest.
That is why you see me do them more often.
That too has been trial and error.
The standard collages are also very desirable.
When I have a craft I can show you step by step, the gist of it in a longer collage is working for me.
This all may seem like a whole lot of trouble for some to go through just to share a craft or two.
But, with blogging over three years now,
you have to be assertive, be informed and get yourself out there. The community has grown so much so.
Otherwise, that handful of people that may see your work,
will indeed become frustrating for you if your beautiful craft and work is not exposed more.
Practice editing and staging your beautiful crafts, bake goods, and other lovely projects you have.
Get them viewed, receive some comments, and get pinned & shared.
YOU CAN DO IT!
Great tips, Debbie! I’ll have to be more aware of my cropping when I’m editing my pictures.
Thanks for the tips, Debbie! I’m not much of a crafter, but I’ll take any photo editing help I can get. I’ve been playing around in Photoshop Elements, but I miss the ease of Picnik!
Your welcome…I loved picnik too, but picmonkey is pretty simple as well.
Debbie
I love this! I use picmonkey, but have not upgraded. I am going to upgrade this week! Why have I not heard of craftgawker? Is it like Pinterest for crafty chicks? Okay, heading over to Picmonkey to upgrade.
Thanks for the tutorial!
Craftgawker is awesome, and gets you some traffic, they have foodgawker, dwelling gawker wedding gawker. All great!
Great tips Debbie. I use PicMonkey, but you have taught me a few things I didn’t realize. Thanks.
Oh, this is fabulous! Thank you so much for the tips! I’m heading out today to buy some poster board and craft paper! LOL!! You have such a caring/sharing heart!~~Angela
Thanks for the information. I will put it to good use. Thanks for sharing. Have a great day.
great post Debbie! I have used a lightbox for small projects, but I am unlike most bloggers. I don’t do beauty shots, AND you know how some people are tone deaf? I don’t see difference in before and after photos when I read these type of posts. My eyes just don’t “see” it, like my ears just don’t “hear” it. I never, ever, ever edit my photos. I trust the camera more than I do myself. Plus, I save time and stress.
Pinning your post though for those who do need some tweaking. 🙂
gail
You my friend are a rock star! I need all the help I can get LOL…and I think a lot of other gals do as well.
You are really a pro now girl!
So much great info Deb! Love the side by side, made it and didn’t Foodgawkerpics and tips. Great visual 🙂
Great and valuable tips, Debbie! I’ve been doing nearly all of my photo editing in Picasa and only using PicMonkey for graphics and collages. Me thinks I need to do more editing in PicMonkey though. I’ve yet to get anything submitted on Foodgawker. Haven’t tried Craftgawker yet. 🙁
Excellent tips Deb!
xo Kris
Thanks fro the tips, Debbie…I have stopped by craft gawker once before and did notice all of the light pictures and presumed that they were the (front page etsy style) look that they preferred. I have played around with some great shots like yours for my etsy shop and now, will have to start doing it again and re-visit craftgawker again!
Yep, that’s how I do it to Debbie:) Great post!
Thanks for sharing some great tips! The learning never ends!
Thank you for sharing! I have started doing some of this myself…but this opens it up even more. Saving this post to my favorites…so I can refer back. Thanks again! 🙂 k.
Great tips, Debbie. Love that rooster.
What fab tips! It took me an embarrassingly long time to realize how much of a difference editing makes. My photo set-ups are just about as fancy C:
Eliminating the busy background does make your project pop!
Is there anyway to get a project on Pinterest if I don’t have a blog? I love to craft but don’t have enough or understand blogland well enough to have one. 🙂 Thanks for the tut on the editing pictures. I love your blog and the crafts!
Gosh, not sure about that..usually the pin leads to somewhere a site of some sorts, so I am thinking not..
Great tips Debbie. I am just starting to learn pic monkey. This was some great advice.
Kris
Great post Deb! Thanks for the tips!!
xo, Claire
I don’t often have something pin worthy, but even if I did, I’m horrible at editing and presentation. These are wonderful tips. Thanks!
Great tips! I have a hate/hate relationshp with the gawker people. Just when I think I have them figured out, they reject me yet again. I’m down to about 50% acceptance with them now. I’ll try your less cluttered look next time, because I do love the traffic from them.
what an awesome post Debbie…Pinned that one for sure. I already use PICMONKEY but the pic prop background tips are incredible!
Hey Girly! First of all thank you for the shout out and your help editing my cookie picture. I have been trying to figure out the neutral picker but sometimes it doesn’t work for me. It’s been sort of frustrating because I drag the dropper over but nothing happens. I’ll get the hang of it someday! Loved this post. 🙂
This is a great tutorial. Thanks, Debbie! I think it’s odd about Ann’s photos. As an artist, I prefer the analogous colors on the left Show you how much I know (which is next to nothing, LOL)….
xo,
RJ
Debbie, this is such a great post! I really need to buy some white poster board. 🙂
What a great idea to use the craft papers as backdrops!
Great post Debbie. Definitely useful information…thank you 🙂
Great post Debbie! 🙂
Great tutorial Debbie, I really need to play around with my photos more, which is something that I rarely take the time to do. Though a picture is worth a thousand words, I should make it a priority! and thanks for pointing that out in your fabulous photos.
thanks SO MUCH Debbie for these great tips with Pic Monkey! I have Photoshop Elements but it is too intimidating for me to edit photos over there. I also have the Royale account over at Pic Monkey but I did not know all of these other features to use like clarity and sharpen. I have not heard of Craftgawker but it sounds like another avenue to be able to share projects (past and present) with other folks.
Great Tips – thanks!
I consider myself pretty expert at Pic Monkey and I have to tell you: that Neutral Picker is LIFE CHANGING!!! I have never known how to use it (or really what it was for) and can’t believe what a difference that makes!!
THANKS FOR SHARING!!!
Thank you! I’ve often wondered what the neutral colour picker is for! Love you tips
Thank you for this very useful post! I love the way you set up your crafts with flowers, and the cropping makes such a huge difference in the impact.
Thanks so much for that neutral picker tip! I’ve been using Picmonkey for a long time and didn’t know that 🙂
This was VERY helpful, THANK YOU!
Thanks for this! I was just looking for crafts to do from the dollar tree but this one will do double duty, a dollar tree craft AND it’ll help with the Pinterest account. I’m new to blogging on my own so every little bit helps. By the way I LOVE PicMonkey.
Great article! Thank you for the tips and suggestions. Most of my work is furniture made from salvaged barnwood, but I’ve started making smaller accessories & crafts. I love the idea of using scrapbook paper; because for next to nothing you can create ANY backdrop you want!!!