
Spray painted faux Easter eggs
Hi everyone!
I’m Jane from Cottage at the Crossroads and I’m happy to be guest posting for Debbie today.

About two years ago, my husband and I started a little blog called Cottage at the Crossroads. I met Debbie through her Newbie Party, and it’s such an honor that she’s letting me guest post on her blog while she’s on her fantastic trip to Ireland. I’m the one dancing a little jig today! And, of course, in Debbie’s honor, I could not do a guest post today without doing something that involved
SPRAY PAINT!
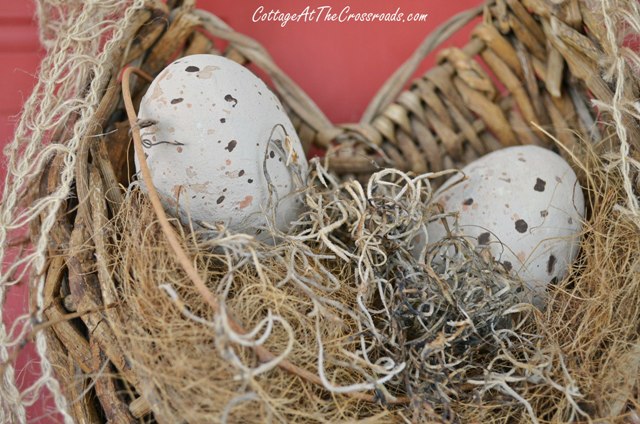
So my project today involves taking cheap plastic Easter eggs and transforming them into more natural looking eggs.
So I started out with 4 large plastic eggs and several of the smaller ones that come apart. Now I know these are fun, bright colors, but I wanted some eggs that looked a little more like real eggs. But have you priced those? Even the ones that are made of paper mache are EXPENSIVE! So I got to thinking that I could spray paint these babies and googled to find some instructions. I ran across Vivienne’s faux robin’s egg tutorial.

Vivienne first sprayed her eggs with plastic primer, and then she hit them with Rust-Oleum’s textured paint.
After gluing the two parts of the eggs together, I did the same. I used a cardboard box to contain the over spray, and here they are with their first coat of the textured paint. Using the textured paint helps to hide the seam as well as giving the eggs a more natural eggshell finish. I kept spraying the textured paint on the eggs until I used up all the paint in the can. This process actually took two days because I let them dry thoroughly between each coat.
Now, at this point, the eggs were mostly brown and that wasn’t the look that I was going for, so I pulled out some country grey chalk paint that I already had. After I added a coat of that, I decided it was too light, so I added some brown craft paint to the chalk paint to get the color that I desired. Now don’t do what I did. I didn’t save any of this color, and when I touched up the eggs later, I couldn’t match the shade that I had used. So if you decide to paint your own eggs, save some of your background color!
Now the fun part-adding speckles! I would definitely recommend practicing this technique before you actually try to add your speckles. I used a wet toothbrush, loaded it with watered down craft paint, and flung it onto the eggs. Trouble is, instead of all speckles, I got some dribbles. Now you see why you need to save some of your background color-to fix the dribbles!
Over-all, I think the eggs turned out very well. The next day I did use a small paintbrush to remove the dribbles and add a few more speckles.
Here is a close up, and you really cannot see the seam in the small eggs unless you look closely.
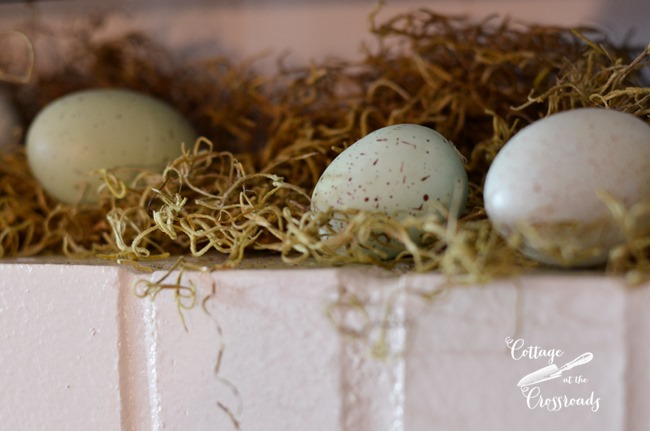
Now don’t you agree, these eggs look WAY better than those cheap, neon-colored ones! I’m not sure what kind of creature would lay these eggs. Perhaps a dinosaur? Maybe if I sit on them, I’ll hatch a pterodactayl?
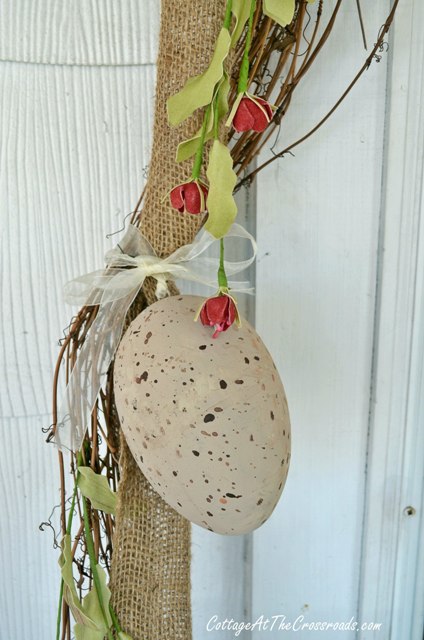
I placed them in my dough bowl to show them to you, but I plan to use them in a spring door decoration. You can visit our blog, Cottage at the Crossroads, to see what I did with them.
Thanks so much for having me today, Debbie. I hope you and your family are having the time of your life!
Oh my gosh, Jane those are too cute for words….YAY for spray paint.
thanks for sharing..I adore you and Leo.
Please visit Cottage at the Crossroads for more fantastic home ideas!
XO
You may also enjoy 100+ All things Spring with lots of crafts, home decor and more
If you are new here, welcome! I am also very excited to share a new stencil line with you.
[envira-gallery id=”32693″]
PLUS OVER 30 Spring ideas of my own down below. Just wait a second for the thumbnails to load and browse through what catches your eye.
Love these! They look so natural and Eastery!
I love these eggs. They look so good! Great job.
As I told Jane when I saw these the first time they came out great. I love them!!
Cynthia
Thanks so much for letting me guest post on your blog today, Debbie! I can’t wait to hear all about your trip!
Hi Debbie,
I am so glad you have Jane guest hosting this week..she is a neighbor and a very talented lady…Love your blog…Jane you already know I love these eggs and everyone can display them with any color decor….great!
Jane, they turned out beautifully. Believe it or not I do wield a can of spray paint from time to time so this I could manage. hugs, olive
Super cute! You would never know they were plastic 🙂 Just darling!!
They look so much better now ! They look very natural!
Wow these are so great and so real looking. Thanks for sharing this with us.
Kris
Your eggs turned out great, Jane! I would never have thought they were those multi-colored plastic eggs. And to think I picked up, then put back, a package of eggs at Goodwill last week! Argh ~ I”m going to go back and see if I can grab a couple of packages. They have a whole side of an aisle with plastic Easter eggs and grass {all new}.
I can’t believe they were regular plastic eggs!! Fantastic! Sooooo have to try this! Thanks!
Jane, they turned out perfect. Love them! You are so creative:)
Awesome! What a great idea!! Heading over there now!
Great improvement on the plastic eggs! A nice Easter project! Thanks for sharing!
How fabulous are these! What a great tutorial! Off to the craft store today!
Jenna
Wow – I can’t believe those are those nasty plastic eggs!!! Beautiful job – thanks for sharing the tutorial!
These eggs turned out so cool! This is definitely an idea to add to my file!
Love this!!! I have a whole bag of the cheap plastic ones and can now transform them!! Thanks!!! XO, Pinky
I followed exactly, even using the same paint products, but I was unsuccessful with painting the eggs with Rustoleum textured paint. The spray was too powerful for the eggs. No matter how far away I held the paint can, the eggs jumped around leaving 99% of the paint in the box and very little on the eggs.
I am sorry to hear that Susan. Jane’s turned out wonderful. I know the key to spray paint is shaking the can very well first hand.