
Hello everyone!
Meet my friend Claire from a little Clairefication.
I met Claire sometime back at my newbie party.
She sure is talented and I am happy you stopped by today to check it out.
Claire outdid herself on this diy St. Patrick’s day pillow.
Let me stop talking and let Claire take over.

Hi, it’s me Claire and I blog over at A Little CLAIREification! I am SUPER excited to be guest posting here today at Debbie-Doos! What a treat, thanks Debbie!! You can find out a little bit more about me here.
Today I am bringing you a wee little “luck o’ the Irish” with a fun St. Patrick’s Day Pillow! I am actually of Irish descent and we LOVED our visit to Ireland so I hope Debbie has an absolute BLAST on her trip!

My readers know that I LOVE throw pillows and I make them for almost every holiday. Throw pillows add so much personality to any space and are easy to make!
I like to make sham style or envelope pillow covers because I can then remove the cover for easy storage and re-use the pillow form! I am ALL about saving money so, not only are these covers cheap to make, but re-using the pillow forms is easy on my budget too!
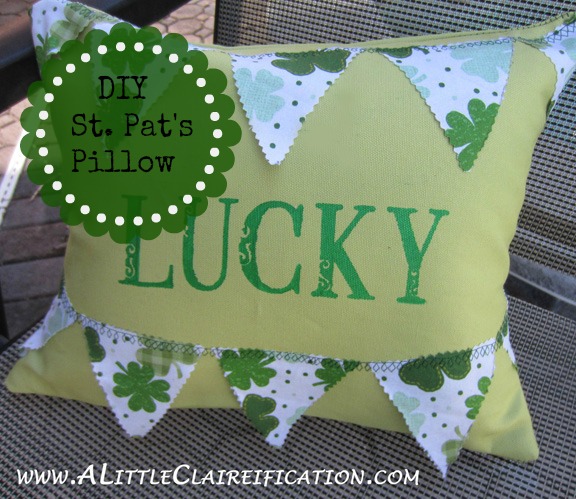
I wanted to try making a St. Patrick’s Day “Bunting” Pillow since banners are so popular (and cute!). I am using a 16 x 12″ pillow form that I had and some cute fabric I got on sale at JoAnn.

I used three pieces of fabric: 17 x 13 for the front piece front and then 17 x 8 AND 17 x 10 for the two back pieces. The back pieces need to overlap by about 4 inches for that sham style, so this gives me room to add the hem that will show on the back.

Tip: Depending on which pillow size you are using, just give yourself an extra inch in length and height for the front piece for hemming (ie: for a 15×15 pillow I would cut a 16×16 front) and then make sure your back two pieces will overlap by about 4 inches before cutting, again giving yourself an extra inch on the sides for the perimeter hem.
I used the cute shamrock fabric for the “bunting” triangles. Once I had the size I wanted – 3.5″ on top x 4″ sides – I traced a bunch of them and then used my pinking shears to cut them out. Adds a cute border and helps prevent fraying!

I arranged them and pinned them where I wanted them. Once those were in place, I printed out the word “Lucky” in vinyl on my Cricut so I would have a stencil for painting. In the past I have also simply printed letters or numbers on paper, traced them on the fabric and hand painted, so you can always do that too if you don’t have a paper crafting machine. No worries!

I then picked a decorative stitch on my sewing machine to secure the pieces, but you could sew a straight stitch by hand as well – will just take you a little longer.

I used green fabric paint for the letters.

And, I actually debated (for hours) just doing three rows of bunting and NO painting so there’s another option too!
While the fabric paint was drying, I took the the larger of the two back pieces and did a traditional two fold hem on one long side. For the smaller back piece, I just did one fold and a zig zag stitch since this will not show as it will be the inner flap on the back.

Once the paint was dry, I laid out the front piece right side up, and then aligned the larger back piece with the top, right side down, hem at the bottom. Then I aligned the smaller back piece with the bottom, right side down, hem at the top. You see how the two back pieces overlap.

I then pinned the entire perimeter – I made sure to fold up the bottom row of bunting triangles so they wouldn’t get sewn into the bottom because I like them loose.

If you don’t want them to be loose, you could sew them into the perimeter or you could also use a bit of fabric glue to secure them at the end if you prefer but I like them to “wave around”. 🙂
I used a zig zag stitch all the way around the perimeter to help prevent fraying.

Then I turned the cover right side out – here’s the finished back (before ironing!). 😉 I normally just do a single stitch on the larger piece since it shows in back but decided to do a decorative stitch this time – just a little added fun detail.

I inserted my pillow form and there you have it! A sweet little “Lucky” St. Patrick’s Day Pillow!
You can see a couple of my other pillow tutorials HERE; and HERE.
It has been such a blast guest posting here today – I’m so glad Debbie invited me over! I hope you like the pillow and that you will stop by and visit me sometime soon!
xoxo,
How cute is that and the bunting really makes the pillow:) Great craft Debbie!
Super cute! You have knocked the St. Patrick’s Day posts out of the ball park. Woo-Hoo!!
Very cute pillow!
Claire is fabulous! And her pillow…just like her!! Great job!
Debbie, Claire is so sweet and WOW! talented too. This pillow is cute as can BE. Love it. Just so festive.
Adorable and great instructions.
Erin Go Braugh!!
This is such a cute pillow, Claire!
Claire this is a great pillow. Have a great day.
Cynthia
Hi Debbie,
Clare’s pillow is so adorable. I love bunting on anything and on this pillow it is really sweet.
Kris
SO cute and a great way to decorate for holidays without commit your whole living room! Love the buntings!
Adorable Pillow!!!!!!
Cute pillow! Thanks for sharing the instructions!
Thanks for all of the sweet comments, ladies! It was awesome being here today! Thanks Debbie! 🙂
– Claire
That is a super fun pillow! I love St. Paddy’s Day!
It is darling Claire. I also think the name of your blog is brilliant.
Aw, thanks so much!! 🙂