
Hello everyone! Shari here.
I have a Turnstyle Vogue makeover with a dry-brush texture tutorial for you on a basic tool that was introduced to the United States in 1801.
Yes – I Wiki’d that fact.
Can you guess what it might be?
It is something that we have all used at some point in our lives. Until recently, we saw most of them in our younger years but they have become a trending staple in many homes.
I know…no need to guess, because you can obviously see the answer right here –
Yes.
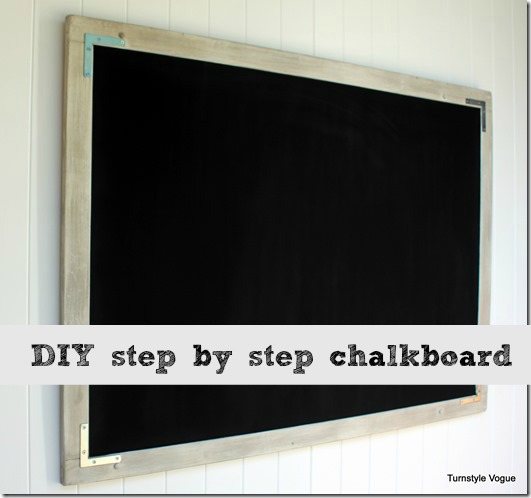
The chalkboard.
This particular one started out looking like this:
Very old school.
Very juvenile.
It was time to bring it up to date with some modern, vintage and industrial touches.
Modern? The black surface.
Vintage? The frame.
Industrial? The corner brackets.
First I’ll show you the Up-Do and then I’ll give you a brief tutorial on how to achieve the paint finish on the frame.
In order to get chalkboards ready to use, you are supposed to prime them with an all over wash of chalk – and then erase – but I didn’t do that here because a) I like the crisp newness of the black and b) I’m not keeping this and c) too messy!
I use construction hardware often when doing a furniture makeover, among other things. I gave a rundown of a variety options the other day with my “15 Hardware & Embellishment Options For Furniture” post.
This is a standard corner bracket that you can get at any hardware store or department.
The finish on the frame is done by using two Annie Sloan chalk paint colors – French Linen and Old White.
Although it is just paint, you should be able to see texture and depth to imply layers of paint being exposed over the years.
This is a simple dry-brush technique that can be done quickly.
For the two paint colors, you will need two paint brushes of course. The key is trying your best to use to different types so that the applications are not identical.
Dry-brushing is not difficult as long you remember that less is more.
You only want paint on the very tips of the bristles. Gently touch the surface of your paint with the tip of the brush and then blot off any excess.
NOTE: the picture below shows more paint on the brushes but that is because the first two steps require normal painting coverage.
(I have to apologize for the pictures. I could not get the right lighting to really show the detail but I did my best with the close-ups. )
To start, you will want complete coverage of your base coat. This is done in French Linen:
The next coat will be with the Old White with about 75% coverage.
Go ahead and paint the Old White on completely and then using a damp cloth, gently wipe away until you see the first coat coming through. This is similar to a wash but a wash will not get you the grain-like effect.
You can see what I mean with this close-up.
Now the dry-brushing starts with the French Linen.
Again, after blotting excess paint off your brush, lightly sweep your brush across the surface. You can then determine if you want to use a little more pressure to get more paint on.
Just work it until you get the look you desire.
TIP: I only wait a minute between dry-brush coats. Since the application is so light, the paint dries fast and if it is a little wet still, the blending creates some really cool patterns!
While the larger, round brush – with more bristles holding the paint – creates a smoother French Linen application, the small brush allows the Old White to create a dimensional texture.
It is important to REPEAT THE PROCESS four or five times so you have layer upon layer. You will see where the darker color is more prominent in areas and that is what you want. You don’t want it to look manufactured and “perfect.”
After the painting is complete, then a coat of clear wax is all that is left to do, buffing it after it dries completely. You can apply a darker wax as well if you want an antiqued look.
I took this picture later in the day with the natural light hitting it directly so the tone is different, but you can get a sharper image of the end result.
That’s it!
Two colors.
Two brushes.
Two minutes. (Okay, not really, but almost!)
As always, I’d love to have you come see my latest projects and posts such as these Crown Royal bottles turned into home décor and a discussion on how well ten of the projected 2013 trends are holding up so far.
Something is always going on.
Have a great day!
Be inspired,

To read my post and browse my galleries at Turnstyle Vogue, click HERE !
I love interacting with people! Please take a moment to consider staying in touch with me through these formats:
Join Me On GOOGLE +
Like Me On FACEBOOK
Follow Me On PINTEREST
SUBSCRIBE to Turnstyle Vogue
Tweet With Me On TWITTER
STUMBLE UPON With Me
Thank you Shari, always a pleasure to have you.
Hop on over to Shari, say, hello and poke around for a bit.
You will be glad you did.
Great tutorial on the paint techniques and I love the added brackets on the corners.
Love the look! I never thought to repeat the layers of the two colors, but I love the finished product. Thanks for sharing!
Great idea! Love the corner brackets,
Deb
Loved the tutorial Shari….love the chalkboard.
super post Shari, love the new look of the chalkboard! I love dry brushing too!
gail
Nice tutorial and great results!
Lynn
Really love the look of this. (And I remember “curing” a blackboard like you mention in the beginning when I was growing up and our teacher got a new one for her classroom. )
Love it Looks Beautiful
iI am saving as one way I can do my bedroom
Thank You
Lisa
Pretty awesome guest you have here today. Just saying, don’t wanna make her head fat though.
Bliss